
6 Exercises for Hip Internal and External Rotation
6 Exercises for Hip Internal and External Rotation
TL;DR: Scroll down to the bottom for a video summary!
Hip rotation is one of the main actions of our hip (along with flexion, extension, adduction and abduction), so a healthy flexibility training routine should contain some exercises to help with your rotation. Flexy and strong hip rotators not only help in poses that require a lot of rotation (like the amount of external rotation required for pigeon pose, or sitting cross-legged on the floor), but they also help stabilize our hips in positions of flexion or extension (like our front splits!).
Internal vs. External Hip Rotation (in a Flexed Hip)
For the purposes of this post, we’ll specifically be talking about hip rotation from a flexed hip (front of the hip bent, knee closer to chest) because that’s one of the most common positions to need to access your hip rotation (ex. pigeon pose, middle splits, straddles, squatting, etc). But be aware that there are benefits to training your hip rotation in hip extension (where the front of your hip is “flat” and the backside of your knee is lifting toward your backside) that recruit different muscles.

This is our neutral, no-rotation, position with the right leg flexed. The front side of the femur (thigh bone) is angled toward the ceiling.

In external rotation, the thigh bone starts to rotate externally away from neutral. Note the knee stays in the same spot, directly in front of the hip.
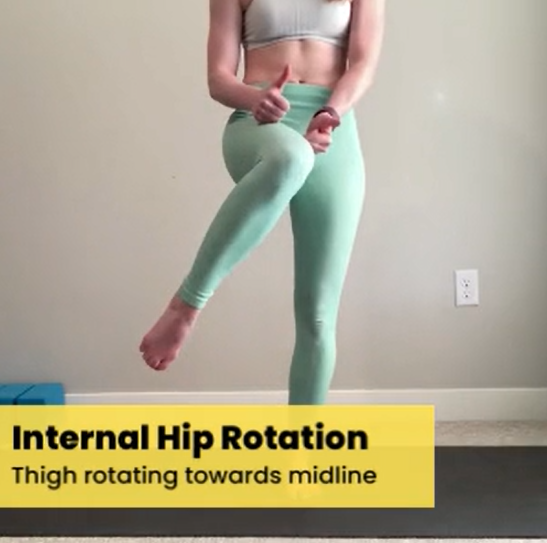
In internal rotation, the thigh bone rotates internally toward our midline.
“Typical” range of motion for internal and external rotation is often cited to be around 40-45° (ex. this study), although anecdotally oftentimes I see students have far lower internal rotation than external, closer to 20-30°.
Mobility Drills for Hip Rotation
These are two exercises I often include in my warmups because they are a gentle way to start moving your hips through a full range of internal and external rotation.
1. Standing Pendulum Leg Swings
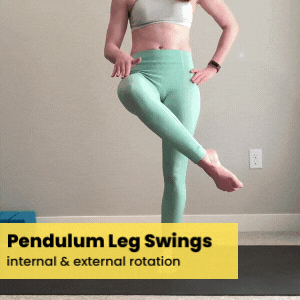
Start standing with your weight on your left leg, and right knee lifted. Your hip and knee should be both be bent 90 degrees, with your knee directly in front of your right hip (don’t let your knee droop to the floor, keep it lifted!)
Keeping your knee in the same spot (you can place your hand on your thigh near your knee to help give it a physical reference of what “staying in place” feels like), slowly swing your lower leg across your midline, rotating your thigh to the outside - this is your external rotation (thigh rotating away from your midline)
Then swing your lower leg to the outside, rotating your thigh to the inside - this is your internal rotation
Slowly repeat, rotating the top of your thigh to the outside, then inside, for 5 reps in each direction. Be mindful to try and keep your knee quiet (don’t let it wave around), and hips level (don’t let your hips tilt)
Switch legs and repeat
2. Windshield Wipers

Start sitting on your butt, legs splayed out as wide as is comfortable, and knees bent (90-ish degrees is great, but having your feet farther away to make it more than 90 degrees is fine).
Keeping your butt on the floor (don’t let one butt check lift), slowly flop both knees off to one side. Don’t worry how far your knees drop, they don’t need to touch the ground, just let them lower as much as is comfortable without pushing.
If you feel any discomfort in your knees, try:
Leaning back
Adjusting your foot position (sliding feet a little closer or farther away from your hips)
Or don’t let your knees drop as low to the ground
Then slowly flop your knees to the other side
Continue “windshield wiper-ing” your knees back and forth for 8-12 reps
Conditioning Drills for Hip Rotation
These are slightly more “muscle-y” exercises than the above mobilizers, helping strengthen our internal and external rotation. Add these in after you’ve had a chance to warm up and move your hips through a full range of motion.
3. 90-90 Leg Lifts (aka Pinwheel Leg Lifts)

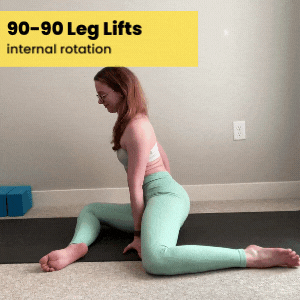
Start sitting on the floor (or on a yoga block) with both knees in a “90-90” or “pinwheel” shape.
Your right knee should be directly in front of your right hip, with your knee at a 90 degree angle, foor pointing off to the left (this leg will be externally rotated, thigh to the outside)
Your left knee should be directly to the outside of your left hip, with your knee at a 90 degree angle, foot pointing behind you (this leg will be your internally rotated leg, thigh towards-ish your midline)
If you have knee discomfort in this position, lift your hips! Sit on a yoga block (or two), or some other kind of bolster
Active Externally Rotated Leg Lifts: Placing your hands on the floor for support, lift your front leg away from the floor, trying to lift both the inside of your ankle and your knee at the same time. Repeat for a total of 10 leg lifts on the front leg
Need to make it easier? Lean back away from the front thigh
Want to make it harder? Try to lift your leg with your arms lifted overhead (no arm support to help with the compression)
Passive External Rotation Stretch: Lean forwards toward your front thigh for a passive stretch in your right glutes for 10-20 seconds
Active Internally Rotated Leg Lifts: Moving on to the outside leg, place your hands on the floor for support, and try to lift your left leg away from the floor, lifting the outside of your shin. Repeat for 10 reps
Need to make it easier? Lean away toward the right side
Want to make it harder? Take your hands away from the floor
Passive Internal Rotation Stretch: Lean backwards as far as is comfortable, while squeezing your left glutes to keep your left hip pushing forwards. Hold this passive stretch for 10-20 seconds
Switch sides (re-pinwheel your legs in the other direction) and repeat
4. Clamshells & Reverse Clamshells


Start lying on your side, with your feet stacked on top of each other, knees bent about 90 degrees, and heels in line with your butt
Clamshells: Keeping your hips stacked on top of each other (don’t let the top hip fall backwards!), lift/open your top knee, feeling a squeeze in your glutes. Slowly lower with control, and repeat for 10 reps
Need to make it harder? Add a mini resistance band around your thighs
Reverse Clamshells: Starting in your “open clamshell” position (feet stacked and top knee lifted), keep your top knee in the same place as you lift your toes, rotating your thigh toward the floor. Then drop your toes rotating your thigh back to the ceiling. Repeat for 10 reps
These can also be done with a resistance band on your thighs to make them more challenging
5. Fire Hydrants with Toe Drop

Start on all fours: knees under your hips, hands under your shoulders
Keeping your knees bent and hips level (don’t let your right hip lift), lift your right leg out to the side, feeling a squeeze in your glutes
Need to make it easier? Place a yoga block under your left knee to give more space to open the right leg out to the side
Need to make it harder? Add a resistance band around your thighs
At the top of your knee lift, externally rotate your right thigh towards the ceiling by dropping your toes toward the floor
Lift your toes back to a neutral position (shin parallel to the floor), and drop/close your leg back to your starting position
Repeat for 10 reps on one leg, then switch sides
6. Close Knee Block Crunches
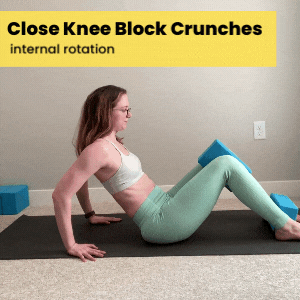
Start sitting on the floor with your knees bent. Place one yoga block on the skinniest width between your knees, and another yoga block on the widest width between your feet (so your knees should be closer together than your feet)
Leaning back into your hands for support, crunch your knees towards your chest, then slowly lower back down
You can lean back farther onto your elbows if this feels too challenging keeping your torso lifted (especially if you have a bit of a belly, lowering your back toward the floor will help!)
Repeat for 10 reps
Hip Rotation Exercises (Video)
Related Content
Recommended Class Recording:

Note: this class is also a part of a 2-class bundle! If you also want to work on your front splits too, you should check out the “Starting Splits” Front & Middle Splits recording bundle.
Who this class recording is for:
This 45-minute class is intended for “beginner” to “begintermediate” students interested in working on their middle splits and straddles. For more intermediate/advanced students who are 3 inches or closer to the ground in their middle splits, I suggest you check out the 60-minute Middle Splits (Box Splits) workshop instead which has even more active flexibility drills in a longer class format. This workshop is a better fit for students who’s hips are 4 inches or higher away from the floor when doing a middle split.
Even if you are a super beginner and can’t touch your toes, this video has stretches and modifications for a variety of levels.
What this class includes:
A quick full-body warm-up to get you ready to stretch
Active flexibility exercises focusing on the two main muscles groups needed for middle splits and straddle pancakes: adductors (inner thighs) and hamstrings (with a healthy dose of glute and hip flexor strengthening for support!)
A full 45-minute stretching routine you can follow 1-3 days per week to work on your middle splits (due to the amount of strengthening involved, I don’t recommend doing this routine every day - your body will benefit more from rest days!)
Recommended props:
A chair (or a bench or low table)
Yoga blocks - totally optional, but they are a wonderful prop, especially if you’re a beginner. If you don’t have blocks, I recommend practicing next to a chair, your bed, or a wall so you can reach your hand out for balance if you need to
Note: Because of Squarespace’s file size limitations (which is what I use for this wonderful website!), upon purchase you will receive a PDF with a link to the recording. You can then stream the recording online from the private link.