
Getting a “Pointier” Toe Pointe
Getting a “Pointier” Toe Pointe
“Point your toes!” - said every aerial/pole/contortion coach ever
The cue “point your toes” can be a bit misleading, because often when we talk about a traditional, ballerina-style toe point (a “pointe”), what we really mean is point your ankle (and then point your toes). If your coach has yelled at you to point your toes before, and your foot automatically curls into a gargoyle claw, while technically correct (you are, in fact, pointing your toes), if you want the traditional aesthetic lines of a nicely pointed foot, you’ll have to work on your ankle flexibility. Lucky for you I have a slew of exercises and stretches that can help, including ones that isolate the ankle stretch from your toe pointing (no gargoyle toes allowed!).

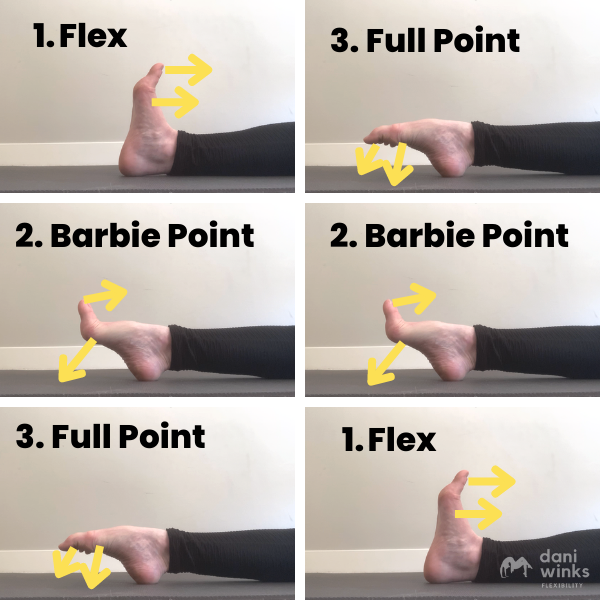
The Gargoyle Claw
aka the “I AM pointing my toes!”

The Barbie Point
aka the “Floint” (Flex + Point)

The True Toe Pointe
aka “What Ballerinas Do”
8 Toe & Ankle Stretches for a Stronger (and Longer) Toe Pointe

1. Heel Raises (3 Ways)
Start with feet hip with apart, toes pointing forwards
Keeping your legs (knees) straight, lift your heels off the floor as high as you can (you should feel a squeeze in your calves!
Slowly lower back to the floor
Repeat for 10-15 heel raises
Adjust your feet so heels are pointing in, toes pointing out (feet angled outwards), and do another 10-15 heel raises
Adjust your feet one last time: toes in, heels out (feet angled inwards). Do 10-15 heel raises

2. Hungry Hungry Hippos Toes
You’ll need a TheraBand, towel, or some clothes on the floor for your feet to grab for this exercise
Start with your TheraBand/towel/prop-of-choice on the floor in front of your foot
Press your toes into the TheraBand as your scrunch it in
Keep scrunching the TheraBand in (like a ravenous hungry hungry hippo) until you’ve run out of band
Do 2-5 sets on one foot, then switch feet

3. Demi Pointe Liftoffs
Start with the ball of your foot on the ground, heel raised as high as you can (aka a “demi pointe” or “barbie point”)
Press your toes into the ground to “hop” the foot just an inch or two away from the ground, contracting your arch the whole time
Reset the ball of your foot back on the ground (back to that demi pointe position) and repeat for 8-12 liftoffs, then switch feet
4. Barbie Point & Flex
Doing drills that focus on the “barbie point” position are some of my favorites because they help isolate the ankle pointing action (which often needs more assistance) from the toe curling action (which usually doesn’t need as much help)
Start sitting with your foot actively flexed (pulling the top of your foot and toes back toward your knee)
Keep reaching your toes backwards while you reach the ball of your foot away - this is your “barbie point” or “floint” (flex + point) position. Your toes are flexing, and your ankle is pointing
Finish out your pointe by curling your toes
Reverse the movement: keeping the ball of your foot reaching forwards (maintaining the ankle point), lift your toes. Then pull the ball of your foot back to your actively flexed position
Repeat for 5-12 reps, then switch feet

5. Banded Barbie Point & Flex
You’ll want a TheraBand or wide elastic band for this exercise (a skinny band won’t be able to cover the ball of your foot and your toes)
Start witting with one leg extended and your foot flexed with a light resistance, wide TheraBand wrapped around the ball of your foot and toes
Keeping your toes flexed (the band will help pull them backwards), reach the ball of your foot forwards, pushing it into the band (“barbie point” your foot)
Finish your toe pointe by curling your toes downward
Reverse the movement: keep reaching the ball of your foot forwards (pushing it into the band), lift your toes back toward your knee. Then flex your ankle back to your starting foot flexed position
Repeat for 5-12 reps, then switch feet

6. Demi Pointe Ankle Push
Start in your demi pointe: on the ball of one foot, toes flat on the floor pointing forwards, heel lifted as high as you can
Keeping your toes pressed into the floor, press your heel and ankle forwards to stretch the front of your ankle (it’s OK if your foot doesn’t go as vertical as mine!)
Hold for 20-30 seconds, then switch feet
Alternatively, you can do this exercise as slow and controlled pulses, pressing the heel forwards, then relaxing, for 20-30 seconds.
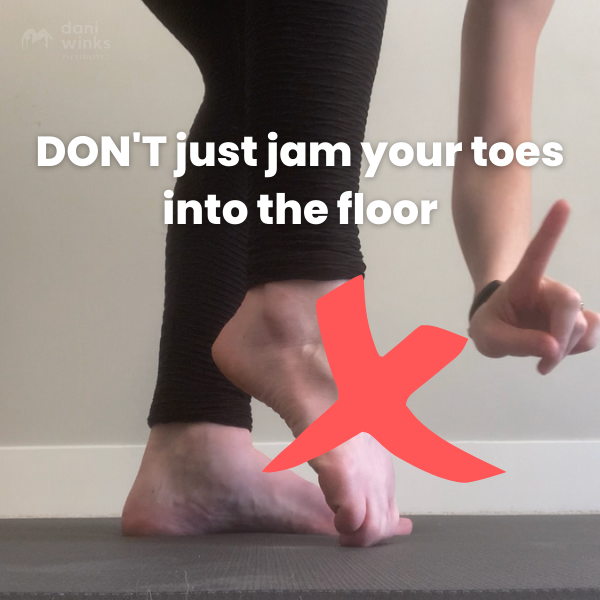
7. Toe Tuck Ankle Push
Start standing, with the toes of one foot tucked underneath, and the first “knuckles” of your toes on the floor (see photos below). You may have to bend your knee and lean your shin forwards to get the knuckles on the floor, that’s OK! We want the weight-bearing “base” of this pose to be on the knuckles of our toes, not the tops of our toes
Keeping the knukles of your foot pressed into the ground, press your heel forwards to stretch the front of your ankle and top/front of your foot
Hold for 20-30 seconds, then switch feet
Just like the previous exercise, you can do this exercise as “pulses” as well.


8. Banded Knee Straightens on a Block
This last exercise has a “bonus” benefit of helping work on fighting the dreaded “knee microbend” (which I find is something folks are also commonly working on when they’re working on pointing their toes - combined both of those can help smooth out your leg “lines”).
Start with one leg extended forwards, knee bent, with 1-2 yoga blocks supporting the underside of the knee (2 yoga blocks = more challenging). Wrap a TheraBand around the top of your pointed toes, and pull it underneath the yoga block(s) so it can help keep your toes and foot reaching toward the floor
Press the underside of your knee down into the yoga block(s) as you straighten your leg completely, engaging your quads and maintaining a point in your ankle and toes.
Slowly lower back down
Repeat for 8-12 reps, then switch legs
Related Content
Recommended (Mini) Workshop Recording

Who this workshop recording is for:
This 30-minute workshop is meant for students interested in cleaner lines - both on the floor as well as in the air. This class specifically will focus on knees, ankles, and toes.
Prerequisites: None!
What you’ll learn:
Get a flatter toe point - learn how to lead your point from your ankles and active flexibility exercises to work both ankle and toe flexibility
The toe “smoosh” - for students with an already comfortable pointe, we’ll also include strengthening exercises to work towards your “toe smoosh” - the alien-like toes-curled-under foot position used by contortionists to suspend their feet in bridges and more
How to kill that goddamn knee microbend - exercises to engage your quads and smooth out the knee microbend that plagues so many of our leg-in-the-air poses
A full 30-minute flexibility & conditioning routine you can follow-along to keep working on your pointe and anti-microbend practice (including a couple of extra minutes at the end to show how to foam roll your feet)
Recommended props:
Light TheraBand (or some kind of wide elastic resistance band)
Towel (ideally a hand or kitchen towel, but a full sized bath towel can work in a pinch)
Upon checkout, you will receive a PDF with a link to the workshop recording (Squarespace limits file upload sizes so I can’t actually upload the whole recording here). The recording is for your personal use only, not to be shared with others - thank you!