
“Proper” Hip Alignment for Middle Splits
“Proper” Hip Alignment for Middle Splits
(And How to Adjust Alignment for Your Unique Hips)
The position and orientation of our pelvis can have a big impact on the effectiveness of the stretch we’re getting in poses like middle splits or frog stretches. A couple of variables we want to consider are:
hip-knee alignment - where our hips are in space relative to our knees (or ankles)
thigh rotation - what direction are the thigh bones facing?
pelvic tilt - slightly forwards, neutral, or slightly backwards
torso position - which can impact pelvic tilt
An important clarification: we are specifically talking about middle splits (not straddles) in this blog post. If you need a refresher on the differences between these two poses, check out Straddle vs. Middle Split - What’s the Difference?.
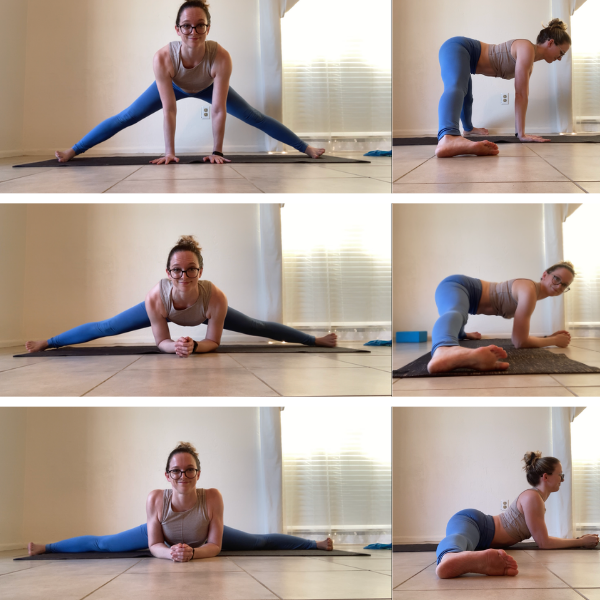
All of these are examples of “traditional” middle split hip alignment (regardless of whether the middle split is flat or not)
A “traditional” middle split has:
straight legs
hips in line with knees and heels
thighs and knees facing forwards
belly/torso parallel to the floor (or belly on the floor in a flat split)
hip bones facing the floor (no pelvic tilt), sits bones sticking out behind you
inside edge of feet on the floor, outside edge of feet lifted (if getting close to flat)
BUT that’s not the only way, or even necessarily the “best” way to do a middle split. Especially when it comes to hip anatomy - which can vary quite a bit person to person, like I wrote about earlier this week - it helps to be able to tailor your stretch to fit your unique body, and your movement discipline. This is where working one-on-one with a coach can be so beneficial - they can help you “problem solve” the most effective adjustments to your form to ensure that you’re stretching the most effectively for your body.
Let’s dive into each of the alignment areas to review their impact on the stretch, and why students may choose a slightly different variation.
Hip-Knee-Ankle Alignment
I like starting with this first because it’s the least complicated to look at (and the least “controversial” in terms of generally recommended best practices).

“Traditional” Alignment: Hips in line with knees in line with ankles - one straight line all the way from one ankle to the other (or in a frogger stretch, this would just be “hips in line with knees”). In a flat middle split, that means your inner thighs and the inside of your ankles will be flat on the floor.
Why This is Preferred: For most bodies, this is what gives the best adductor (inner thigh) stretch. It’s also the position that directly translates to a legs-open-180-degrees straddle.
Why You Might Choose to Do Something Different: If you feel a deeper (productive) stretch in another hip position, by all means stretch it out! For most students, letting the hips drift forwards a bit makes this easier (which is why it’s a common way for people to “cheat” this stretch without even realizing it), and pushing their butt/hips backwards in space gives a more challenging stretch - but that’s not the case in all bodies.
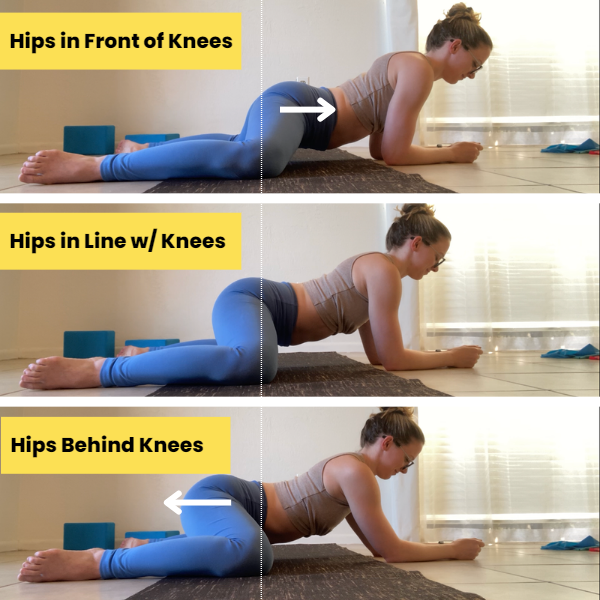
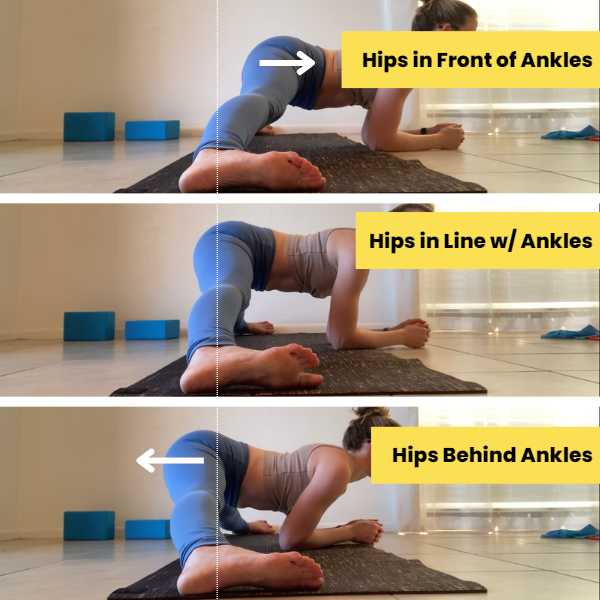
I like to encourage students to explore this for themselves, either in a frogger stretch, or half middle split, or full middle split by rocking their hips forwards and backwards, and noticing how this alters the stretching sensation in the inner thighs (or any other sensations in the hips). If you notice that there’s a hip position that is feeling more challenging and like you’re getting a better/deeper stretch, go ahead use that position for your stretch.
And if you feel the deepest stretch when your hips are in line with your heels (or even behind your heels), but you realize you have a tendency to drift forwards, doing your middle splits with your butt, legs, and heels against a wall is a great way to help keep them in line!
As always, we want to be feeling a stretch (productive!), not a pinching or blocked sensation (counterproductive - this is usually a sign you’re jamming your thigh bone into your hip bone, and no amount of “stretching” will help you go further in that position while your bones are in the way…).
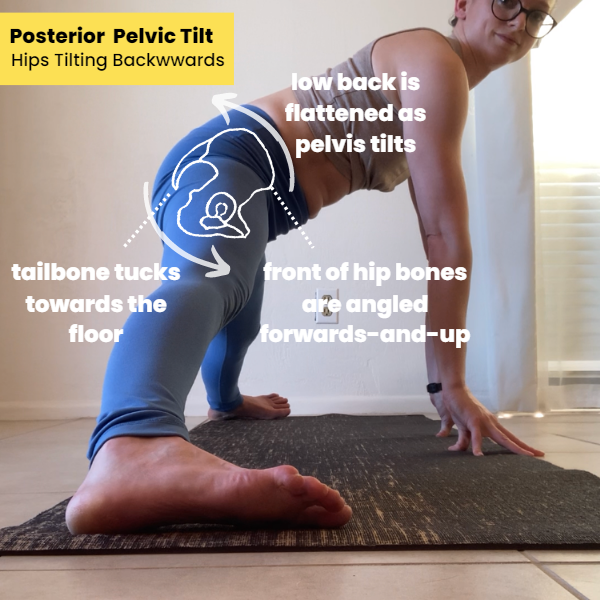
Hip Rotation: Pelvic Tilt
Note: the last three alignment variations we’ll cover all are different ways to impact hip rotation, the relative position of our hip bones (pelvis) related to the position of our thigh bones. We’ll look at pelvic tilt first, because it’s the easiest to see this concept in action.
“Traditional” Alignment: Neutral pelvic tilt, front of the hips facing the floor, sits bones lifted. If you’re imagining the boney part of the front of your hips as having eyeballs, your “hip eyeballs” should be “looking” directly at the floor. In a totally flat middle split, that means your crotch will be on the floor, not your butt.


Why This is Preferred: For most bodies, this is the best position to maximize the inner thigh stretch while avoiding uncomfortable bone-hitting-bone limitations in the hip joint.
Why You Might Choose to Do Something Different: If you feel a hard block in this position, like your legs just get stuck and don’t slide out farther, despite not feeling much of a stretch - that’s usually an indication that there’s a boney misalignment preventing you from opening your legs wider. Because the shape of your hips and femur are unique, you might have to tilt (rotate) your pelvis forwards or backwards to avoid clunking the top of your femur into your thigh bone.
I talked about the effects of hip rotation on opening the legs wider (in a straddle) in this blog post, but the super-abridged summary is:
Our hip is a ball-and-socket joint connecting the “socket” (acetabulum of the pelvis) to the “ball” (head of the femur)
The femur (thigh bone) has a big club-shaped projection that sticks out the top
When we open our legs out to the side (ex. in a straddle or middle split), depending on how the femur is rotated relative to the pelvis, the big club-y part might of the femur might block the femur from opening up wider because it crunches into the hip bone (and bone can’t move through bone!)
Here’s what that typically looks like in a straddle (and remember, a straddle is basically just a middle split, but the shape is rotated 90 degrees!):

For most people’s hip anatomy, if the thighs rotate forwards relative to the hips when in a straddle or middle split (aka internal hip rotation), or when their pelvis tilts backwards (aka posterior pelvic tilt, which also causes internal hip rotation if the thigh bones aren’t moving), this causes the greater trochanter at the top of the femur to crunch into the side of the pelvis. Not fun!

So for people who feel a hard blockage in the outside of their hips in a straddle or middle split can typically adjust the position of their thigh bone and pelvis to make sure the thigh bone has enough space to open without the greater trochanter crunching into the side of the pelvis. For most people this involves externally rotating the hips, which in a straddle or middle split can be achieved by either:
rotating the thighs/legs backwards in space, or
tilting the hip bones forwards (anterior pelvic tilt)
Here’s what those two hip positions look like in a middle split. You can see that for my hips, my body strongly prefers a forward pelvic tilt (anterior pelvic tilt). I actually had a hard time getting a photo of the hips-tilting-backwards version (posterior pelvic tilt) because it gives me the painful/crunchy hip feeling and I literally can’t open my legs any wider:

But like I continue to say - your hips may be different. It’s worth giving all three hip positions a try (neutral, hips tilting backwards, hips tilting forwards), and picking the one that feels the most productive in your body. From a logistics perspective, it can be really challenging to adjust our pelvic position once we’ve already sunk as deep into our middle split as we can, so I suggest sliding your legs out just a bit, then adjusting the rotation of your hips, and then holding that hip position continue to slide the legs out wider.
Hip Rotation: Torso Position
“Traditional” Alignment: Torso leaning forwards, parallel to the floor. In a flat middle split, that means having your stomach on the floor - but you may choose to arch your upper back (similar to a low cobra pose) to shift more weight into the hips instead of relaxing your chest on the floor with a flat back.
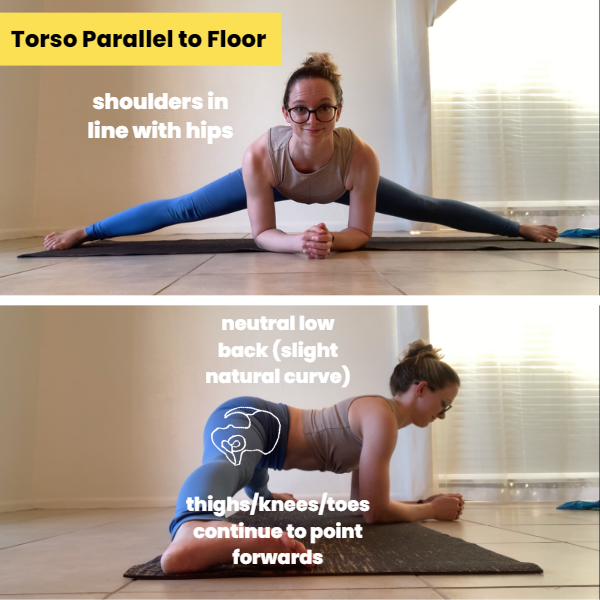

Why This is Preferred: Keeping the torso parallel to the floor makes it the easiest to maintain a neutral pelvic tilt (see above for what that’s often preferred). For most students, lifting the torso has a tendency to internally rotate the hips as the pelvis tilts backwards, which can crunch bone-into-bone in the thighs.


Why You Might Choose to Do Something Different: As with pelvic tilt, if there is a hip rotation that is more comfortable for you personally to get a stretch in, adjusting your torso to be in line with your pelvis will make the stretch more comfortable! For students who find their body prefers more anterior pelvic tilt or external hip rotation, dropping the chest lower to the ground can make it easier to tilt the hips without worrying about adding an excessive backbend to their low back. For students who can get their shoulders or chest to the ground - some may also choose this variation because it’s more comfortable - with shoulders/chest on the floor, you can lean more weight into your upper body, out of your hips. BUT that also makes it a potential opportunity for students to “cheat” the stretch by not allowing enough body weight to push the hips toward the floor to deepen the stretch. So choose accordingly!
Hip Rotation: Thigh Rotation
“Traditional” Alignment: Thighs, knees, and toes (feet flexed) facing forwards (not up towards the ceiling)
Why This is Preferred: Like the other alignments we discussed above, this neutral hip rotation position allows for the deepest inner thigh stretch, without the likelihood of creating a bone-on-bone obstruction

Why You Might Choose to Do Something Different: If you feel a pinching sensation in your outer hips in a neutral hip position, instead of tilting the hip bones forwards (as suggested in the section above), you can rotate your thighs towards the ceiling.
There are a couple of reasons I don’t teach this variation as a “default” position:
Technically it is less of a stretch on the inner thigh muscles than in a neutral (or forward tilted) hip position
Some students find it uncomfortable to smoosh all their weight into their heels (myself included!)
There is a tendency/risk to lean the hips forwards in space, which can also diminish the inner thigh stretch (see Hip-Knee-Ankle Alignment section above)
TL;DR: Do What Gives You The Best Stretching Sensation in Your Hips
The “Too long; didn’t read” (TL;DR) summary is: listen to your body! Don’t blindly accept a postural cue just because someone on the internet said so, feel free to experiment with positions to notice how it changes the sensations you’re feeling in your body. Remember, there is a wide range of structural hip variations, so the hip position that is most effective for you may look different from whoever’s right next to you on the yoga mat.
And if you’re feeling overwhelmed, you can always work with a coach to help navigate your hip exploration journey with more confidence!
Related Content
Recommended On-Demand Workshop

Note: this class is also a part of a 2-class bundle! If you also want to work on your front splits too, you should check out the “Starting Splits” Front & Middle Splits recording bundle.
Who this class recording is for:
This 45-minute class is intended for “beginner” to “begintermediate” students interested in working on their middle splits and straddles. For more intermediate/advanced students who are 3 inches or closer to the ground in their middle splits, I suggest you check out the 60-minute Middle Splits (Box Splits) workshop instead which has even more active flexibility drills in a longer class format. This workshop is a better fit for students who’s hips are 4 inches or higher away from the floor when doing a middle split.
Even if you are a super beginner and can’t touch your toes, this video has stretches and modifications for a variety of levels.
What this class includes:
A quick full-body warm-up to get you ready to stretch
Active flexibility exercises focusing on the two main muscles groups needed for middle splits and straddle pancakes: adductors (inner thighs) and hamstrings (with a healthy dose of glute and hip flexor strengthening for support!)
A full 45-minute stretching routine you can follow 1-3 days per week to work on your middle splits (due to the amount of strengthening involved, I don’t recommend doing this routine every day - your body will benefit more from rest days!)
Recommended props:
A chair (or a bench or low table)
Yoga blocks - totally optional, but they are a wonderful prop, especially if you’re a beginner. If you don’t have blocks, I recommend practicing next to a chair, your bed, or a wall so you can reach your hand out for balance if you need to
Note: Because of Squarespace’s file size limitations (which is what I use for this wonderful website!), upon purchase you will receive a PDF with a link to the recording. You can then stream the recording online from the private link.