
10 Minute Splits Routine
10 Minute Splits Routine
I often get asked how often you need to stretch and for how long to see results, like being able to get your splits. Of course the standard answer is “it depends” - but my general advice if you’re working towards getting your front splits is stretch them 2-3 days a week for 20-40 minutes (after a warm up of course!).
The 10-minute routine below is what I base my own training off of. It’s great because you can still squeeze it in on days you’re pressed for time, or you can run through the whole series 2-3 times to get progressively deeper. This routine aims to thoroughly stretch out (both passively and actively) the major “supporting” muscles in a split - mainly your hip flexors and hamstrings. Often these are the muscles that feel like they’re holding students back from achieving a nice flat split.
This routine is designed to work one leg fully to warm up for a split, then to switch to the other leg.
10-Minute Front Splits Routine
90 Degree Lunge (30 seconds)
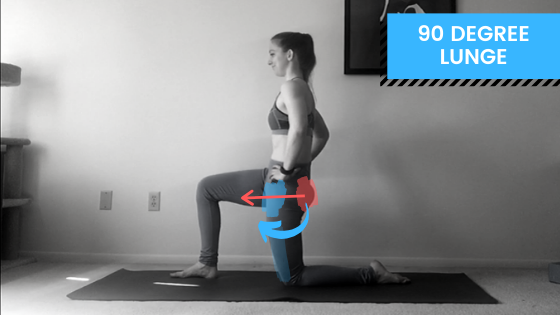
Primary Stretch Target: Hip Flexors | Secondary Stretch Areas: Quad
Start in a lunge with your front knee stacked over your front ankle, hips stacked over the back knee, and hips square pointing straight forwards towards your front toes
Tuck your hips (blue arrow) to point your tailbone straight down to the floor. This will help push the stretch up into your hip flexors (hip crease) in your back leg (blue shaded area)
Squeeze/push through the glute of your back leg to help keep your hips square (red arrow)
OPTIONAL: For a more active quad stretch, actively press the top of your back foot into the ground (while keeping your hips tucked). This will engage your quad and give it a nice stretch as it’s trying to work
Hold for 30 seconds
If your back knee is uncomfortable bearing weight in this position (common if you’re practicing on a hardwood floor), you can try padding it with a folded yoga mat, towel, blanket, or pillow. If your knee is still grumpy, try one of these more knee-friendly hip flexor stretches instead.
90 Degree Lunge w/ Ankle Grab (30 seconds)
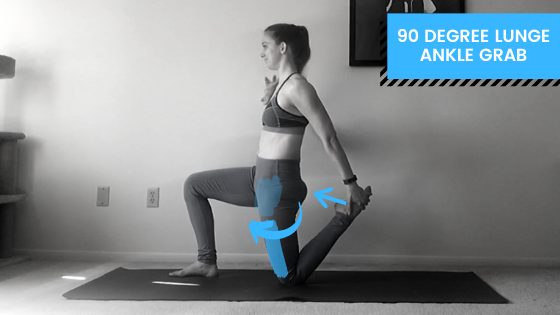
Primary Stretch Target: Quad | Secondary Stretch Areas: Hip Flexors
Keeping your 90 degree lunge position, bend your back knee and reach back with the same-side hand to grab your back shin, ankle or foot
You can place your other hand on a block (or the wall) for balance, or reach it back as well if you feel stable and want to grab your foot with both hands
If you’re having a hard time grabbing and holding that back foot, don’t be afraid to use a strap!
Re-adjust your torso if needed to make sure your chest is still pointing forwards (we don’t want any spinal twist in this pose)
Check in with your hips - are you still keeping that nice tailbone tuck, or did you get distracted trying to figure out your hand-to-foot situation? Re-tuck your tailbone if needed
Gently pull your back foot in towards your butt, keeping your torso nice and vertical, hips square, chest forward, and tailbone tucked. Don’t “cheat” by pushing your butt back to meet your foot. Think “foot to butt” not “butt to foot”
Hold for 30 seconds
Half Split (30 seconds)
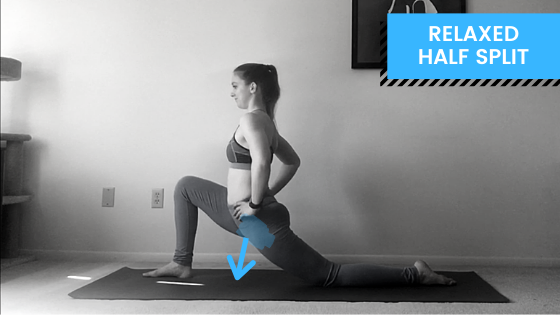

Primary Stretch Target: Hip Flexors | Secondary Stretch Areas: Quad
Releasing your ankle grab, let the top of your back foot come back down to the floor
Walk your front foot forward ~6 inches so that you can sink your hips deeper towards the floor, but still keep that front knee stacked over the front ankle. Relax and let gravity help pull your hips towards the floor
Keep your torso upright (not leaning forwards over the front leg), this will help keep the stretch in your hip flexors
If this feels like a lot in your hips, place your hands on yoga blocks to take some weight out of your hips (but try to keep your torso vertical)
You can either let this stretch be “relaxed” and try to breathe deeply here, or if you want it to be a more active/engaged stretch, press into your front foot to lift your hips an inch or two higher, and try to re-tuck your tailbone to the ground. This will help move more of the stretch up into the hip flexors of your back leg
Hold for 30 seconds
Half Split w/ Ankle Grab (30 seconds)

Primary Stretch Target: Quad | Secondary Stretch Areas: Hip Flexors
Bend your back knee and reach back with the same-side hand to grab your back shin, ankle or foot
Remember, you can always use a strap! This stretch is going to feel more “intense” than the foot grab in the 90 degree lunge, so even if you didn’t use a strap for that first stretch, you might want one here
Don’t let your tailbone flare out to the wall behind you, try and keep it pointing diagonally down toward the ground, toward that back knee
Re-adjust your torso if you need to to make sure your chest is square to the front of your mat (facing forwards, not twisting/opening out to the side)
Hold here for 30 seconds
Half Split Back w/ Knee Taps (30 seconds)

Primary Stretch Target: Hip Flexors (Active!) | Secondary Stretch Areas:
Release your back foot and let it come back down to the mat
Trying to keep your hips nice and low where they are, curl your back toes under, press into your back foot and lift your back knee off of the floor as you straighten your leg
Slowly bend the back knee and bring it to just graze/tap the your mat before lifting it back up to straighten. Don’t let your weight settle on that back knee, we’re just trying to barely tap the ground
Repeat tapping your knee to the ground, then lifting it back to a straight leg
Try and keep your hips as low as you can during this exercise, the goal is for the front leg to be quiet (not pushing the hips up), and all of the movement to come from the back hip and back leg.
Repeat for 6-10 knee taps, then you can bring your back knee to the ground to take weight again
I’m not going to lie, this is a difficult exercise. Your quads and hamstrings and hip flexors are firing trying to keep this slow and controlled, all the while you’re asking your hip flexors to streeeeetch. You can make this exercise easier by putting blocks under your hands and leaning into the blocks. It’s even OK to lean your torso forwards (normally something we try to avoid in our split work) so that you can take more weight into your hands, out of your hips if that helps do this exercise with better form.
Hamstring Stretch w/ Flexed Foot (15 seconds)

Primary Stretch Target: Hamstring | Secondary Stretch Areas: Calf
Press into your front heel to straighten your front leg as your rock your hips back to stack over your back knee. Flex your front foot (toes pointed to the ceiling)
Lean forwards, keeping a flat back, even trying to initiate the lean from your pelvis instead of from your chest. Bring your attention to your tailbone, and see if you can try and lift it to point to the wall behind you - this will tilt your pelvis forwards, your belly will start to lean over your front thigh, then the rest of your torso can follow. You may only tilt forward a couple of inches - totally OK! It doesn’t take a lot of movement in this position to start to feel a stretch in the back of your front leg
Use blocks to support your hands to help prevent your low back from rounding
Hold here for 15 seconds
Hamstring Stretch w/ Pointed Foot (15 seconds)

Primary Stretch Target: Hamstring | Secondary Stretch Areas: ?
Keeping your hips and hands in the same place, just point your front foot
Maybe you can sink a little deeper into this stretch when your front foot isn’t flexed (if you have tight calves and that’s where you predominantly felt the first stretch, you may be able to sink deeper when we “remove” them from the stretch!)
Check in with your hips - make sure you’re still trying to lift your tailbone to the wall behind you
Hold for 15 seconds
Pyramid Pose (30 seconds)
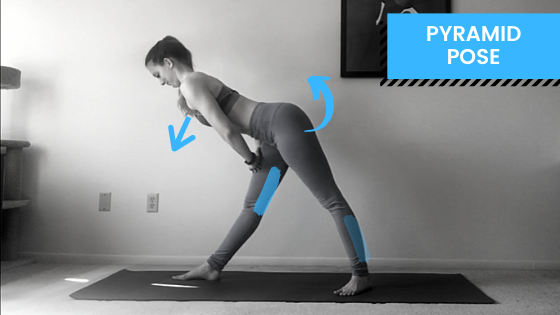
Primary Stretch Target: Hamstring | Secondary Stretch Areas: Calf
Tuck your back toes, press into the back foot to start to straighten the back leg, but hop it in a foot or so closer to your front foot so you’ve got a shallower stance
Straighten both legs and stand up tall. Adjust your hips (if needed) to make sure both hip bones are pointing straight to the front of the mat, and your hips/butt are not opening up out to the side
Keeping your legs straight and a flat back, hinge forwards at your hip crease, letting your entire torso start to fall towards the floor
If your front knee hyperextends, bring a tiny micro-bend into the front leg (we don’t want to push more weight into a hyperextended joint in this post
Only drop your torso as far as you can keeping a flat back (remember, our cue for this is trying to “lift your tailbone”). Hands can come to rest on that top thigh, or on yoga blocks or your shin if your hamstrings are feeling really loose
Hold for 30 seconds
Pyramid Good Mornings (30 seconds)
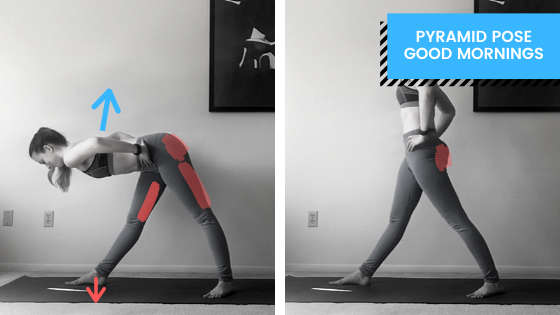
Primary Stretch Target: Hamstring (Active!) | Secondary Stretch Areas: Calf
Keeping the same shape in our legs, bring your hands to your hips
Keeping our nice flat back, press your front foot into the ground to help lift your torso back to standing (maybe even giving an extra glute squeeze at the top!). This is helping us engage our hamstrings as we’re stretching them
Again, pay attention if you have super extend-y knees, keep a microbend in the front leg in this one if you need to
Then bend at the hip crease, lower your torso back towards the floor, and push into strong legs to lift it back to standing
Repeat for 30 seconds (taking a break with your hands on your thigh to give your legs a rest whenever you need to)
And now that we’ve woken up and stretched our hip flexors and hamstrings various ways, started to get them feeling nice and loose, onto the pose we’ve all been waiting for…
Splits! (60 seconds)
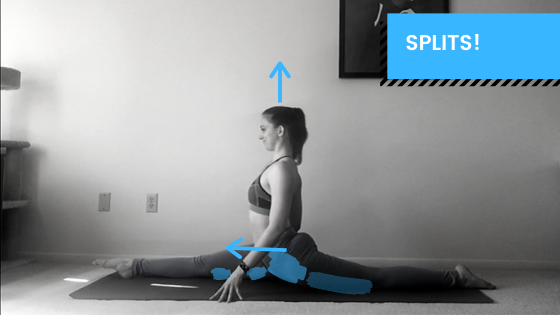
Primary Stretch Target: (Varies) | Secondary Stretch Areas: (Varies)
Slide into any comfortable version of a split (if “regular”/traditional splits still feel far off, consider one of these split variations). For the purposes of this routine (trying to focus on our hamstrings and hip flexors), try and keep your hips “square,” meaning make sure your back-leg-hip is pulling towards the front of the mat and not spilling open to the side
Keep your torso nice and vertical - yoga blocks under your hands can help with this!
Hold here for 60 seconds (yes, this is a long hold!), taking nice, slow, deep breaths. Inhale for a count of four, and exhale for a count of six to really help your body try to relax
At the end of your minute-long hold, you’re welcome to relax your hips and let them open to the side if your body is craving a “not square” split (you deserve it!)
Lather, Rinse, and Repeat
Once you’ve run through this 5 minute routine on one leg, repeat on your other leg. I like to do this routine 2-3 times (for a total of 20-30 minutes of stretching) to really help my hips open up. If you’re splits are already quite close to the ground (or on the ground), throw a yoga block under your front ankle, or under the top of your back foot and repeat this routine working towards your oversplits. You can choose to do 2-3 times on the same leg (which helps keep it nice and warm, and may help you go deeper) before switching sides. Totally up to you!
Play around with adjusting this routine over a couple of different stretch sessions and see what your body likes. Maybe it likes longer holds. Maybe it hates the active flexibility drills. Customize it as much as you need!
If you have any questions, comment below, or feel free to reach out to me via Instagram (@dani.winks).
Related Content
Recommended On-Demand Class

Note: this class is also a part of a 2-class bundle! If you also want to work on your middle splits and straddles too, you should check out the “Starting Splits” Front & Middle Splits recording bundle.
Who this class recording is for:
This 45-minute class is intended for “beginner” to “begintermediate” students interested in working on their front splits. For more intermediate/advanced students who are 3 inches or closer to the ground in their front splits, I suggest you check out the Splits Clinic: Getting Flat Splits workshop instead which has drills aimed at slightly more flexible hips.
This workshop is a better fit for students who’s hips are 4 inches or higher away from the floor when doing a front split with their torso lifted.
Even if you are a super beginner and can’t touch your toes, this video has stretches and modifications for a variety of levels.
What this class includes:
A quick full-body warm-up to get you ready to stretch
Active flexibility exercises focusing on the two main muscles groups needed for square front splits: hamstrings and hip flexors
A full 45-minute stretching routine you can follow 1-3 days per week to work on your front splits (due to the amount of strengthening involved, I don’t recommend doing this routine every day - your body will benefit more from rest days!)
Recommended props:
A chair (or a bench or low table)
Yoga blocks - totally optional, but they are a wonderful prop, especially if you’re a beginner. If you don’t have blocks, I recommend practicing next to a chair, your bed, or a wall so you can reach your hand out for balance if you need to
Note: Because of Squarespace’s file size limitations (which is what I use for this wonderful website!), upon purchase you will receive a PDF with a link to the recording. You can then stream the recording online from the private link.