
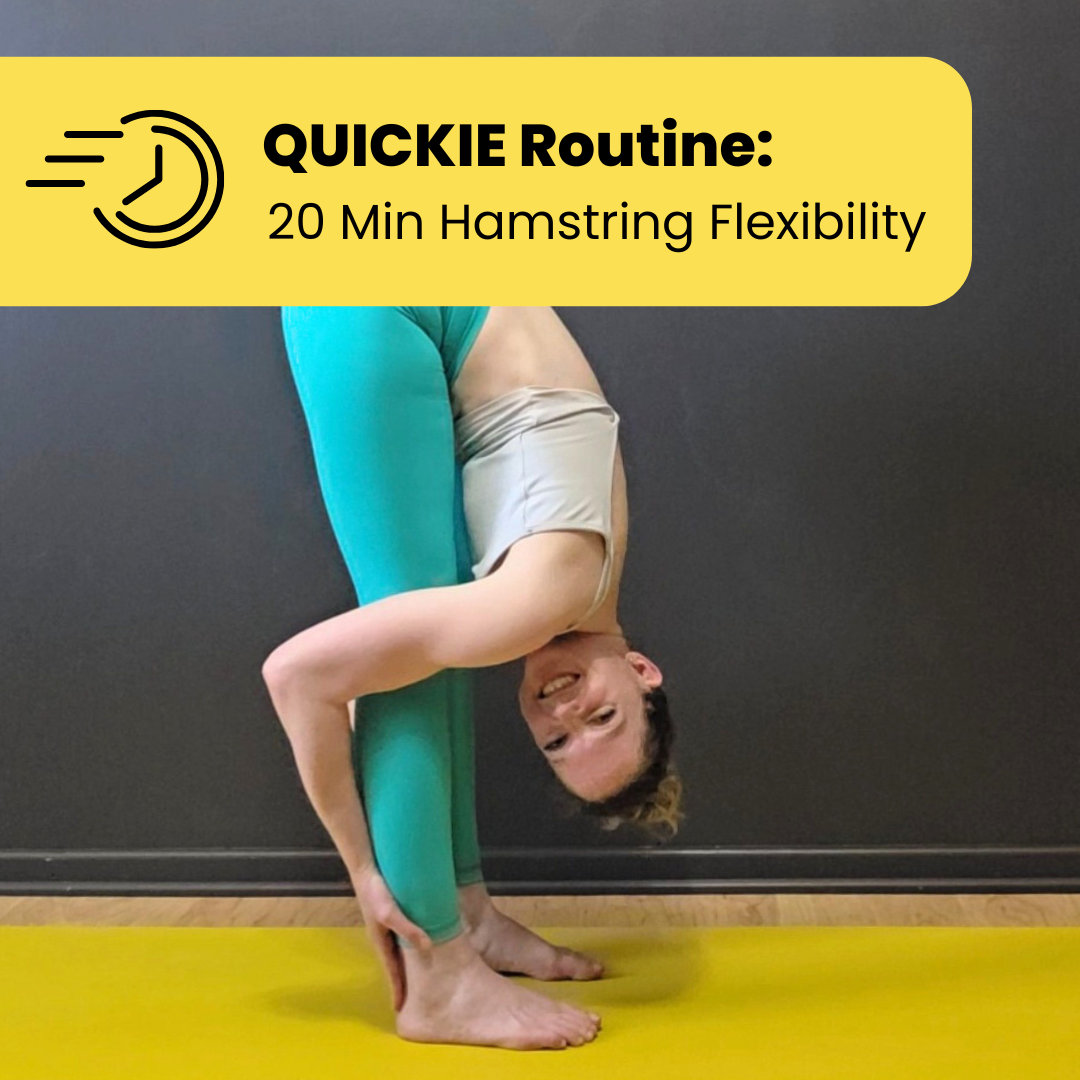
30-Day Toe Touch Flexibility Challenge
30-Day Toe Touch Flexibility Challenge
Calling all toe-touching wannabes! To kick off June I’m launching a free 30 day hamstring-focused toe touch challenge (don’t worry, it’s not time sensitive, you can start whenever!). Join me and my lovely very-averagely-flexible assistant Nate to learn a beginner-friendly stretching routine aimed to help improve your hamstring flexibility to help you touch your toes.
Why a 30 Day Challenge?
It can take up to 4-6 weeks to notice progress with flexibility training, so 30 days (or one month) is a realistic timeline to be able to expect some positive changes if you are training effectively. And since this challenge only asks you to actually stretch 2-3 times per week (see sample schedule below), it’s easy to commit to regular training for “just” a month!
Training Schedule
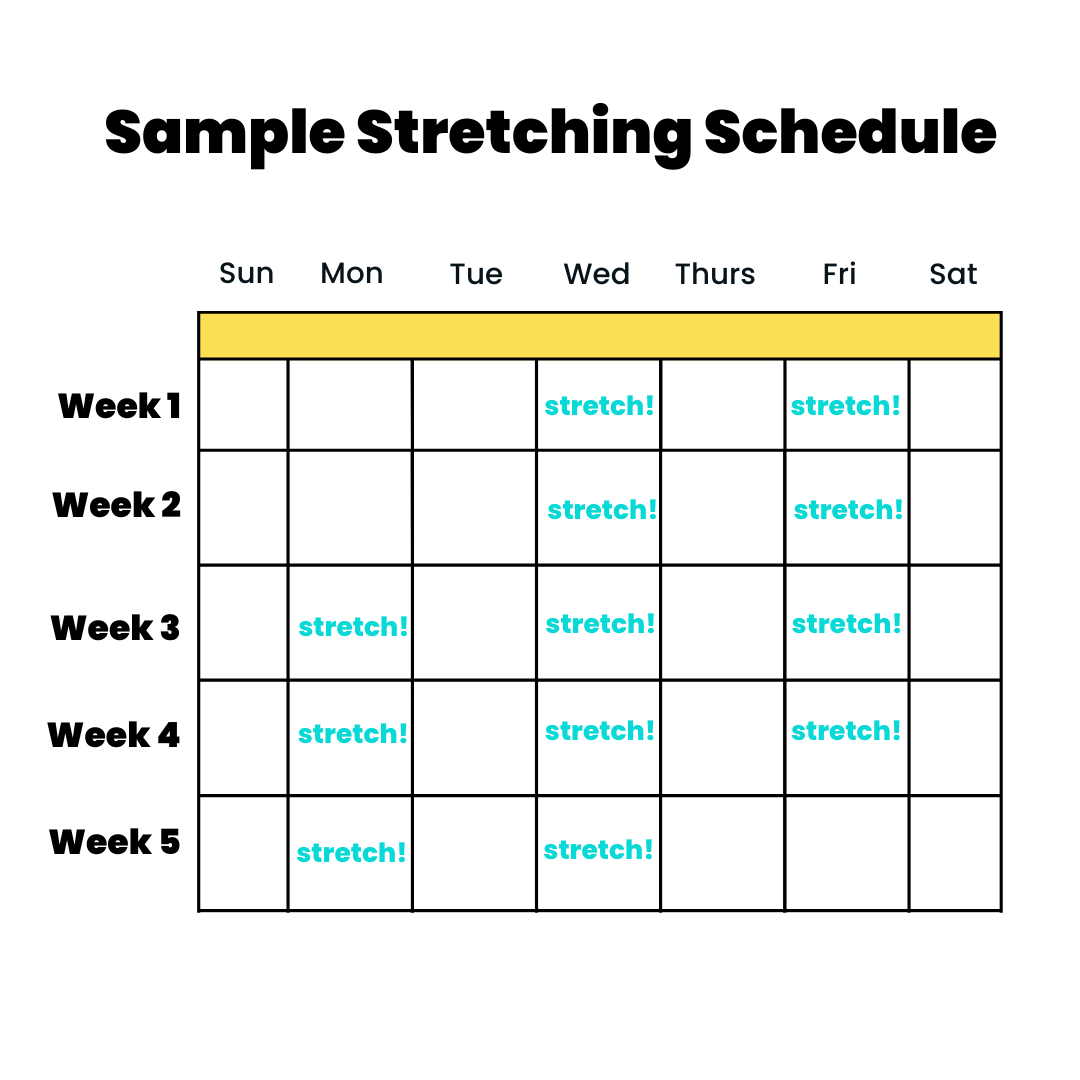
The training schedule is simple - all you have to do follow the 20(ish) minute stretching video 2-3 times each week. That’s it.
But what about the rest of the time? What if I want to stretch every day?
Your body needs recovery days - especially from active flexibility exercises (which these toe touching stretches are full of) because your muscles need time to repair. Of course every body is different, and there are some people who are fine stretching every day - but in my experience working with (literally hundreds) students, you will likely see more progress by intentionally including rest days into your week.
For folks who really like to do something every day, consider going for a walk, foam rolling, or doing light mobility work on your “rest” days (but no intense stretching!).
The Stretches:
Obligatory Reminder #1: Start With a Warm Up
If you're not tacking this stretching routine after a previous workout, make sure to start with ~5 minutes of a hip-focused warm up.
Sample hip-focused warm up:
Jogging in place (1 min)
Squats (1 min)
Hip circles & knee circles (1 min)
Bent knee internal/external rotation (30s)
Gentle bodyweight good mornings (30s)
Gentle relaxed forward fold with movement (30s)
Obligatory Reminder #2: Pay Attention to Proper Form!
Because this routine focuses on hamstring flexibility (instead of back flexibility), it’s important to make sure you are stretching your hamstrings and not “cheating” the stretches by rounding your back. If you need a refresher, this blog post is a great overview of hamstring anatomy and proper stretching technique. The TL;DR (“too long didn’t read”) version is:
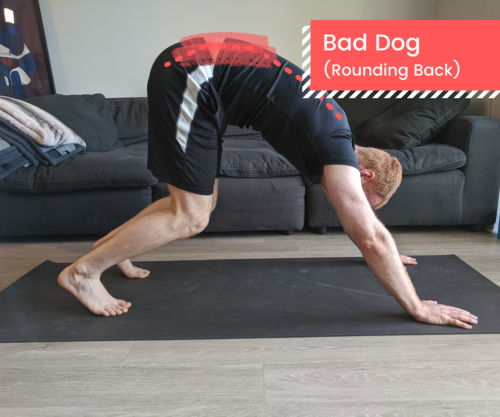
Keep your back flat when trying to stretch your hamstrings - rounding your back gives your hamstrings a break (“cheats” the stretch) and can actually make hamstrings more tight if you are someone who has some sciatic nerve tension
Don’t be afraid to bend your knees! In the video, Nate does a great job at showing what this typically looks like. This is especially helpful if you are having a hard time “feeling” the stretch - try bending the knees and see if that helps you find more of a sensation in the muscle belly of the hamstrings

Good Form:
Knees bend to accommodate tighter hamstrings
Tailbone lifts to tilt pelvis
Back stays flat

Poor Form:
Back rounds to compensate for trying to straighten the legs
Poor Form:
Back rounds even though knees are bending - still no good!
Exercise #1: Sciatic Nerve Glide
These first two exercises are both examples of nerve mobilizations - I’ve included them because I find a lot of beginners who struggle with making progress with forward fold flexibility have some sciatic nerve tension that’s negatively impacting their stretching. Remember, nerves are not meant to be stretched! The goal of using gentle mobilizations like these is to help the nerve slide back and forth through our soft tissue, not to tug on them so hard you feel a stretch (which puts them under too much tension and can make muscles even tighter as a result). So to keep this exercise in your "pre stretching sensation" range of motion:

Lie on your back with your right knee bent, hands supporting the back of your right thigh
With your right ankle pointed, start to straighten the right leg until you start to feel the *beginning* of a stretch (don't worry if the knee is still very bent)
Flex the right foot/ankle at the top
Bend the knee lowering your right foot back toward the floor
Point your ankle at the bottom to reset
Repeat 10x on the right leg, then switch legs
Exercise #2: Sciatic Nerve Tensioner
Just like the nerve glide, remember to keep this exercise gentle! Aim for no more than 3/10 intensity (just barely feeling the beginning of a stretch)
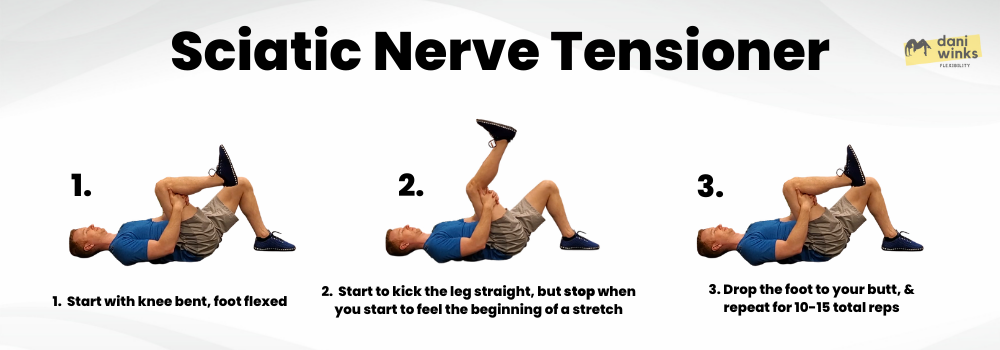
Lie on your back with your right knee bent, right foot flexed, hands supporting the back of your right thigh
With your right ankle flexed, start to straighten the right leg until you start to feel the *beginning* of a stretch (don't worry if the knee is still very bent)
Bend the knee lowering your right foot back toward the floor
Repeat 10x on the right leg, then switch legs
Exercise #3: Wall Heel Slides

Start lying down with your legs up a wall (knees bent), butt close to the wall (the closer your butt is to the wall, the harder the exercise)
Start to slide your feet up the wall, straightening your legs, until you feel a hamstring stretch. Hold for a moment
Slowly slide your feet back down to release the stretch
Repeat 10x

Exercise #4: Legs Up the Wall Stretch (Hold)
Extend your legs up the wall, straightening your legs as much as you need to to feel a hamstring stretch. Hold for 30 seconds.
Exercise #5: Supine Hamstring Stretch (with Strap)

Lying on your back with your left knee bent and foot on the floor, place a strap around the bottom of your right foot. Pull the right leg up (keeping a small bend in the knee is totally fine) until you feel a hamstring stretch. Hold for 30 seconds.
Exercise #6: Supine Leg Lifts

Lying on your back with your left knee bent and foot on the floor, extend your right leg out long. Keeping your back flat on the floor, slowly lift your right leg as high as you can, trying to kick your leg toward your chest (keep a bend in the leg if this is very challenging). Slowly lower with control. Do 10 leg lifts, then switch legs.
Exercise #7: Supine Hamstring Contract-Relax

Start in your supine hamstring stretch (see #6 above), gently pulling your right leg toward your chest (knee can be slightly bent)
Contract your hamstrings by kicking your right leg away, while using your arms and the strap to hold your leg in place (don't let the leg actually move). Hold the contraction for 10 seconds
Relax your hamstrings (stop actively kicking the leg away) and hold the passive stretch for 10-20 seconds
Repeat for 3 total rounds of contract-then-relax
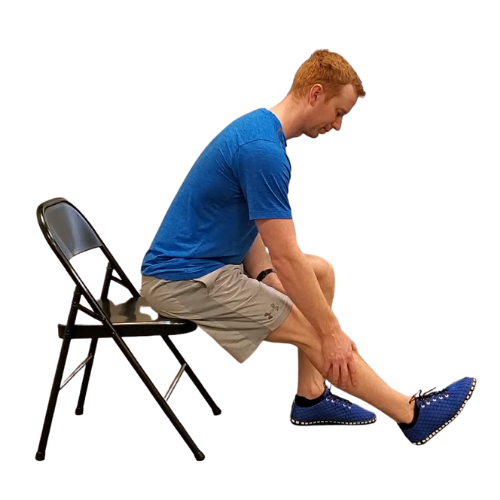
Exercise #8: Seated Single Leg Lifts & Forward Fold
Start sitting in a chair with your back flat, left knee bent, right leg extended out in front of you. Slowly lift and lower the right leg 10 times, feeling a squeeze in the quads and the hip flexors. After the 10th lift, follow immediately with a forward fold (still keeping your back flat, of course!) - hold for 30 seconds.

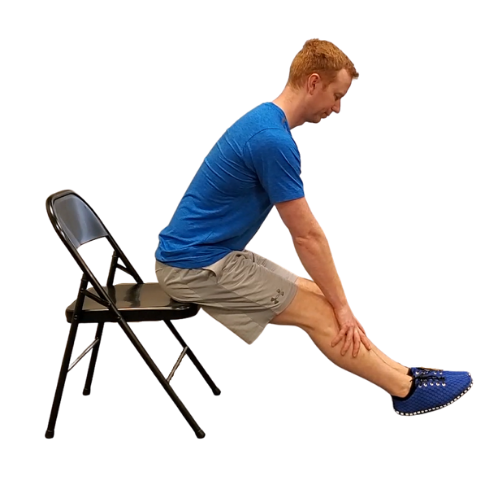
Exercise #9: Seated Double Leg Lifts & Forward Fold
For an extra challenge you can try doing both leg lifts together (10 lifts and lowers with control), followed immediately by a forward fold (30 second hold). Try to keep your back as flat as possible, even if it means leaning backwards.

Got Progress Pics?
I’m looking for volunteers to share progress pics from your experience with this 30-day (and beyond!) challenge. If you get some nice progress pics and are comfortable with me sharing them on my website, shoot me an email!
Related Content
Recommended Recorded Class:
Who this routine is for:
This 20-30 minute training routine is targeted to students who want to work on their hamstring flexibility for deeper forward folds. Modifications of drills are given for all levels - whether you’re someone who’s working to finally be able to touch their toes, or whether you’re a more advanced student trying to get their belly all the way to their thighs in a forward fold, this workshop has drills for you!
What you get:
THIS IS NOT A FOLLOW-ALONG VIDEO like the majority of my other recordings. Instead, this is a written routine that includes detailed how-to videos for each drill, as well as educational content to help you maximize your progress in your hamstring-training journey.
This PDF includes:
Flexibility training best practices
Anatomical considerations for training hamstring flexibility
How to modify the drills to make them easier or harder as your flexibility progresses (spoiler alert: bending your knees is encouraged!)
How to test to see if you have nerve tension that will impact your training (and how to adjust accordingly)
Suggestions for training frequency
A program of drills with how-to videos explaining proper form, what sensations to look for, what muscles to engage (if needed), and how to modify to adjust the difficulty/intensity for each drill. The “default” routine is meant to fit a 20-minute training session
Additional recommended drills (along with how-to videos) for another 10 minutes of training for students who want to extend their practice to a 30-minute session
A printable all-on-one-page list of drills for quick reference
Heads up: Because each of the how-to videos is filmed as an educational video with comments on form, technique, and modifications - and not as a “follow along with me” style video, the videos will likely take longer to watch than to actually execute the exercise. So plan on your first run-through of this routine to take longer than 20 minutes because you’ll likely be watching the videos in their entirety which will take a bit longer (and then just skimming through them for reminders in the future).
Recommended props:
Yoga mat (knee padding is your friend!)
Some kind of long strap - can be stretchy or stiff
2 yoga blocks
A chair or bench (very helpful for folks with tight hips)