
Can’t Touch Your Toes? 8 Beginner-Friendly Hamstring Stretches
Can’t Touch Your Toes? 8 Beginner-Friendly Hamstring Stretches
3/6/21 Update: Scroll down to the bottom of this post for a follow-along stretching video that includes all of these recommended exercises!
If you’re working on being able to touch your toes, but your hamstrings are so tight you can’t even sit up straight in a pike, stretching can be very frustrating - especially if you’re following “tutorials” that assume a base level of flexibility that you just don’t have yet.
Don’t worry, you’re not alone, tight hamstrings are extremely common (despite what a couple of swipes through Instagram may suggest). Many people naturally develop tight hamstrings as a result of poor posture, a genetic pelvic tilt, or simply lots of prolonged sitting.
Ironically, “traditional” hamstring stretches, like a standing forward fold, or a seated forward fold, may be the worst thing for you to work on if you’re hamstrings are super tight.
But never fear, there are plenty of other beginner-friendly stretches you can do that safely and effectively target your hamstrings without causing undue stress on your low back.
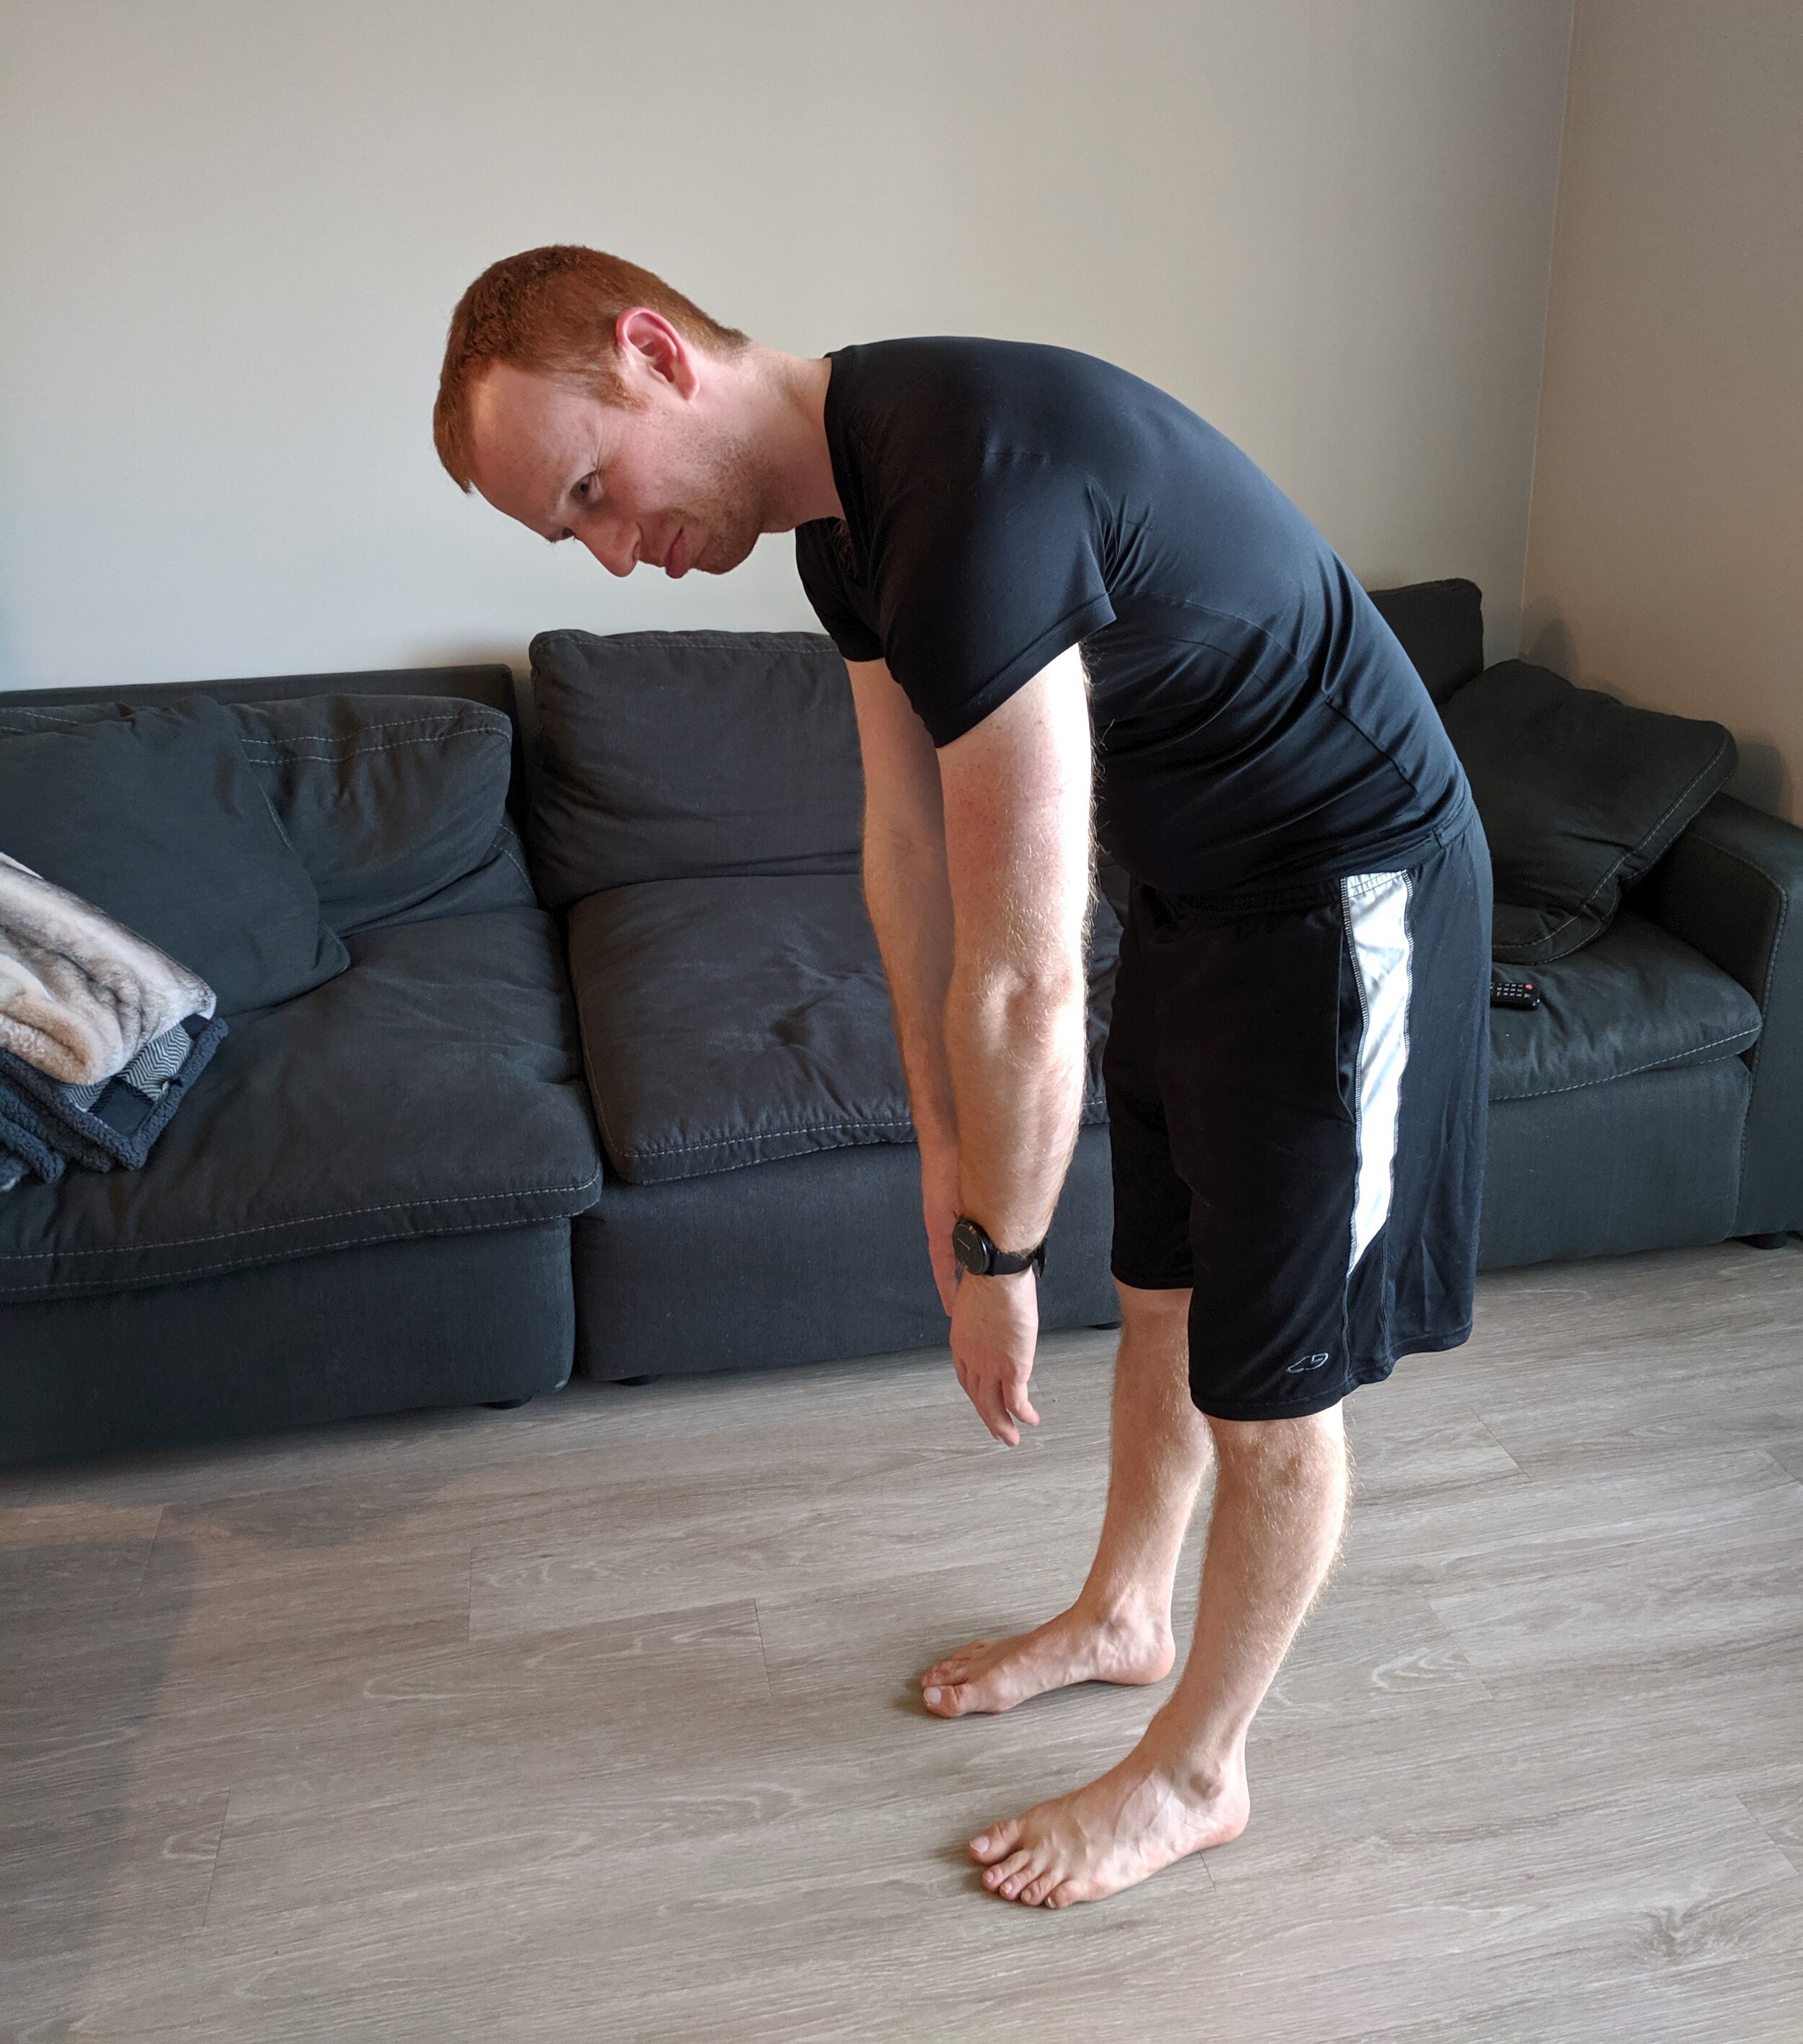
Because I think it’s helpful to see what stretching looks like on a “real” body with a similar-to-you level of flexibility, I recruited my boyfriend for these tutorials. While Nate used to be able to comfortably touch the floor in a standing forward fold, due to increased strength training and cutting out his flexibility practice, he can no longer touch his toes, or sit up totally straight in a seated pike. He is our ideal stretching model for this topic!
Beginner-Friendly Hamstring Stretches
1. Legs Up the Wall

Legs-up-the-wall is a much gentler - but just as effective - hamstring stretch as your “traditional” forward fold. It allows you to more easily modify the level of stretch, and has the added benefit of not dumping all of your body weight into your hamstrings like in a forward fold (which then translates into a lot of weight into your low back if your hamstrings are tight).
Lie on your back with your butt a foot or so away from the wall, and feet resting on the wall about hip width apart. Try to keep your legs “neutral” (not internally rotating your legs so your toes come to touch, or externally rotating so your toes splay out to the sides).
Keeping your low back flat on the floor, and not letting your tailbone tuck up towards the ceiling at all, try and straighten your legs. If you can’t straighten them all the way, straighten them as much as you can until you feel a nice stretch in the back of your hamstrings (blue shading in photo). It’s absolutely fine if your legs don’t straighten. If you can straighten your legs all the way, but don’t feel a stretch in the back of your legs, scoot your butt a couple of inches closer to the wall (and repeat until you find a leg angle where you do feel the stretch).
Hold this stretch for 20-30 seconds.
Variation: Straddle Legs Up the Wall - You can also do this same exercise with your feet and legs open wide in a comfortable straddle.
2. Wall Heel Slides
This one is like legs-up-the-wall, but incorporates a little gentle movement. Consider wearing socks to help your feet slide on the wall.
Start like you’re setting up for legs-up-the-wall, but scoot your butt an inch or two closer to the wall to make it harder.
Gently start to straighten your legs by sliding your heels up the wall. Keep your low back and your tailbone pasted into the ground. Only slide your heels as far up the wall as you need to feel a stretch in the backs of your legs (this may be a super small movement, maybe your heels only move an inch or two up the wall as you start to straighten your legs). Your legs do not need to completely straighten.
Bend your knees, slide your heels back down a couple of inches and relax (let the stretch go).
Alternate straightening and bending your legs, holding the straight (or “straight-ish”) position for a couple of seconds before relaxing out of the stretch. Continue sliding your heels up and down the wall, sliding your legs into- and out-of the stretch for 30 seconds.
Variation: Straddle Heel Slides - Just like legs-up-the-wall, you can do this one in a straddle position to. Instead of sliding your heels up to the ceiling, they might also be sliding out as your legs work to straighten.
3. Lying Down Single-Leg Stretch (With a Strap)
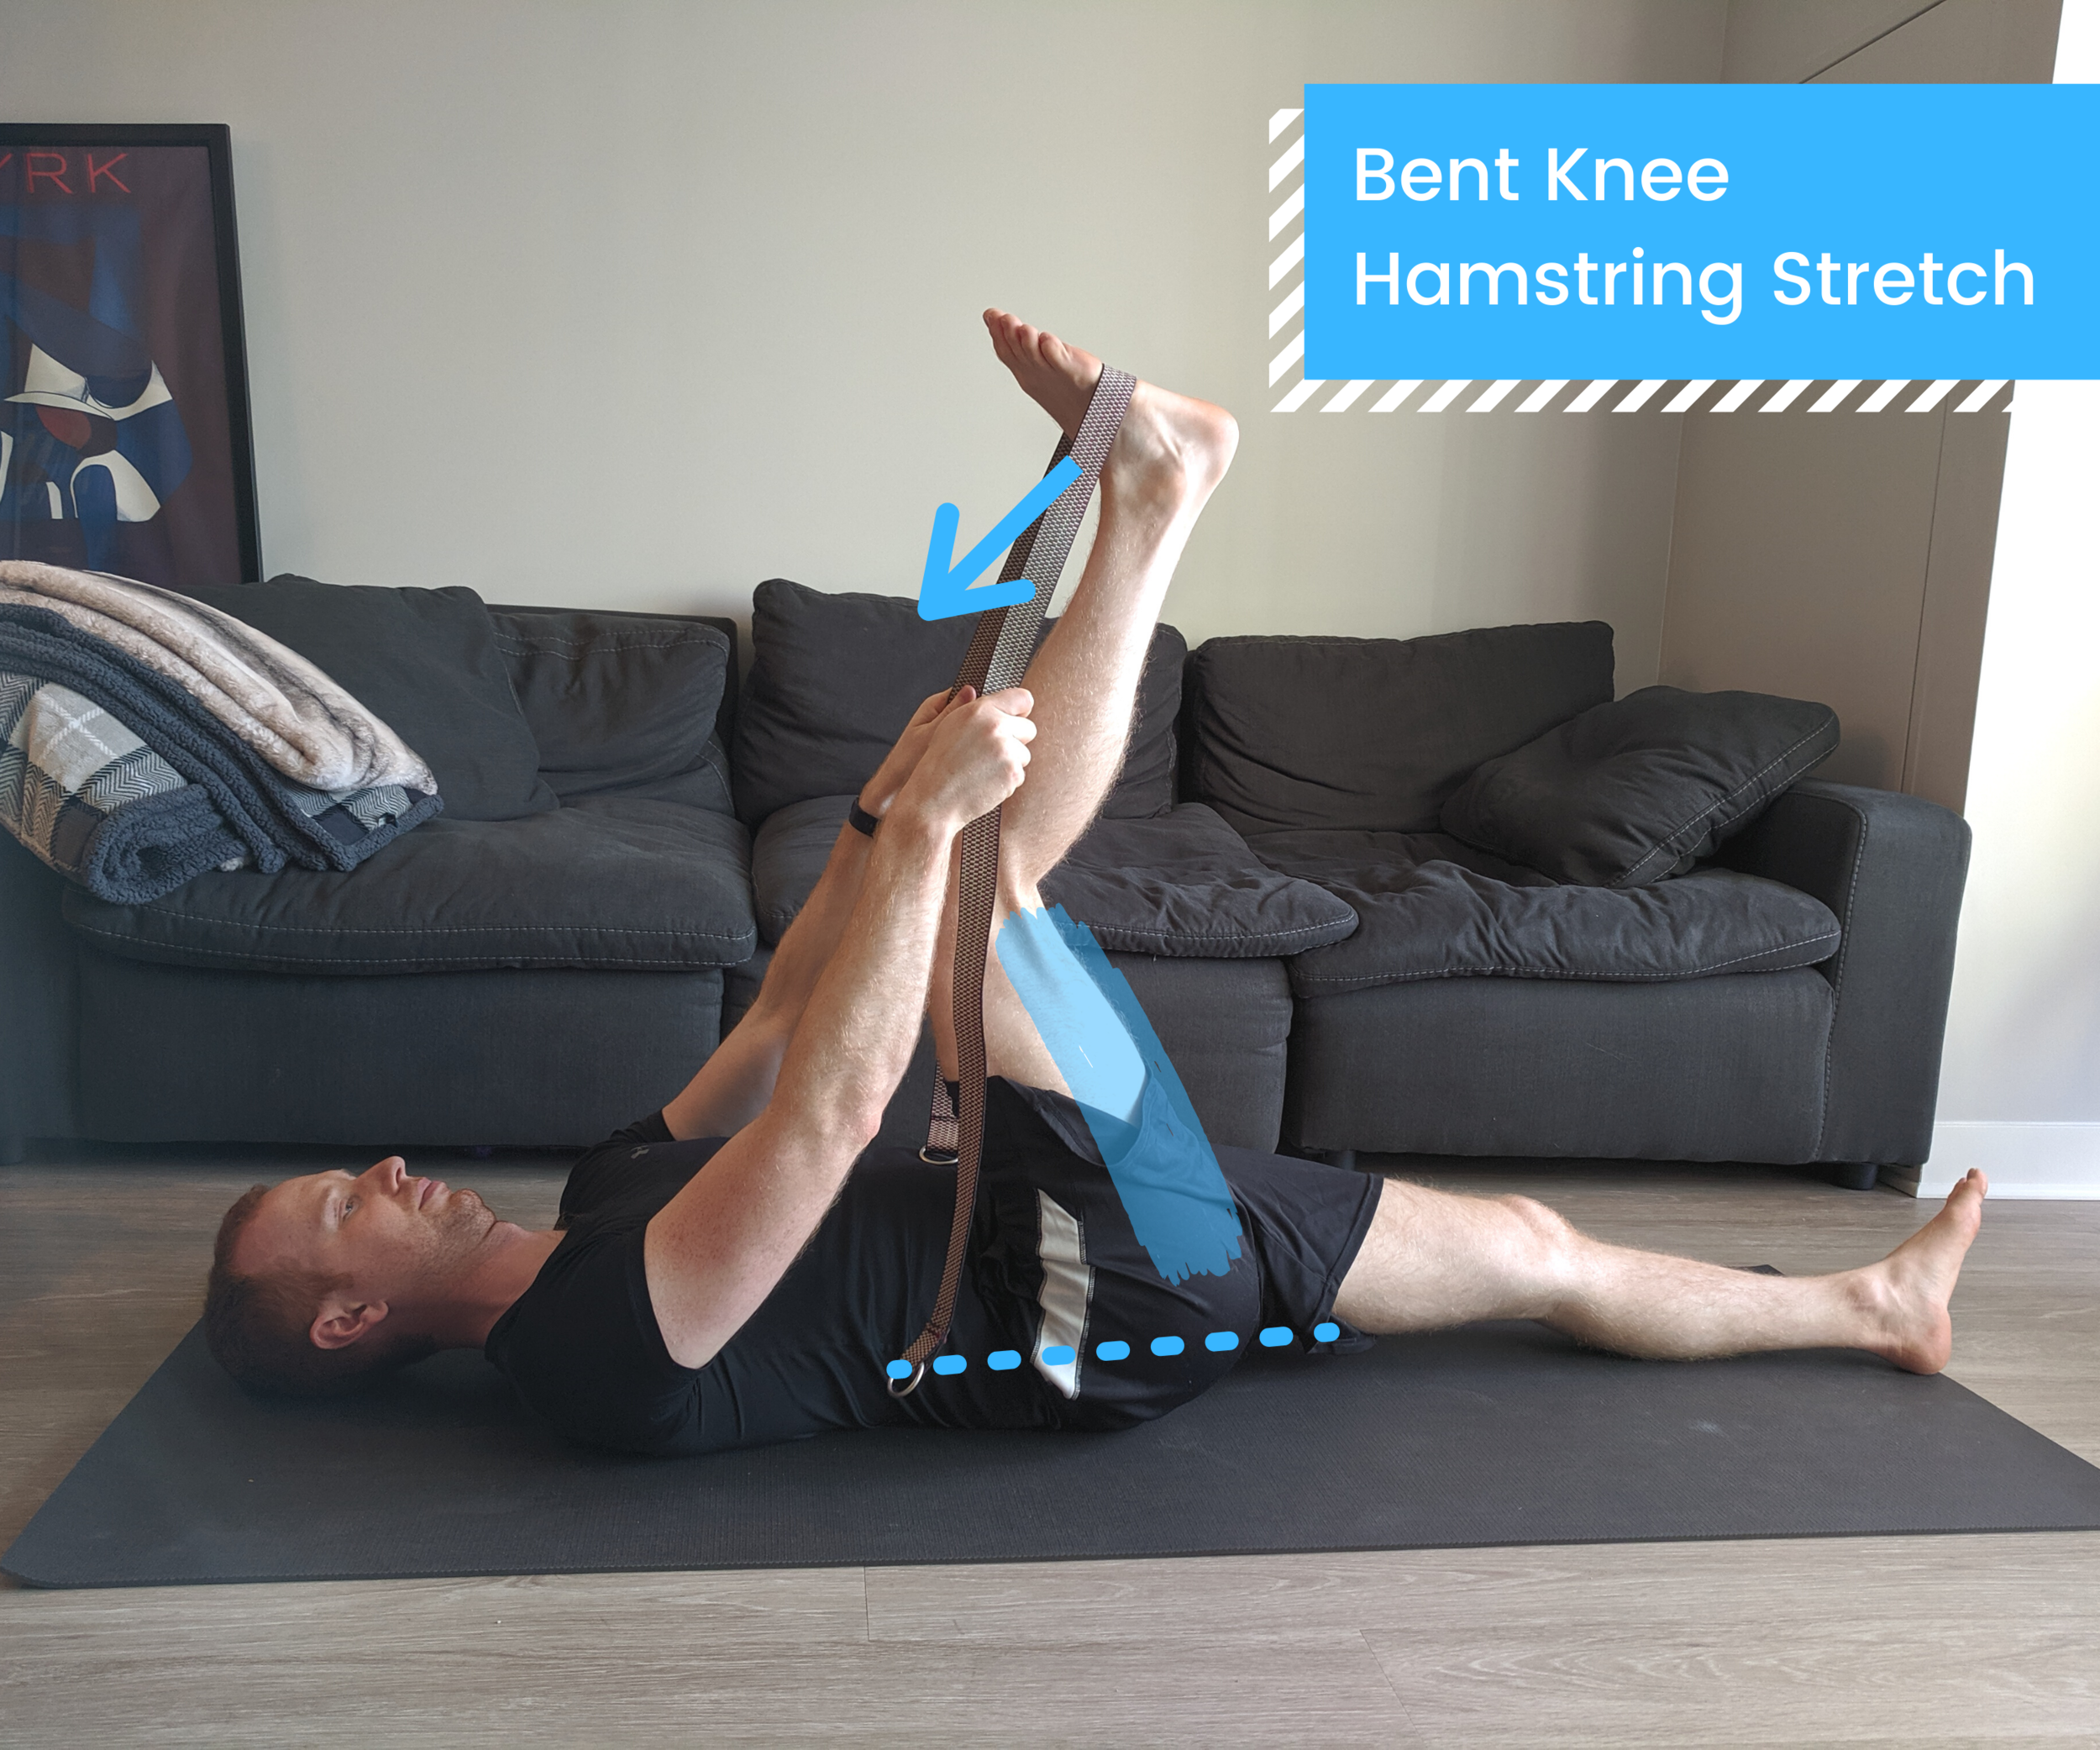
This is a nice stretch for people who like to deeply stretch one leg at a time so they can focus on the stretch.
Start lying on your back, with a flat/neutral low back (a slight natural lumbar curve is OK).
Lasso a strap around the bottom of one foot and pull that leg up towards the ceiling until you start to feel a stretch in the back of your top leg (blue shaded area above).
Only lift your leg as high as you need to to feel a deep stretch in your hamstrings - pulling your leg “deeper” into the stretch won’t help you more.
Keep your low back flat and tailbone shooting out towards your heel on the floor (don’t let it tilt up).
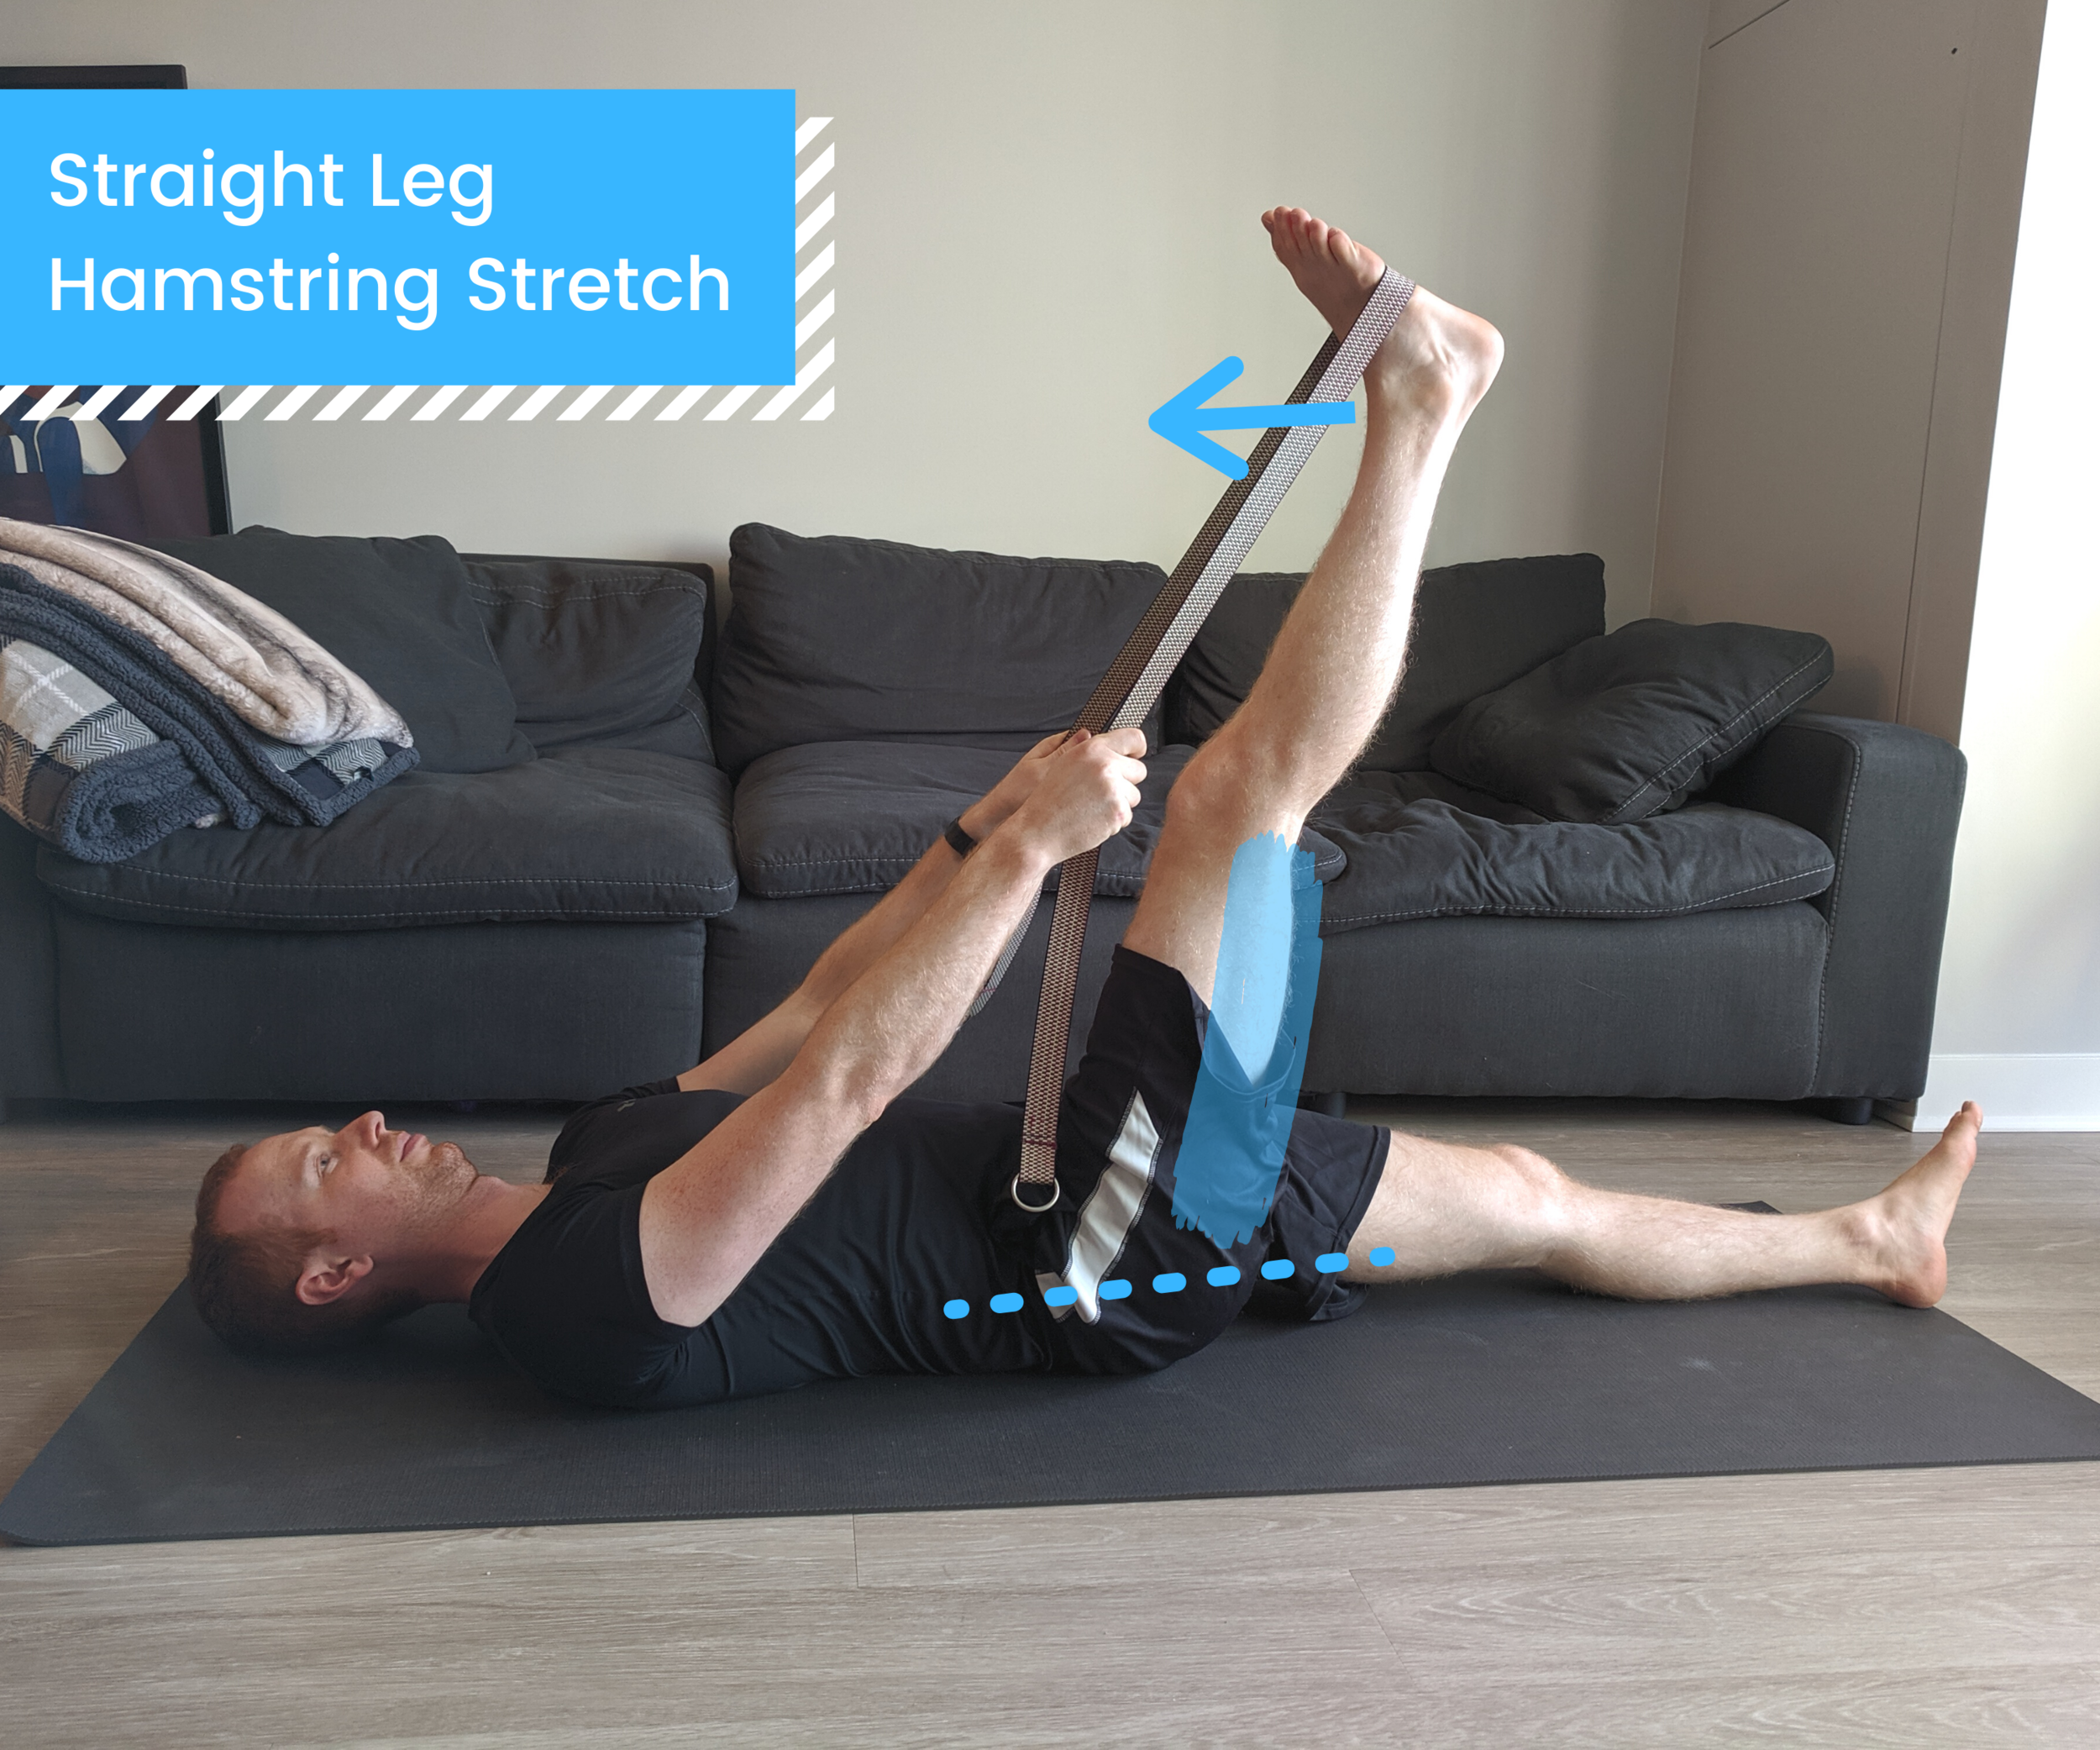
You can keep the top leg bent if that feels like you can get a deeper stretch in your hamstring, or you can straighten that leg. Choose your own adventure! Don’t worry if when you straighten your leg you can’t pull it quite as high towards the ceiling - that is normal. We want to focus more on feeling the stretch, not just lifting your leg as high as it will go.
Consider holding the strap somewhere where you can keep your arms straight to help you “relax” instead of having to keep actively pulling the strap in with bent arms (this isn’t "crucial to “doing the stretch,” but you may find it feels “easier” with straight arms)
Keep the bottom leg straight on the floor. If you notice it starting to lift, that’s an indication you might be letting the bottom of your pelvis and your tailbone tuck and tilt towards the ceiling (which will lessen the stretch). Keep your tailbone pointing towards the heel of the foot on your mat instead.
Hold for 20-30 seconds, then switch legs.
Variation: Single-Leg PNF Stretch
4. High Pyramid Pose

Correct: Trying to lift the tailbone up the wall behind you (gold arrow), letting your pelvis determine the depth of the stretch
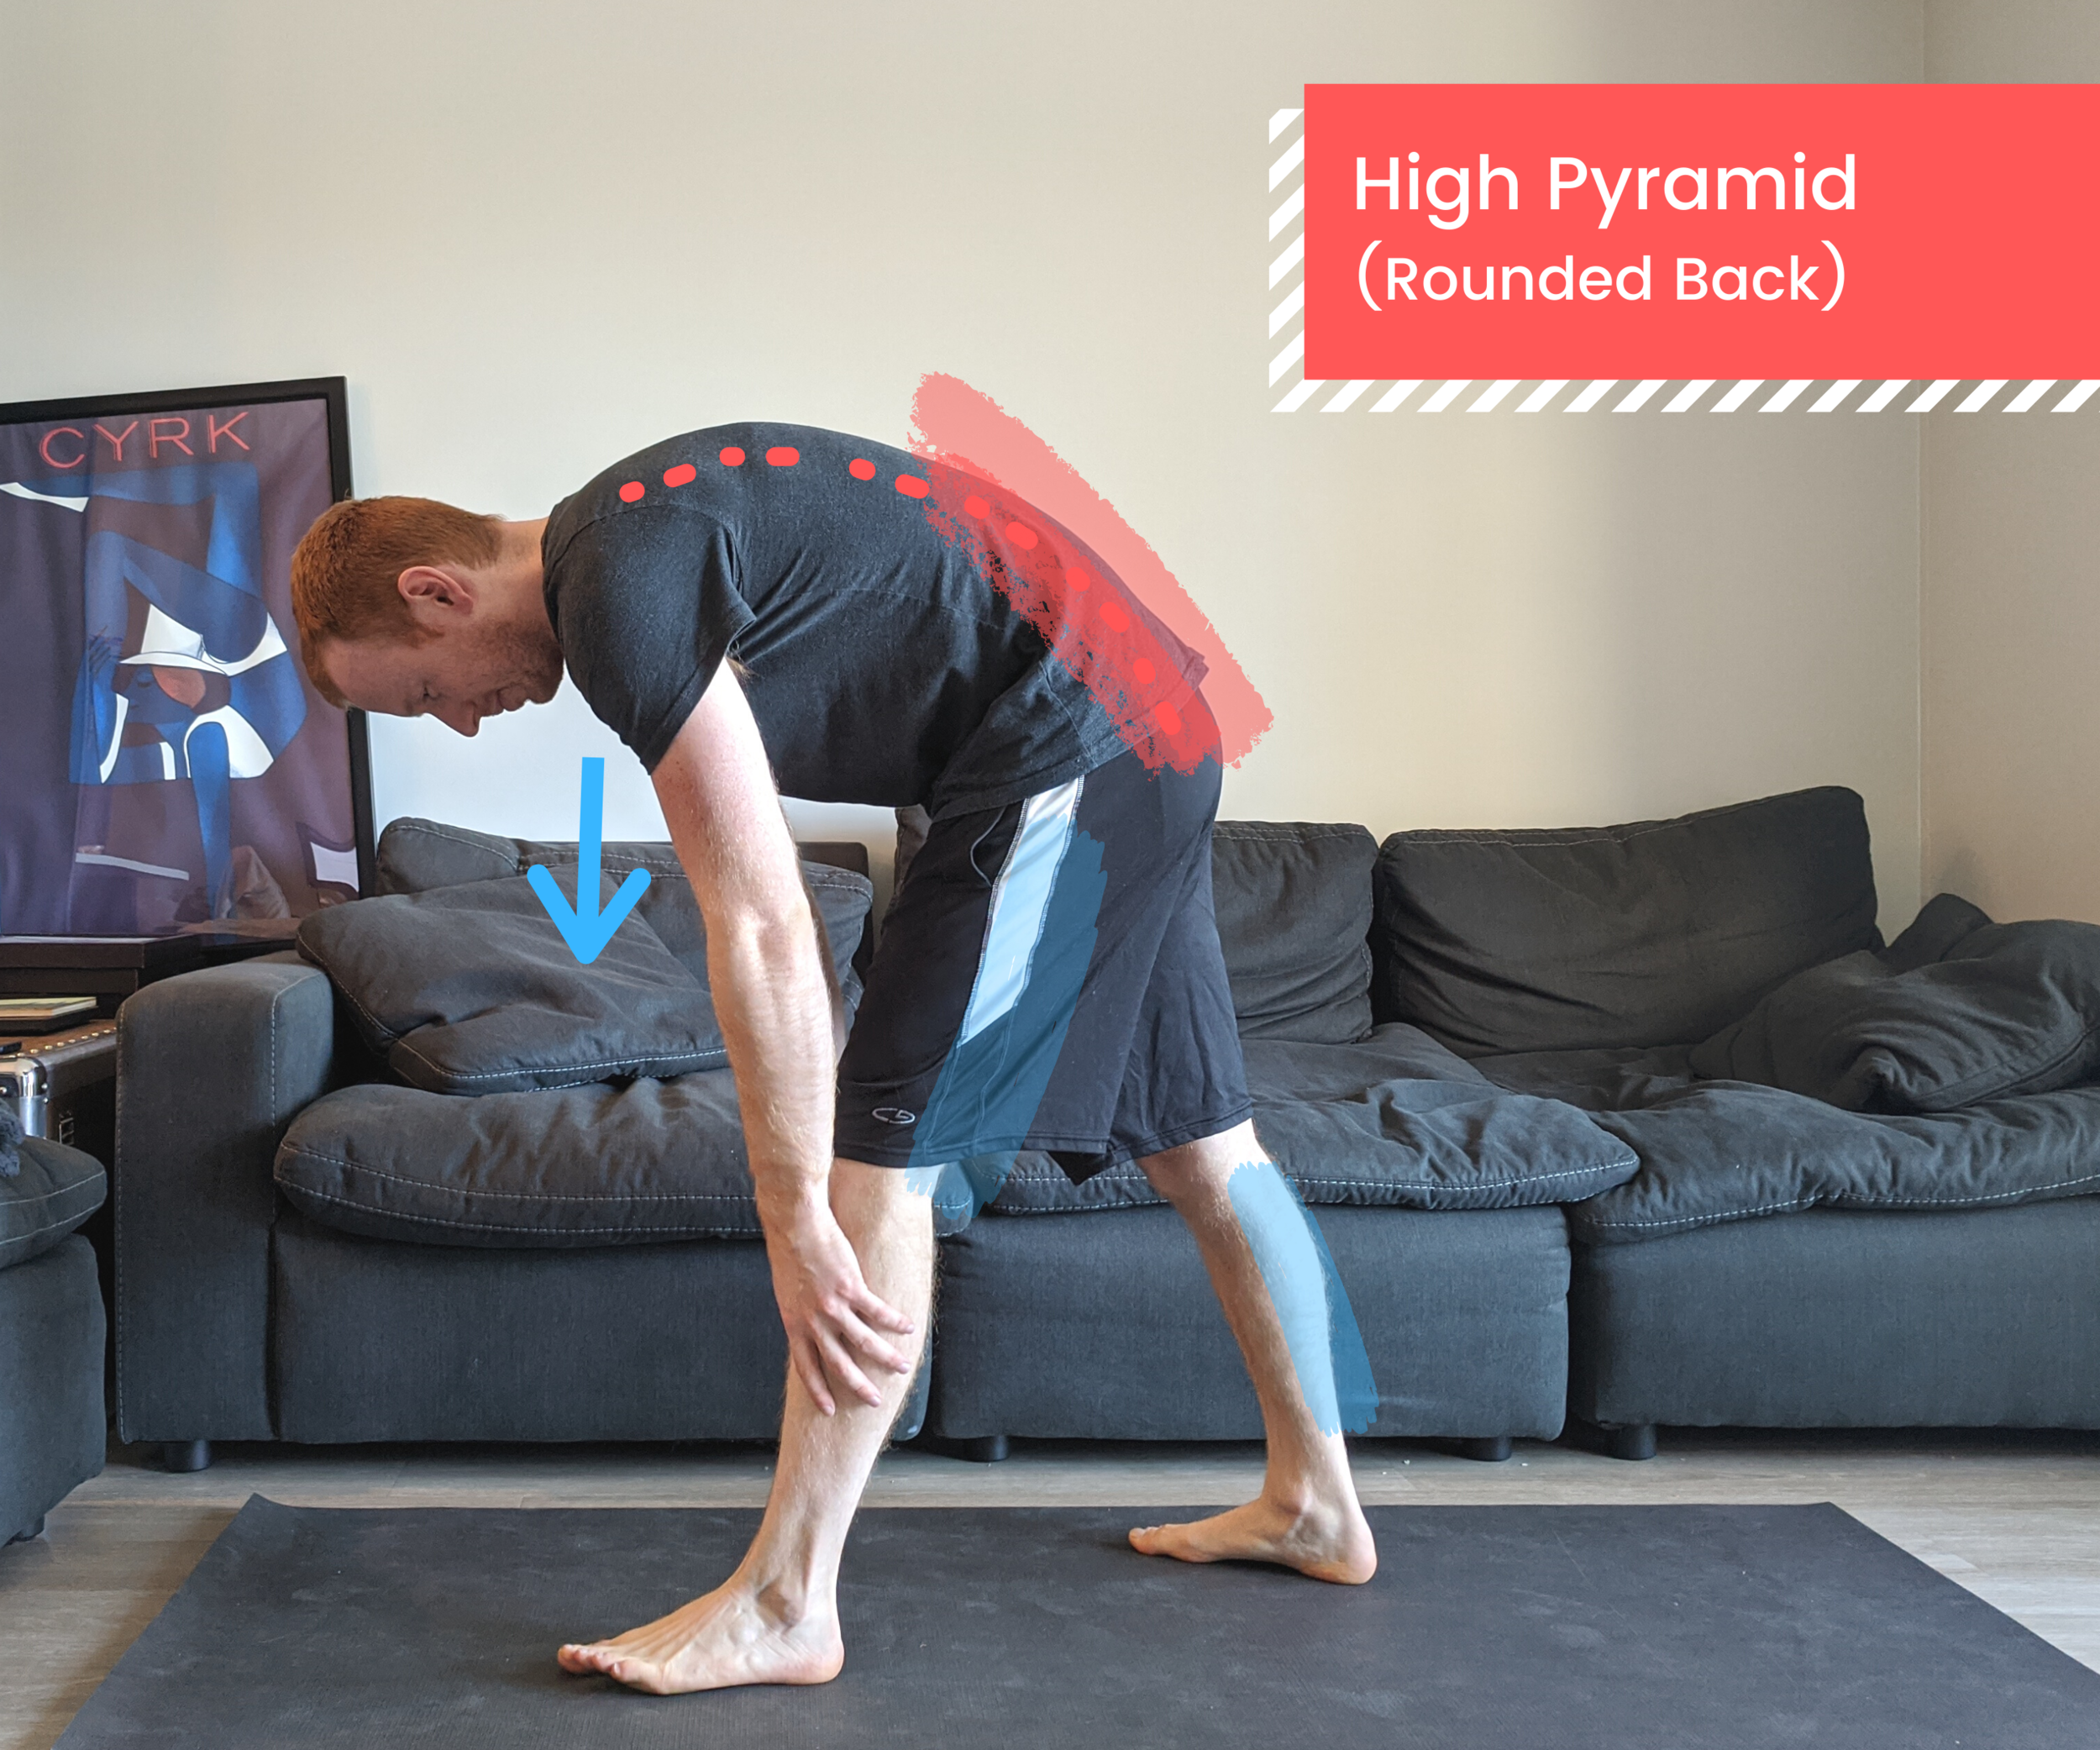
Incorrect: Letting your tailbone round down towards the floor, rounding your back, reaching forwards with hands trying to “go lower”
Now that you’ve done some of the lying down poses and practiced your “pelvis awareness,” it’s time to move on to some upright poses. Remember - it’s all about feeling the stretch in the back of your leg, not just trying to lean forwards as far as you can!
Stand with your feet staggered, the back heel 2-3 feet behind the front heel, and feet hip-width apart (so heels are not directly in line with one another like you’re on a balance beam). Let your back toes point out around 45-60 degrees to help with balance
Check in with your hips, make sure both hip bones are parallel to the front of your mat (both hip bones pointing forwards like headlights). Adjust to pull the front hip back and push the back hip forwards if needed (it’s common for hips to twist “open” out towards the corner of your mat, we want to “close” them and make sure both are pointing towards the front)
Instead of reaching forwards with your arms to fold forwards, think about initiating this stretch from your hips
Start to lift your tailbone from pointing towards the floor up towards the back of your mat, or up the wall behind you
As your tailbone lifts behind you, your belly will start to fall forwards - let the rest of your torso start to lean, keeping a flat back
Stop once you feel a nice stretch in the back of your front leg. You may only lean forwards a couple of inches before you start to feel the stretch. You can place your hands on the front thigh for support, or bring them to your hips. With proper hip alignment (tailbone lifting behind you), there is no need to reach farther down your leg
Hold this stretch for 20-30 seconds
5. Pyramid Pose Good Mornings
This is a nice active flexibility variation to the static high pyramid pose. In this exercise, we engage (contract) the hamstring in the front leg, while it’s being stretched.
Set up in your high pyramid pose (see exercise #4 above), leaning forwards until you start to feel a stretch in your hamstring. Bring your hands to your hips
Use strong legs to push you back to standing. Intentionally try to press down through the front foot as you lift your torso back to vertical. The goal is to use your leg muscles to help your torso lift, not your low back. Your back should stay flat throughout the exercise
Repeat for 10-15 slow and controlled lifts
6. Straddle on a Block

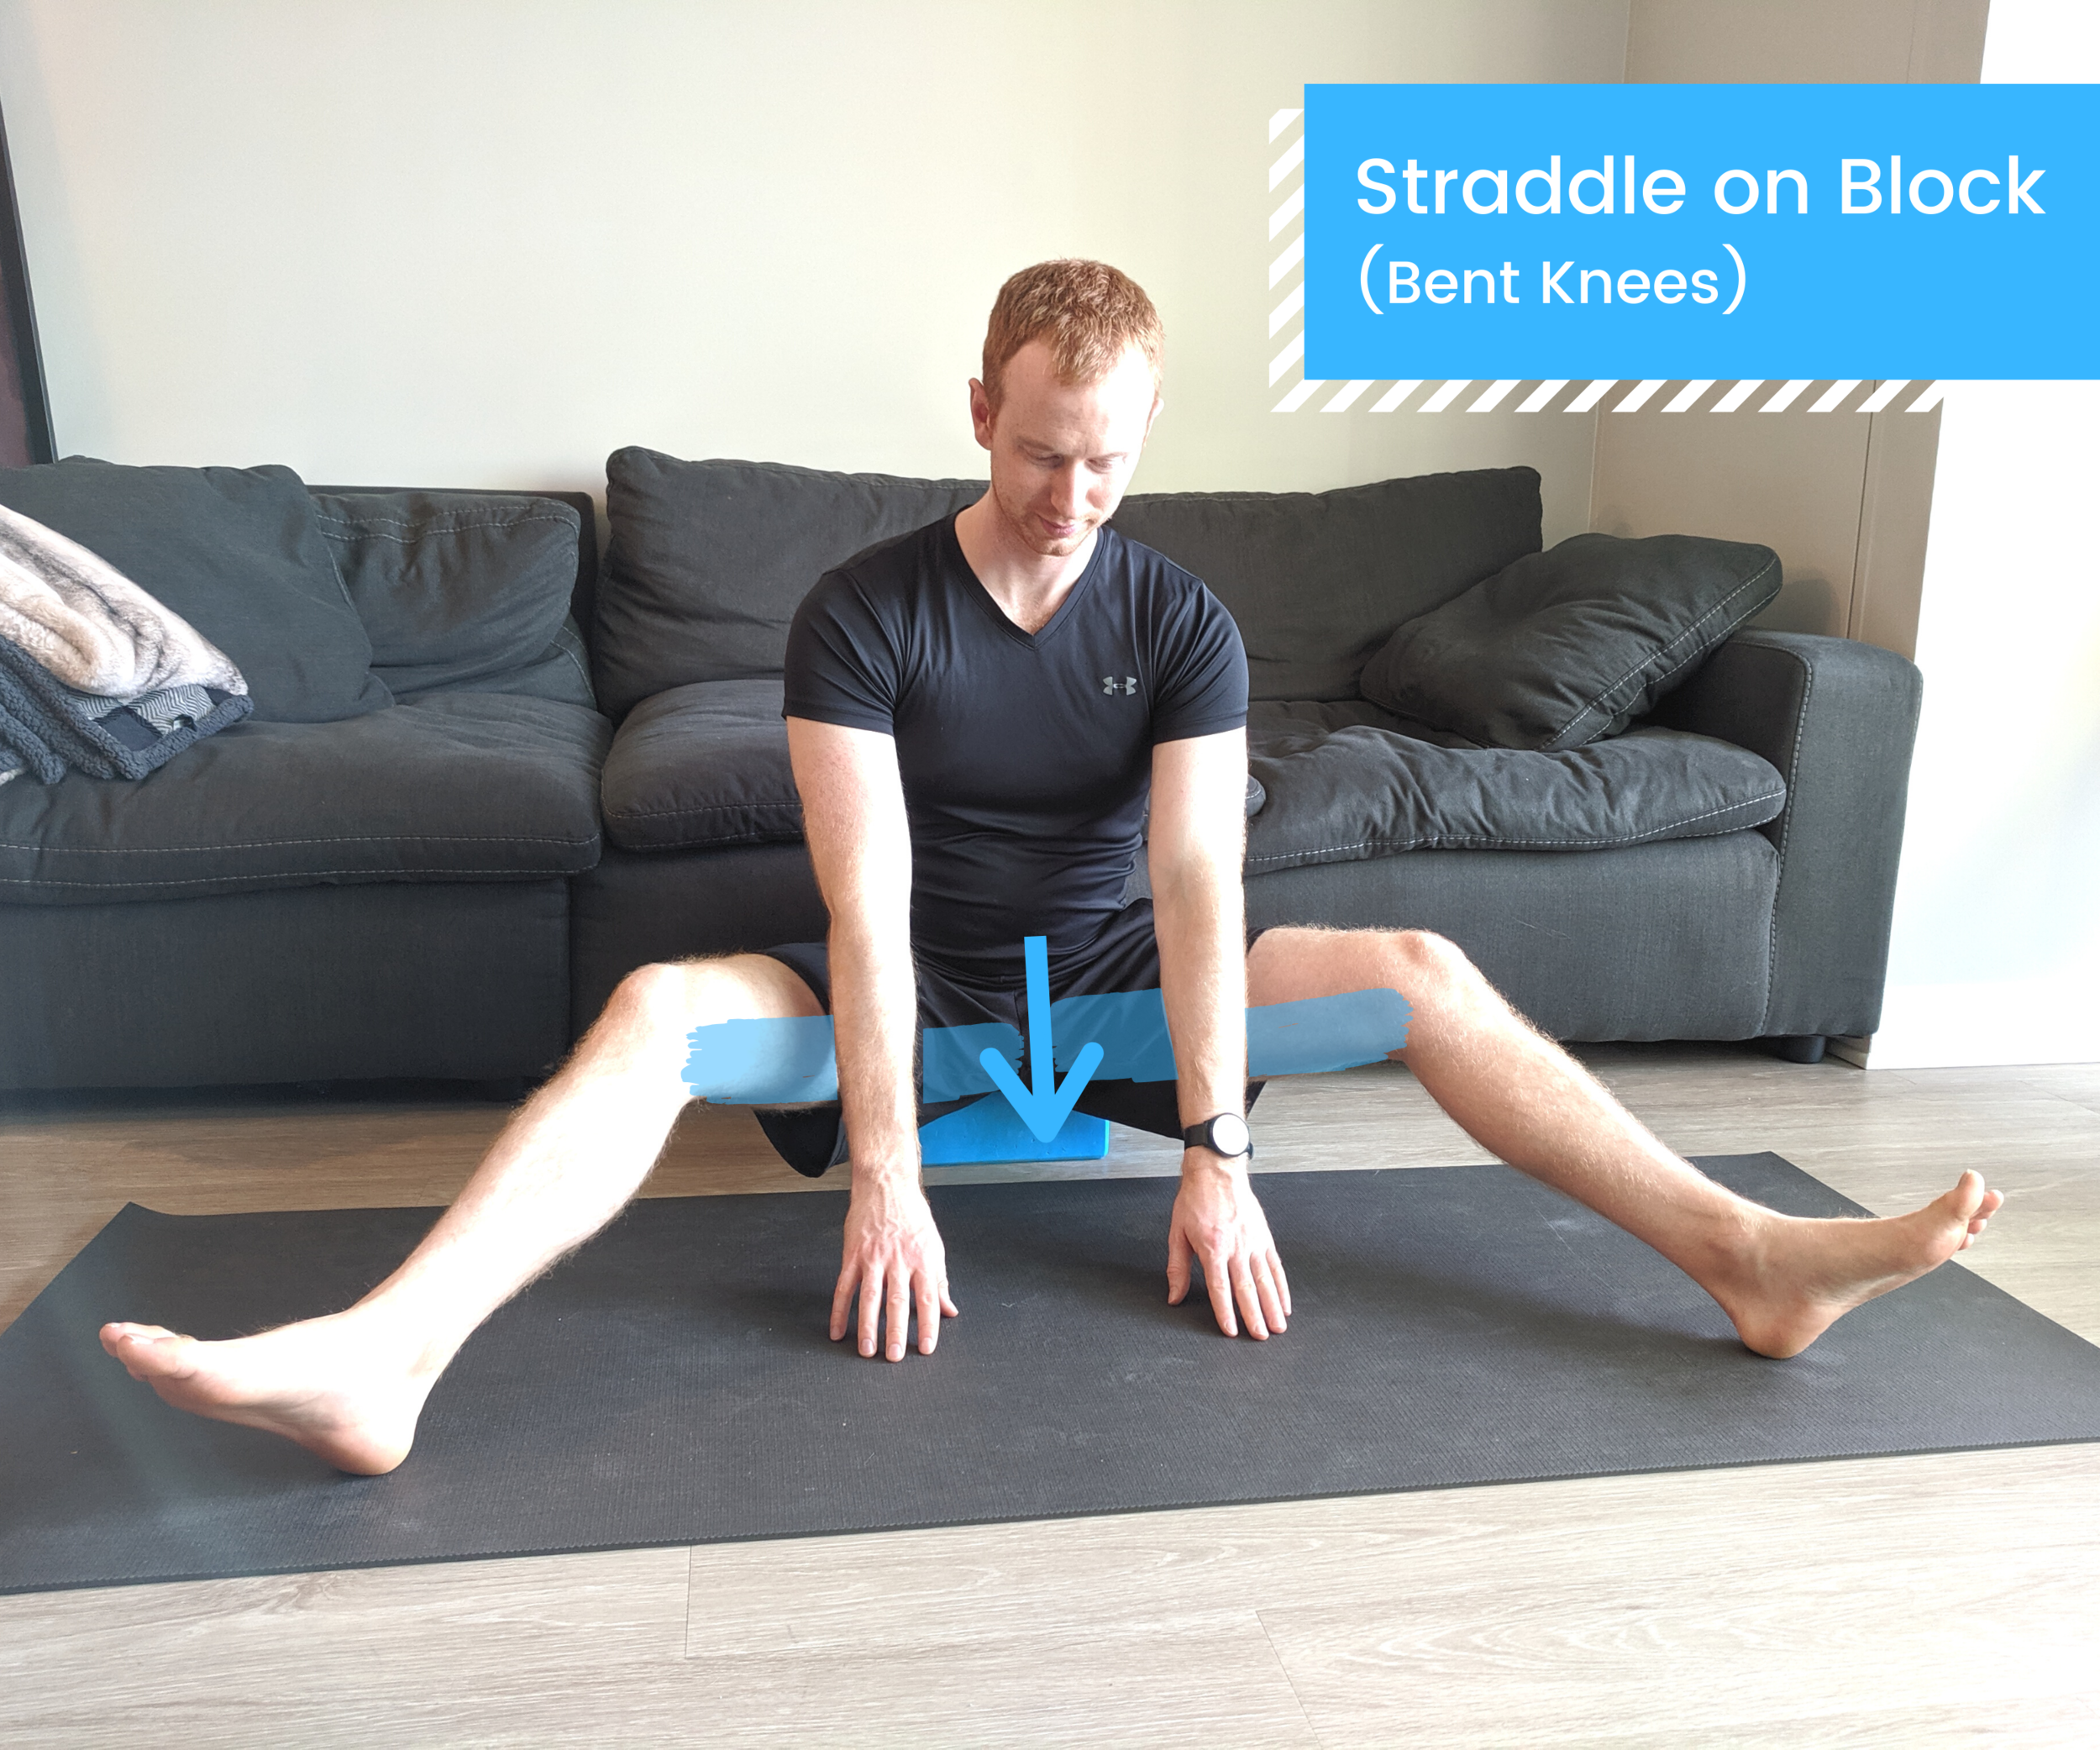

Some people are funny about not wanting to use props like yoga blocks when they stretch. But boy oh boy will they save your low back some grief!
Start sitting on a yoga block (or a pillow, or a couple of textbooks - really anything to elevate your butt a couple of inches will work), with your legs splayed out to the sides in a comfortable straddle
You can choose to do this stretch with either straight legs or bent knees, both will be able to give you a nice stretch (you may even want to try both and see if one helps you get a better stretch than the other)
Sit up nice and tall, with the crown of your head reaching to the sky, your back nice and flat and vertical, and knees pointing up to the ceiling. The goal of sitting on a yoga block (or any elevated surface) is to help you sit up straight in this position without rounding your low back
If you already feel a stretch in your hamstrings (blue shaded area above) when you sit up straight, hold there - that’s a great starting point!
If you don’t yet feel a stretch, start to lean forwards with a flat back - this is your “straddle pancake” stretch (some day you may be able to “pancake” all the way flat to the floor!)
Instead of thinking about reaching forwards with your arms (which may cause you to round your back and “cheat” the stretch), think about reaching forwards with your belly, or trying to tip the top of your pelvis forwards like a watering can
Hold this stretch for 20-30 seconds
Variation: Stretch each hamstring separately. Reach to one side (hands on either side of your thigh or knee, torso pivoting to align over that thigh) for 20-30 seconds, and then repeat on the other side.
7. Active Straddle on a Block
This is a nice active variation on your traditional straddle pancake stretch. I like to start with the passive straddle pancake first, then follow it up with this exercise.
Start in a comfortable straddle on a block (see exercise #6 above), and then walk your feet an inch or two closer together to make it a tiny bit easier
Just like above, you can do this exercise with straight legs, or keep your knees slightly bent (as Nate has in the video)
Lean forwards into your “straddle pancake” stretch. You may only need to lean a couple of inches before you feel that stretch in your hamstrings. If you feel like you can’t quite lean with a flat back, bend knees even more until you can lean (but still feel a stretch)
Once you’re leaning forwards, actively press your heels into the ground to help lift your torso back to sitting upright. Just like the active pyramid good mornings (see exercise #5 above), the goal is to use our leg muscles to help push our torso upright, not use our low back
Note: It is very possible (and easy!) to do this exercise without the leg engagement/press component. But we want to use our mind-muscle connection to recruit our hamstrings to work here, while they’re being stretched. So it’s less important how far you’re reaching forwards, and more important that you are intentionally trying to press your heels into the ground to help lift you back up - that is the action that is helping contract our hamstrings
Repeat for 10-15 slow and controlled presses
8. Down Dog with Bent Knees
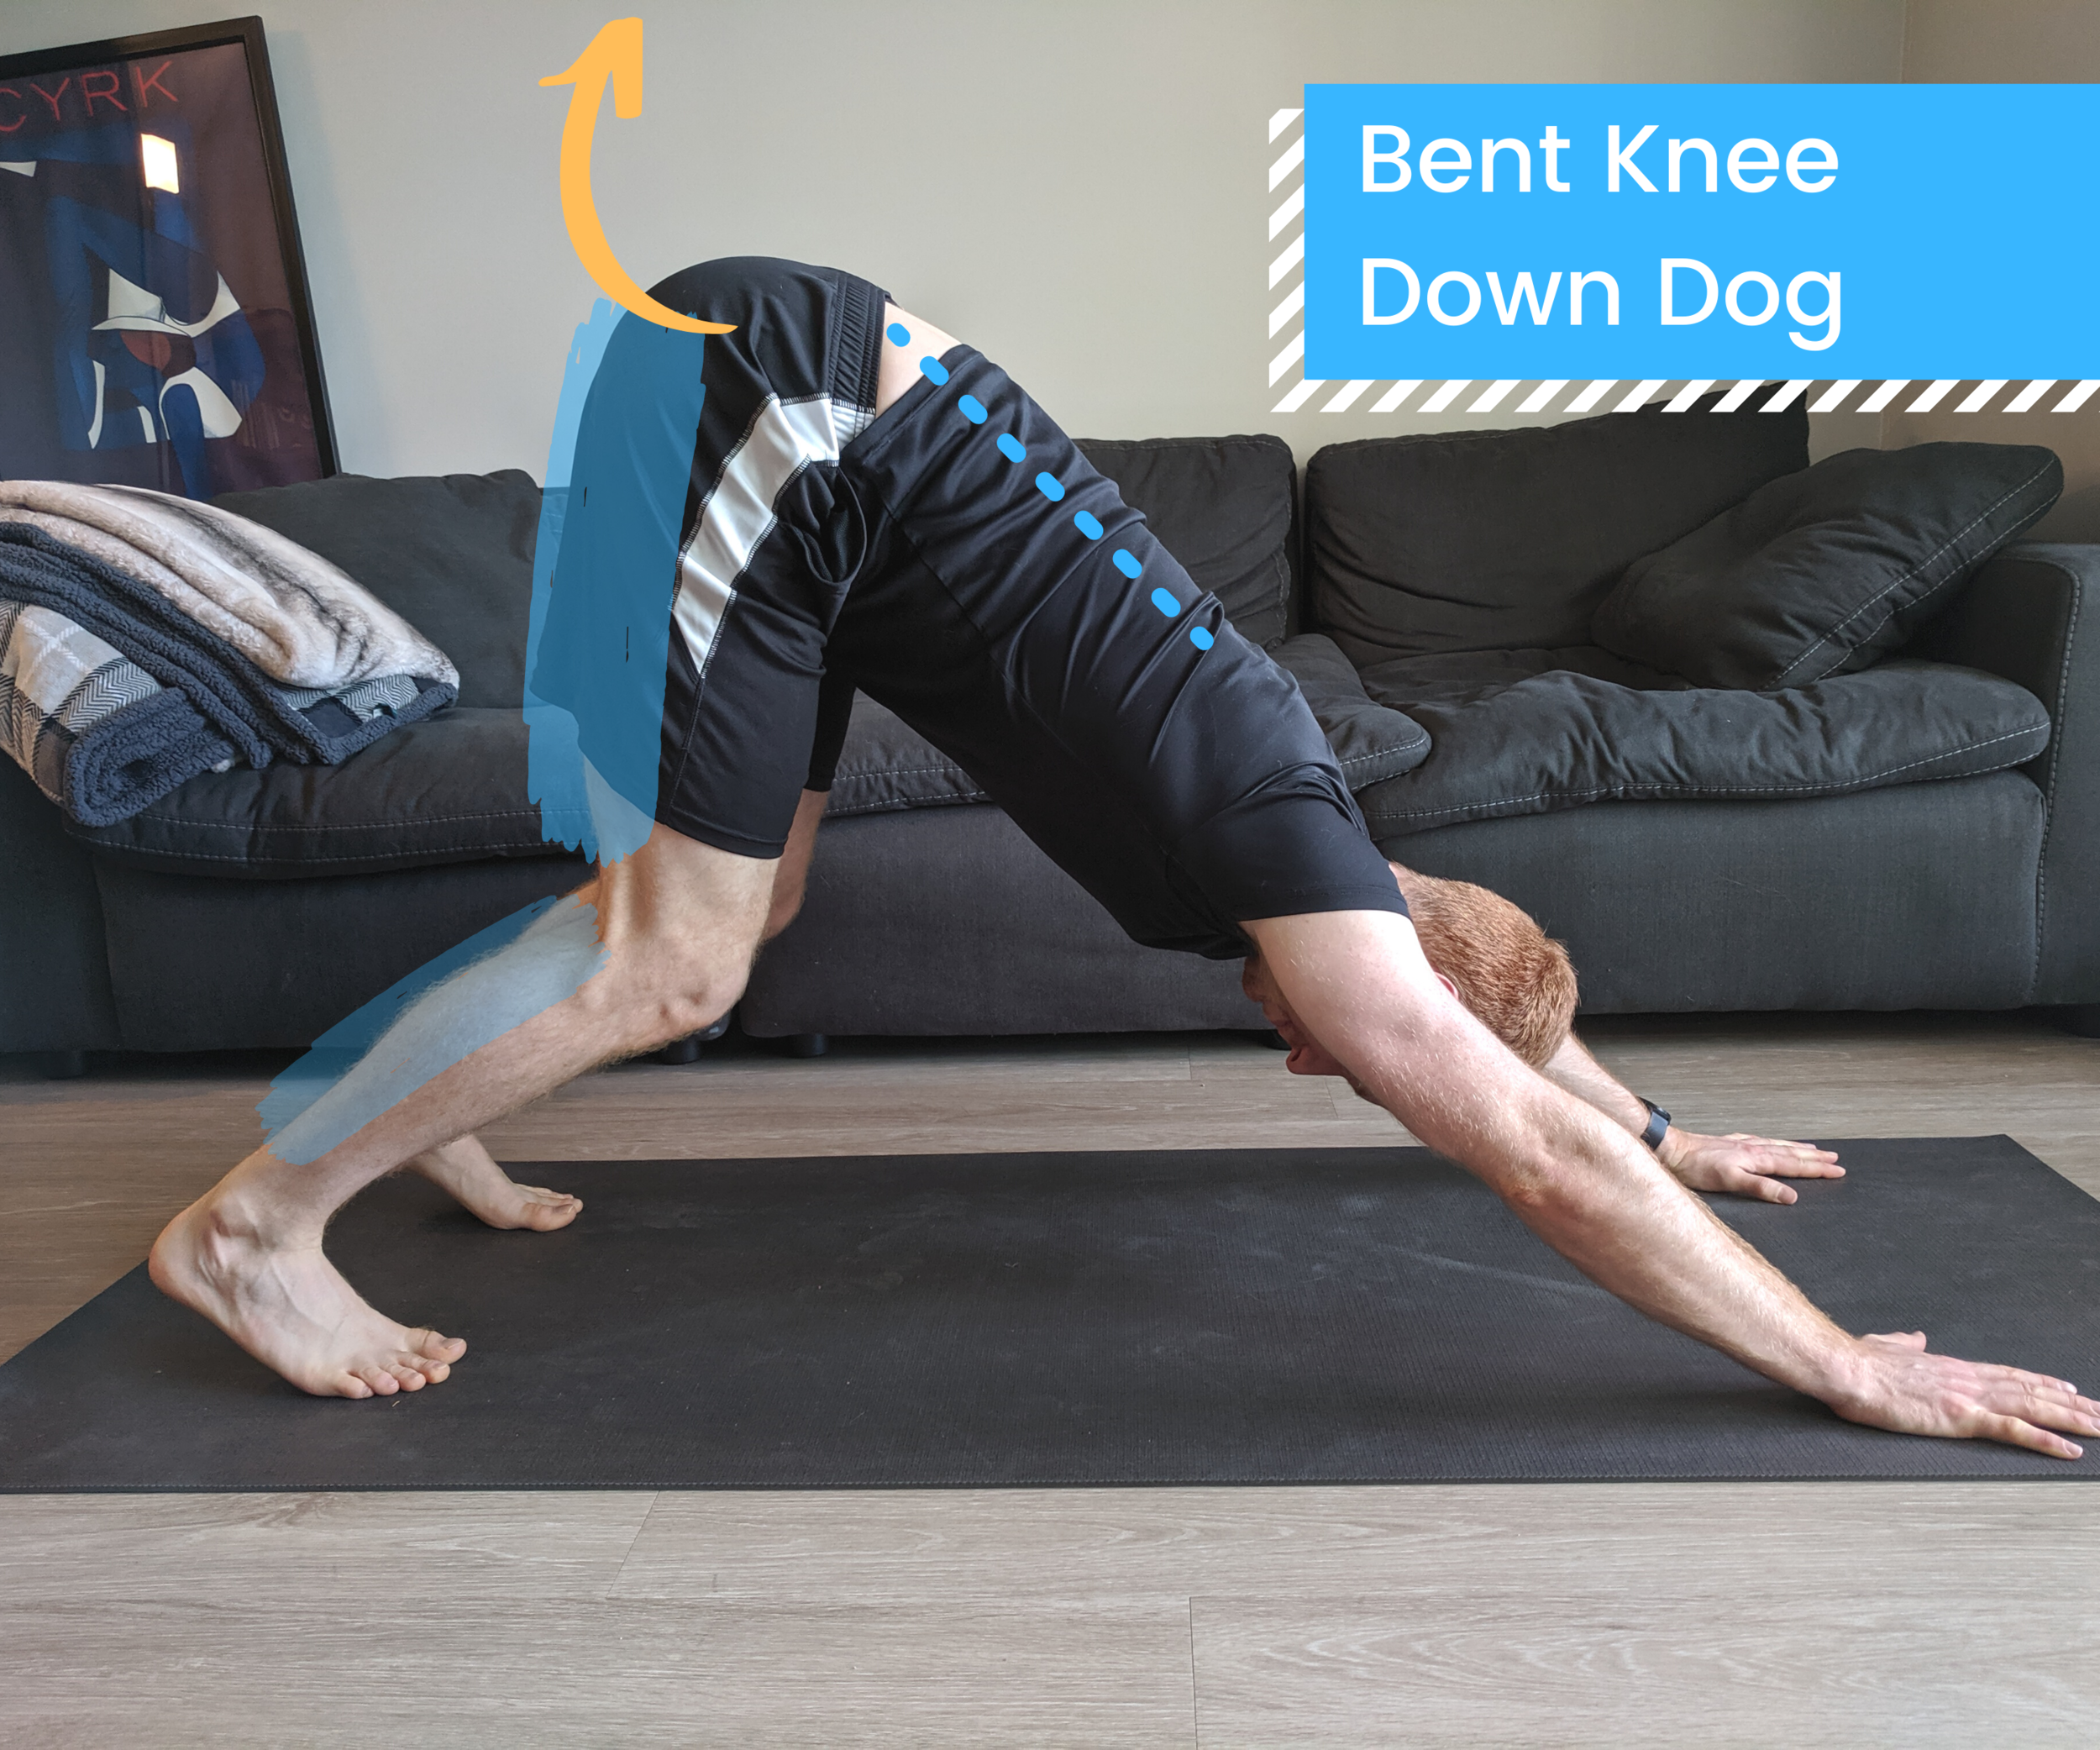


We’ll end with a classic. The yoga pose Downward Facing Dog is often recommended for people with tight hamstrings, and with good reason! Down dog is easy to modify by bending your knees, and slowly working towards more straight legs as you progress over time.
Start in a plank position, with arms straight, hands planted under your shoulders, flat back, and feet kicked back behind you with the balls of your feet on the floor (legs can be straight and knees lifted, or you can keep your knees bent on the ground). I like to start in plank because it helps me find a good distance for my hands and feet for down dog
Pushing into your palms, lift your hips towards the ceiling as you push them up and back, coming into your down dog. For a nice down dog where you feel a stretch in your hamstrings (and avoid pressure in your low back):
Forget about trying to drop your heels to the floor - that’s helpful for a deep calf stretch, but may be distracting for now
Bend your knees. Start with a “generous” bend so we have some wiggle room to adjust our pelvis
Try and lift your tailbone towards the sky (gold arrow in the first picture above) to help lift your sits bones towards the ceiling for a proper hamstring stretch. Our goal is to have a nice flat back, and not let it round (which will cause tension in your low back) - think about trying to draw a straight line from your butt through your ribs, through your shoulders, all the way down to your hands
Once you have adjusted your tailbone/pelvis, you can work towards starting to straighten your legs. It is absolutely fine to leave your legs super bent if that’s what’s helping you feel a nice hamstrings stretch
Hold for 20-30 seconds
Variation: Bend one knee, slightly straightening the other, then the other (“walking out your dog”), alternating back and forth. Or you can bend one knee, and hold there for 20-20 seconds, feeling a bit deeper stretch in the more-straight (but may not actually be straight) leg. Repeat on the other leg to even things out.
Final Stretching Tips
To get the most out of your stretching session it’s worthwhile to do some sort of warm up for 5-10 minutes before stretching. Diving straight into some deep static stretches without warming up is a recipe for a potential injury. Plus you’ll notice you’re legitimately more flexible once you’ve got your blood flowing and muscles a little more warm. If you already have an exercise routine (going for a walk, riding your bike, running, lifting weights, etc), the best time to stretch is right after your workout - not only will you be super warmed up, but you’ll help “undo” some of the tightening (contraction) work your muscles might have been doing as part of your workout.
But stretching doesn’t have to be some massive time investment. I typically recommend alternating stretch days to give your body rest in between (see a sample stretching schedule here). So working towards touching your toes could be as little as stretching for 10 minutes after your already scheduled exercise, or doing a 15-20 minute warm-up-plus-stretch-session 2-4 days a week.
Follow-Along Stretching Video
[EDIT] I’ve gotten some (accurate) feedback that the video below has some hard-to-hear audio. I suggest checking out the follow-along video from the 30 Day Toe Touch Challenge instead!
Related Content
Recommended Recorded Class:
Who this routine is for:
This 20-30 minute training routine is targeted to students who want to work on their hamstring flexibility for deeper forward folds. Modifications of drills are given for all levels - whether you’re someone who’s working to finally be able to touch their toes, or whether you’re a more advanced student trying to get their belly all the way to their thighs in a forward fold, this workshop has drills for you!
What you get:
THIS IS NOT A FOLLOW-ALONG VIDEO like the majority of my other recordings. Instead, this is a written routine that includes detailed how-to videos for each drill, as well as educational content to help you maximize your progress in your hamstring-training journey.
This PDF includes:
Flexibility training best practices
Anatomical considerations for training hamstring flexibility
How to modify the drills to make them easier or harder as your flexibility progresses (spoiler alert: bending your knees is encouraged!)
How to test to see if you have nerve tension that will impact your training (and how to adjust accordingly)
Suggestions for training frequency
A program of drills with how-to videos explaining proper form, what sensations to look for, what muscles to engage (if needed), and how to modify to adjust the difficulty/intensity for each drill. The “default” routine is meant to fit a 20-minute training session
Additional recommended drills (along with how-to videos) for another 10 minutes of training for students who want to extend their practice to a 30-minute session
A printable all-on-one-page list of drills for quick reference
Heads up: Because each of the how-to videos is filmed as an educational video with comments on form, technique, and modifications - and not as a “follow along with me” style video, the videos will likely take longer to watch than to actually execute the exercise. So plan on your first run-through of this routine to take longer than 20 minutes because you’ll likely be watching the videos in their entirety which will take a bit longer (and then just skimming through them for reminders in the future).
Recommended props:
Yoga mat (knee padding is your friend!)
Some kind of long strap - can be stretchy or stiff
2 yoga blocks
A chair or bench (very helpful for folks with tight hips)