
How to Use Neck Engagement for a Deeper Cobra Pose
How to Use Neck Engagement for a Deeper Cobra Pose
Here’s a neat comparison/quiz I posted on Instagram recently: can you guess the difference between these three cobra poses?
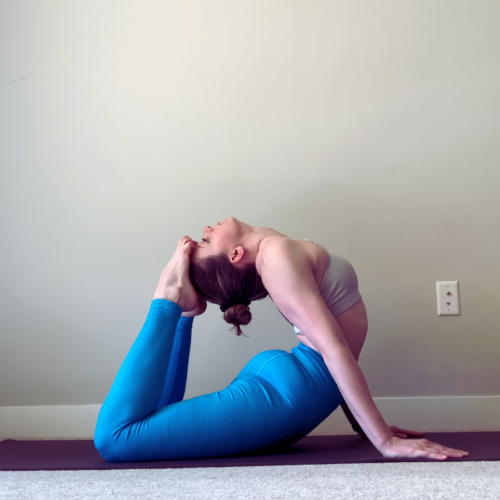
Toes to Eyebrows
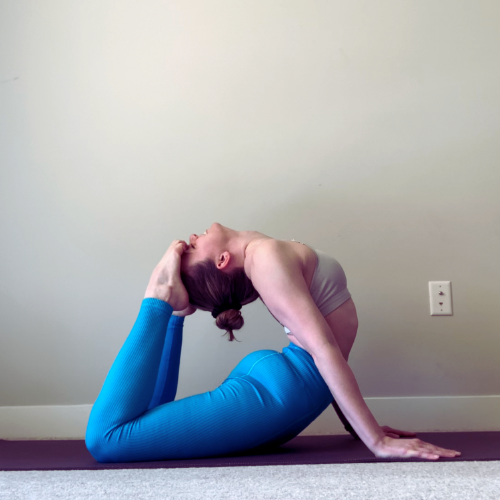
Toes to Eyes

Toes to Nose!
My hands and hips are in the same spot in all three cobras - so how is it that I was able to get my feet so much closer to my head in the last cobra?
The answer is neck engagement!
The only difference in these three poses is how I initiated the arch coming through my neck:

Starting Position: Neutral Neck
The first variation - personally, my least bendy variation (but as a contortionist, still quite bendy!) - is where I just let the head fall back “naturally,” not thinking about engaging my neck in any particular way.

Starting Position: Neutral Retraction
In the second cobra, I retracted (pulled back) my head and neck first, before letting my head fall back. Personally, I don’t find this engagement as comfortable in cobra pose and only use it in a cobra when I’m choosing it as a style/choreography choice where I want to look like I’m “unfurling” into the backbend.
Starting Position: Neutral Protraction
In the third cobra, I protracted (pushed forwards) my head and neck before letting my head fall back to arch my neck. Not only do I find this version the most comfortable, it’s also the one that allows me the greatest arch through my neck!
Note: just because these are the engagement reactions in my body doesn’t mean your body will behave the same way. Variations in your own flexibility and strength may make a different engagement a better choice/fit for your body (including the “just do what feels natural” variation - I still have many students who prefer that) - so it can be helpful to try them all and test to see what works best for you!
Give It a Try Yourself
Before diving into playing with these neck positions in a cobra (where the force of gravity on the weight of your head makes this quite intense on your neck), I suggest trying these first in a tabletop position (where the weight of your head applies less extreme pressure to your neck). Once you get the coordination for doing these in that easier position, then you can give them a go in your cobra pose.
And remember - backbending should never hurt. If you’re getting any pain, pinching, or “crunching” in your neck, that likely means you’re arching too far without proper support, so dial it back! Like our low back, we want to be especially careful when it comes to our cervical spine (neck) because of amount of force that can be too-easily applied to the joints between our vertebrae and potentially send us into a deeper backbend than our body can safely support.

The “Do Whatever Feels Natural” Neck Arch
This would be a regular ol’ “unengaged” neck arch, looking up to the ceiling without striving to do anything in particular with your neck. For many students, this is the most comfortable way to arch the neck because that is what they are used to. There’s nothing wrong with that!

The “Double Chin” or “Turtle Neck Back” Neck Arch (Retraction)
From your table top position, retract (pull back) your head and neck by trying to pull your chin back towards your neck (without dropping your forehead). Sometimes we use the analogy of “pulling your head back in your turtle shell” (but make sure this movement is backwards (or “towards the ceiling” in your tabletop) and not downwards (shrugging your head towards your shoulders). I also like the cue “pull your head back to give yourself a double chin.”
Pulling the head back in space before arching requires us to engage more of our deep neck flexors, the muscles responsible for supporting the weight of our head in a backbend. For some students, this can help give more support to their backbend and can feel more comfortable on the neck. This is also often a preferred choice for students who already have more of an exaggerated “forward head posture” in everyday life.
Special shoutout to Amy Goh who was the first instructor I learned this “chicken neck” analogy from - I use it in my classes all the time!
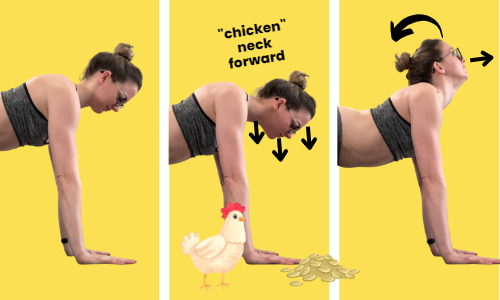
The “Chicken Neck Out” Neck Arch (Protraction)
This time, instead of pulling the head backwards towards the ceiling, reach it forwards down towards the floor - as if you were a chicken pecking some grain off of the ground. As you look up to arch, keep reaching your nose forwards-and-up to keep this length in your neck.
For many students, this helps find the feeling of “lengthening the spine” before backbending, helping us feel like we have more space to arch.
And you can use these same “options” when it comes to other backbends - as long as it feels comfortable on your neck, feel free to try these in your other backbend-y poses (like your king pigeon, your drop back from standing, cat-cow, and chin/chest stands). You might occasionally surprise yourself by finding a different one that feels better in a different pose, and that’s OK! Know that you’ve got options - these ones I’ve listed here only scratch the surface, but are a great couple to get started with to explore your own body to deepen your backbending practice.
Related Content
Recommended On-Demand Workshop

Who this workshop recording is for:
This 60-minute workshop recording will walk you through a follow-along routine to work on the hip, back, and shoulder flexibility required for King Pigeon pose. Note: this is not a yoga-style class (although you may recognize several yoga poses in many of the drills!)
Prerequisites: None. This is an “all levels” workshop and variations of drills are offered for various flexibility levels
This 60-minute, follow-along workshop covers:
A full-body warm up to prepare hips, back and shoulders
Active flexibility exercises to strengthen and stretch:
Back extension (arching through the back)
Shoulder flexion (overhead shoulder reach)
Shoulder rotation to work towards being able to grab your foot and “flip your grip” (don’t worry - variations of drills are shown with a strap for folks with stiffer shoulders)
Hip extension (stretching the front of the back leg hip in pigeon to be able to sink the hips lower and bend the back knee)
Hip external rotation (stretching the glutes of the front leg for a more comfortable Pigeon)
Suggested props:
Yoga blocks (or something to support your hands/hips as needed - practicing near a chair or the wall is often helpful if you don’t have blocks for your hands, and a pillow can be used to support your hips if you need a bolster for some of the exercises)
A long strap - it can be stretchy like a Theraband or stiff like a yoga strap. A scarf or even pair of pants can be used as a “strap” if needed
Upon checkout, you will receive a PDF with a link to the workshop recording (Squarespace limits file upload sizes so I can’t actually upload the whole recording here). The recording is for your personal use only, not to be shared with others - thank you!