
Working Towards King Pigeon Pose (Eka Pada Rajakapotasana)
Working Towards King Pigeon Pose (Eka Pada Rajakapotasana)
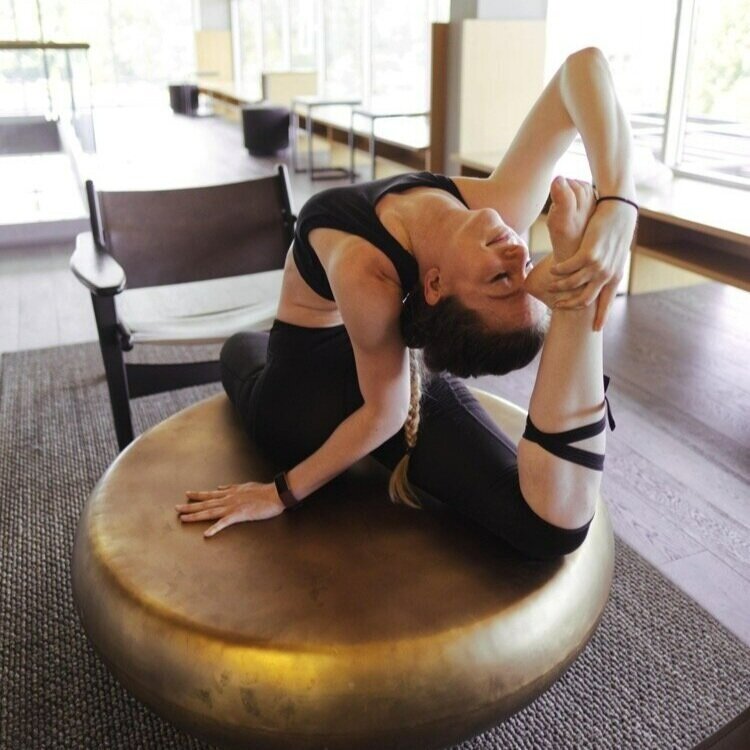
Being able to touch your foot to your head in Pigeon pose (aka King Pigeon, or Eka Pada Rajakapotasana for you yogis) is a great goal for intermediate and advanced students who are interested in working their full body flexibility because it really does require your full body. A strong and bendy King Pigeon pose requires a great deal of:
Hip flexibility - both external hip rotation in the front leg, and hip flexor flexibility in the back leg
Quad flexibility
Back flexibility
Core strength (can’t have back flexibility and balance without it!)
Shoulder flexibility
Neck flexibility
Also obviously it looks pretty damn cool, which is also a totally appropriate reason to want to be able to do a pose. Below are some suggested variations and drills to help your progress towards a backbend-ier Pigeon.
How to Build Up To King Pigeon Pose
0. Make Sure You Have a Comfortable Pigeon Pose
The hopefully obvious disclaimer: King Pigeon is an advanced pose that requires a lot of pre-existing flexibility and strength - it is not a beginner-friendly pose. If you do not already have a comfortable seated Pigeon pose, I really wouldn’t recommend trying to add any backbending to your Pigeon. Work on your foudnational hip flexibility first for “regular” Pigeon, and then once that’s feeling more achievable, you can start working towards the fancier King Pigeon. And as always, remember flexibility is a process!
1. Nix the Deep Glute Stretch (Front Leg)
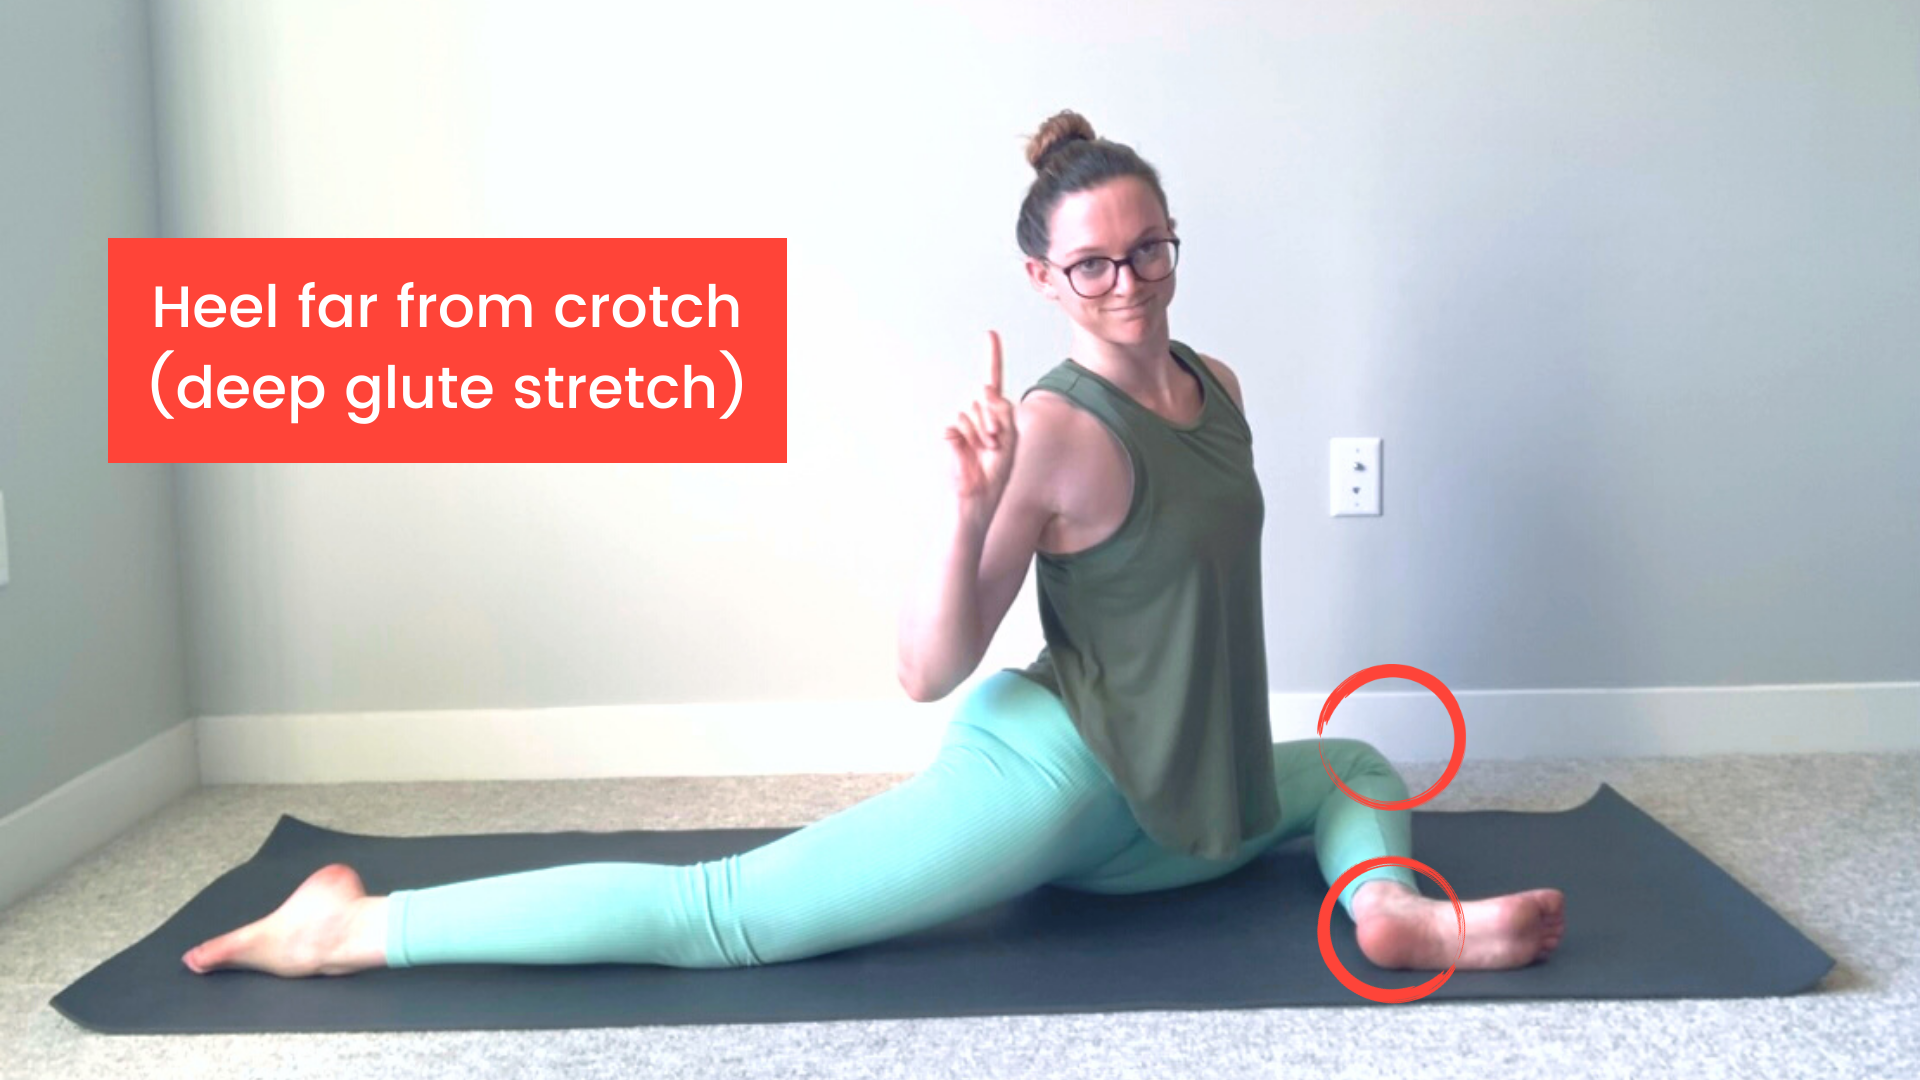

No need to make this pose harder than it needs to be - go ahead and keep your front foot tucked in towards your groin, knee reaching towards the front of your mat. This will take some of the stretch out of your front-leg glutes and lessen the external rotation in that leg, making adding a backbend a bit easier.
Later down the line once you’ve got more back flexibility and a comfier backbend, by all means go back to adding in your more glute-intensive variation, trying to slide your foot farther from your midline towards the outside of your mat.
2. Work on Your Quads & Hip Flexors (Back Leg)
Backbending flexibility requires more than just your back - flexibility in your hip flexors (front of your hip) can help your back extend even more without feeling like you’re just smooshing all your lower vertebrae together. And a little extra flexibility in your quads can also help continue that backbend shape down your leg to help pull your foot towards your head.
I like to work on my hip flexors and quads before I start adding in backbends in my practice because it will help avoid compressing your low back when you start adding the backbend variations, and make all the foot-to-head variations a bit easier. Some of my favorite exercises and poses for this are:
Pulling Heel to Butt
Start in a comfortable seated Pigeon pose (torso upright, not leaning forwards), then bend your back knee, reach back and try to grab your back foot to pull towards your butt. If you can’t quite reach your foot, you can loop a strap around your ankle and pull on the strap. If you are on the bendier end of the spectrum and can comfortably get your foot to your butt, you can bring your foot to the outside of your hip, and work on gently smooshing your heel towards the floor for a deeper stretch. Hold this passive stretch (you should be feeling it mostly in your quads, possibly also your hip flexors) for 20-30 seconds.
Ideally you would do this stretch with your torso angled forwards (which will help keep your hips square and give you a deeper stretch in your hip flexors), but if you feel more comfortable letting your torso twist (opening your chest towards the side like Mermaid), that’ll still give you a solid quad stretch.
Contract-Relax
Time to turn that passive stretch above into an active stretch! Starting in the “heel to butt” stretch above, either pulling on your strap or your ankle to find your passive quad stretch - start resisting by trying to kick that your foot back to the floor behind you, but without actually letting your leg/foot move. The idea is you’re starting with your quads in a stretched position, then by trying to kick your foot back you are engaging/contracting your quads while they’re in that stretch - but you’re not letting them actually shorten because you’re holding your leg in the same position (a quad-lengthened position). Hold that tension for 10 seconds, then relax in your stretch for 20 seconds. When you relax, try not to “let go” of the stretch - by relax I mean “relax your muscles and stop trying to kick your foot to the floor to make it harder.” Instead try to at least maintain the stretch, or if it’s feeling easier once you’ve relaxed your muscles, try and pull that foot in a little closer to your butt. Repeat 2 more times.
So the total minute-and-a-half sequence you’ll go through while you’re in your quad stretch would be: 10s resist, 20s relax, 10s resist, 20s relax, 10s resist, 20s relax.
Butt Kicks
This is another great active flexibility drill for your hip flexors and quads. Unlike the drill above where you’re contracting/engaging your quads, in this one you’ll be contracting your hamstrings (which will help your quads relax). Note: The more upright you sit in this drill, the more your hip flexors will also get a stretch (in addition to your quads). If you need to lean forward to make it easier, that’ll still let you work your hamstring strength & quad flexibility, but hip flexors won’t get the same love.
Start in a comfortable seated Pigeon with your hands on the floor (or on blocks) by your sides for balance. Bend your back knee and try to squeeze your back heel towards your butt, nice and slow and controlled. If you feel your hips start to lift away from the floor, squeeze your back-leg glutes to keep them pressed low. Repeat for 8-12 (slow) butt kicks. Bonus points if you hold the last heel-towards-butt kick/squeeze for 10 seconds (only recommended if you really want to feel the burn).
Hard, right? This exercise should feel surprisingly “squeeze-y” :) To make sure you’re getting a hip flexor stretch in addition to your quads, make sure you’re lifting your foot straight up to the ceiling, then squeezing it into your butt (as opposed to letting your foot slash across at a diagonal). This requires you to keep your back-leg thigh in a neutral position on the floor, and not let those hips turn out or the back leg externally rotate (which takes some of the stretch away from pesky hip flexors). If it feels insanely hard to lift your foot straight up (and not let it drift to the side), you can throw a yoga block under your front leg hip, which will help you keep that back thigh turned under towards the floor.
Foot Up the Wall
If you’ve got enough quad flexibility, try your seated Pigeon with your back knee bent, shin and foot pointing up the wall. Make sure your shin is perpendicular to the floor (toes pointing straight up to the ceiling) and not angling out to the side - this would indicate your hips aren’t square and you won’t get as good of a stretch.
If that doesn’t feel like much of a stretch, you can make it a more intense passive quad stretch by putting a block between your foot and the wall, or a more intense hip flexor stretch by putting a block under your back knee (only if that feels OK on your lower back - that might be a bit intense on less backbend-y folks).
You can also try your “butt kicks” from this position, which will specifically focus on your end range of active flexibility. Feel the squeeze!
3. Work on Your Back Flexibility
If you want a backbend-y King Pigeon, you’ll need to work on your back & shoulder flexibility outside of Pigeon pose as well, working on foundational active back flexibility exercises like back extensions, active cobra poses, etc.
Once you’ve got a bit of that back flexibility, you can start applying it to your Pigeon pose with some supported (and some more muscle-y, unsupported) variations:
Hand-Supported Pigeon Backbend
Start in your comfortable, seated Pigeon pose, with hands either on the floor beside your hips, or on blocks if they don’t quite reach the floor. Suck your belly button in towards your spine to engage your abs (always Step #1 when backbending!), then start walking your hands/blocks back behind your hips, as you start opening your chest towards the ceiling for a gentle backbend. Keep weight in your hands - they are there for support so not all your weight smooshes into your low back. If it feels OK on your neck, you can relax your neck and let your head fall back - otherwise it’s fine to keep looking towards the ceiling or forwards. Hold your hand-supported backbend for 10-20 seconds (don’t forget to breathe!), then return back to your regular ol’ upright seated pigeon, or take a counter-stretch by forward folding over your front leg for a couple of breaths.
Pigeon Reach-Backs
This is a more “active” (muscles engaged) variation of the exercise above, and is a great drill to get your abs conditioned to supporting you while you backbend.
Start in a comfortable seated Pigeon. If your hips/butt are not flat on the ground, throw a yoga block under your front-leg hip to make balancing easier. Reach both arms up overhead, arms straight, thumbs pointing behind you. Then engage your abs (suck your belly button in toward your spine) and start to slowly arch back by reaching your arms back, bringing a slight bend into your back. Keep breathing & pulling your belly button in the whole time. Only lean back as far as you feel you have the strength to then lift your torso back to your flat-back starting point (arms back up overhead). Repeat for 5-12 reach-backs.
4. Work on Your Shoulder Flexibility (Ye Olde Foot Grab)
Being able to grab your foot in Pigeon requires a lot of shoulder flexibility (and mobility - since you have to rotate your shoulder to “flip your grip”) - but lucky for you the shoulder flexibility you need to work on for King Pigeon will also help you in a slew of other poses, like bridges (aka Wheel), forearm stands (aka Pincha), handstands, and more.
Just like for back flexibility, you should be working on your shoulder flexibility and strength outside of your Pigeon pose, working on foundational skills like shoulder rotations, arm extensions, puppy pose (especially with bent elbows), and dolphin push ups.
To work on your shoulder flexibility in pigeon pose, I like to work my shoulders with a strap (even if I can grab my foot), because it allows for playing with a bigger range of motion, and it’s easier to focus on the shoulders without also backbending a bunch at the same time.
One Arm and Two Arm Pull-Backs
Start in a seated Pigeon with a strap lassoed around your back-leg ankle. Bend your back knee, and grab the strap with the same-side arm as the back-leg, pulling the strap up over your shoulder like a sack of potatoes. Your elbow should pointing forwards (as opposed to flaring out to the side).
Start reaching your bent-arm hand up towards the ceiling until your elbow is bent about 90 degrees. Keep squeezing that elbow in towards your midline so your elbow stays pointing forwards and don’t let it drift out to the side. If this already feels like an intense lat/shoulder stretch, hang out here and breathe. If you want to go deeper, keeping your elbow pointing forwards, start kicking your back-leg foot back down to the floor, which will pull your top arm back into a deeper shoulder stretch. Keep your core engaged and try to avoid arching your back here, that way you can ensure the stretch is being pulled into your shoulder and you’re not compensating by backbending. Hold for 10-20 seconds, then repeat with the other arm (the opposite side arm as the back-leg).
To make this harder, reach your hand farther down your strap closer to your foot.
If that first exercise felt relatively easy, you can try grabbing the strap with both hands at once to stretch both shoulders at the same time and work on your balance. Just be sure to keep your elbows squeezing towards each other - the natural inclination is for your elbows to start to splay out to the sides as you pull your arms back (because that’s easier for your shoulders and lats) - so you’ll want to try to keep squeezing them in to keep them shoulder-width apart the whole time.
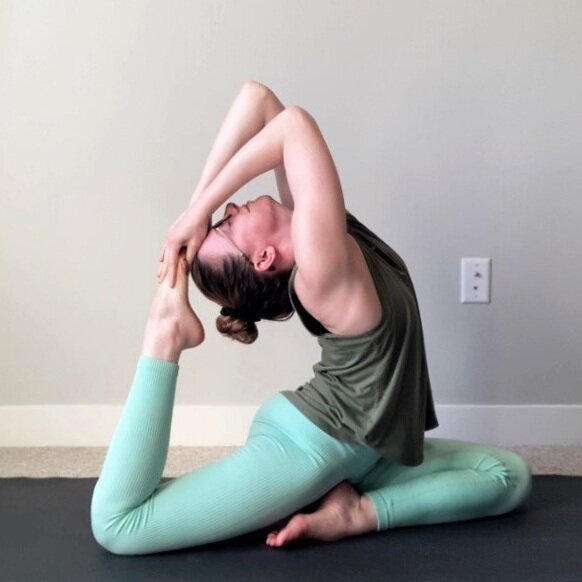
The Coveted Foot Grab & Flip Grip
If you have the shoulder mobility and flexibility, you can try to grab your foot and “flip your grip.” (Spoiler alert: you can also use your strap).
In your seated pigeon pose, bend your back knee and kick your back foot in toward tour butt. Reach the same-side arm as your back-leg back to grab the outside edge of your foot (flexing your foot will make this a little less awkward), with your thumb on the bottom of your foot and fingers on the top of your foot. Keep holding your foot and try to lift your elbow up towards the ceiling, letting your shoulder rotate until your elbow is pointing up. Congrats - you have flipped you grip! If balance is feeling friendly, you can reach your other arm back and try to grab your foot as well so both hands are holding on to your back foot in the air.
Did you give that a try and it was a massive failure? Never fear - you can totally use your strap to work on that sweet sweet shoulder rotation (and eventually as you get more flexible, some day you can try the no-strap foot grab). Start with a strap lassoed around your back ankle, banding your back knee to lift your back foot. Reach back to grab the strap with the same-side arm as your back-leg - in this starting “grab” your elbow will be bent towards the floor. Once you’ve grabbed your strap, start to lift your elbow up towards the ceiling, which will externally rotate your shoulder and bring you back into that bent arm pull-back prep position. Repeat a couple of times to get used to the rotation. If this feels impossible, grab your strap farther from your foot (make it longer) - you may need a very long strap for this exercise! As it gets easier, you can reach your hand closer to your foot and work on a closer-to-the-foot-grip rotation.
5. Put it All Together: Try it at the Wall
Time to put it all together to bust out your pimpest Pigeon pose yet!
Start in your seated Pigeon pose, with your back knee at the wall and your shin and foot pointing up the wall. Add your hand-supported backbend by placing your hands on the floor (or blocks), sucking your belly button in, and walking your hands back behind your hips as you start to let your back arch and chest open, head starting to fall towards your foot on the wall. Bonus points if you add your active hamstring engagement and try to squeeze your heel towards your head! If this feels crazy hard, you can make it easier on your quads by sliding your whole body a couple of inches away from the wall, so just your toes are resting on the wall, instead of your entire shin and foot.
If you want to add in the shoulder flexibility and work toward your foot grab, start in the same position (Pigeon pose with your foot pointing up the wall), reach both arms up overhead, thumbs pointing towards the wall behind you. Engage your abs (pull your belly button in toward your spine) then start to lean back, reaching your hands to the wall. If you can reach your hands to the wall, you can bend your elbows and start walking your hands down the wall toward your foot, making sure you are still breathing and keeping your abs engaged the whole time. If your hands can’t reach the wall, you can hold two yoga blocks in your hands so you can reach the wall with blocks. With hands on the wall (or blocks on the wall), you can try to add in your butt kicks, squeezing your hamstring to pull your foot a little closer to your head. If your hands are really low, you can even try grabbing your foot!
6. Assess and Adjust
Once you’ve tried all those variations (and maybe flopped around a bit in the process, especially if you tried any of the two-handed exercises that require a bit more balance), you can start to assess: Which of those felt hard? Which felt easy? And then tailor your flexibility practice to add in a little more focus on the areas you felt the most challenging: quads, hip flexors, low back, shoulder flexbility, and/or shoulder rotation.
Related Content
Recommended On-Demand Workshop

Who this workshop recording is for:
This 60-minute workshop recording will walk you through a follow-along routine to work on the hip, back, and shoulder flexibility required for King Pigeon pose. Note: this is not a yoga-style class (although you may recognize several yoga poses in many of the drills!)
Prerequisites: None. This is an “all levels” workshop and variations of drills are offered for various flexibility levels
This 60-minute, follow-along workshop covers:
A full-body warm up to prepare hips, back and shoulders
Active flexibility exercises to strengthen and stretch:
Back extension (arching through the back)
Shoulder flexion (overhead shoulder reach)
Shoulder rotation to work towards being able to grab your foot and “flip your grip” (don’t worry - variations of drills are shown with a strap for folks with stiffer shoulders)
Hip extension (stretching the front of the back leg hip in pigeon to be able to sink the hips lower and bend the back knee)
Hip external rotation (stretching the glutes of the front leg for a more comfortable Pigeon)
Suggested props:
Yoga blocks (or something to support your hands/hips as needed - practicing near a chair or the wall is often helpful if you don’t have blocks for your hands, and a pillow can be used to support your hips if you need a bolster for some of the exercises)
A long strap - it can be stretchy like a Theraband or stiff like a yoga strap. A scarf or even pair of pants can be used as a “strap” if needed
Upon checkout, you will receive a PDF with a link to the workshop recording (Squarespace limits file upload sizes so I can’t actually upload the whole recording here). The recording is for your personal use only, not to be shared with others - thank you!