
The Importance of “External Shoulder Rotation” in a Backbend
The Importance of “External Shoulder Rotation” in a Backbend

Shoulders can be a confusing body part (or even body parts depending on how you want to define it!) - there’s a lot of different ranges of motion they can move. That’s why it’s so important to condition them and make sure they’re strong to support the multiple ranges of motion your movement discipline requires.
With backbending and overall back flexibility for things like bridges (aka full wheel), forearm stands, or handstands, a common shoulder position to drill and strengthen is our external shoulder rotation:


Why We Should Care About Shoulder Rotation in Our Backbends
There are a couple of reasons why “external rotation” is so critical for these backbends:
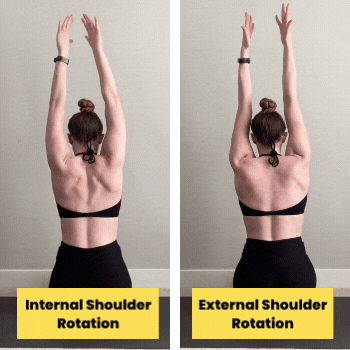
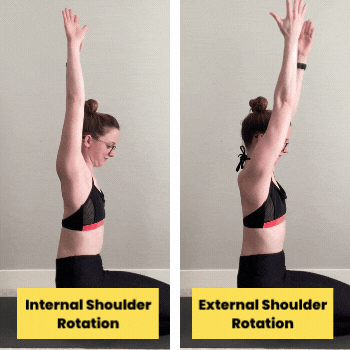
1. Externally rotating your shoulders when arms are overhead slides your shoulder blades away from your spine, towards the sides of your ribs, giving your back more room to bend. Compare this to letting your shoulders internally rotate, which smooshes your shoulder blades together towards your spine, which makes a solid wall of bone on your upper back that sure as hell isn’t going to bend! You can see in the GIFs below how much farther I’m able to arch when my shoulders are externally rotated:
2. External rotation helps with balance and shoulder stability - by both helping better engage your shoulders muscles (infraspinatus and teres minor rotator) to control your shoulder position, or in the case of a forearm stand, helping create a longer “base” for your balance:


Unfortunately, thinking about external shoulder rotation in the traditional anatomical (standing up, arms by your sides, palms facing forwards) sense doesn’t intuitively translate into what we mean when we talk about common flexibility poses when arms are in a different position and “internal” no longer necessarily means “toward your midline.” So let’s take a look at some common poses and what proper external shoulder rotation looks like in each!
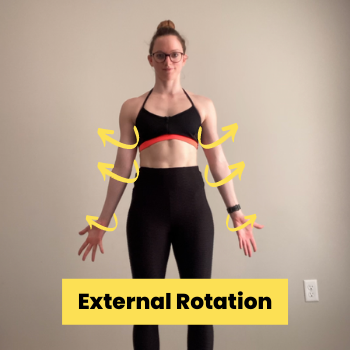
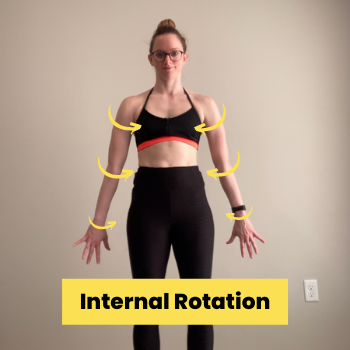
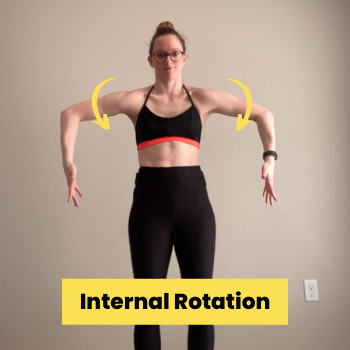
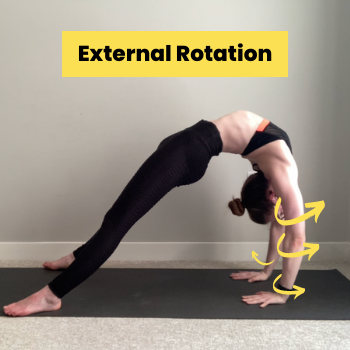
How to Externally Rotate Your Shoulders in Common Poses
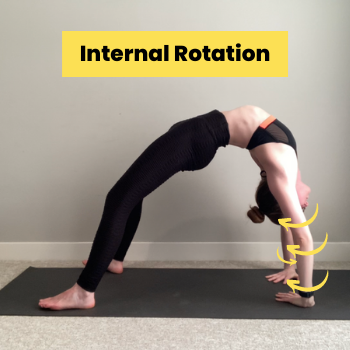
In Downward Dog…
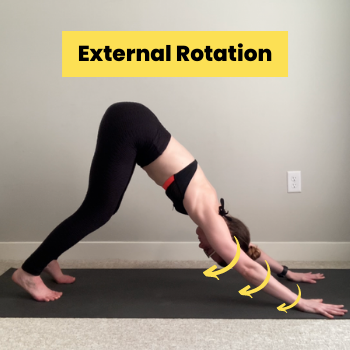

External Shoulder Rotation
Index fingers pointing forwards
Engaging arms to rotate biceps and elbow crease forwards
Shoulder blades hug to the side of your rib cage


Internal Shoulder Rotation
Index fingers point slightly inwards
Elbows flare to the outside (elbow crease to the inside)
Shoulder blades slide together toward your spine
Note: Internal shoulder rotation is not necessarily incorrect in your Downard Facing Dog or other poses, and there are still plenty of valid reasons instructors might cue an internal rotation - it all depends on your goals for the pose that day!
In Puppy Pose…

External Shoulder Rotation
Weight pressing into the pinky side of your hand
Armpits hug toward the floor
Shoulder blades hug toward the floor
Stretch felt in your lats (outside of armpits)

Internal Shoulder Rotation
Weight pressing into the thumb side of your hand
Elbows flare to the outside (elbow crease to the inside)
Shoulder blades slide together toward your spine
Pinching can be felt in the top of your shoulders, or even tingling in the hands (no good!)
In a Bridge…

External Shoulder Rotation
Index fingers parallel with the outside edge of your mat
Armpits hug toward the front of your mat
Shoulder blades wrap to the outside of your ribs/chest
Stretch felt in your lats (outside of armpits)

Internal Shoulder Rotation
Index fingers pointing slightly inwards
Elbows flare to the outside
Shoulder blades smoosh together toward your spine
In a Forearm Stand…


External Shoulder Rotation
Elbows shoulder width apart, lightly squeezing toward each other
Hands together, forearms in a pizza slice shape = slightly less external rotation
Hands separated; forearms parallel like train tracks = more shoulder rotation
Internal Shoulder Rotation*
It’s extremely hard to actually hold an internally rotated shoulder position in a forearm stand, but for the purposes of this post, it’s still helpful to be able to recognize when your shoulders are internally rotating (moving towards internal rotation)
Hands together, elbows flaring out much wider than shoulder width apart, OR
Elbows wide, hands past each other reaching towards elbows
In a Handstand…

External Shoulder Rotation
Index fingers pointing forwards
Pushing hands into the floor, trying to rotate palms to the outside , rotating biceps forwards
Trying to rotate elbow creases to point forwards
If in an “open shoulder” handstand (flat back or hollow back), actively wrapping scapula to the side of your rib
Super engaged shoulders = stable to balance!

Internal Shoulder Rotation
Index fingers may point slightly inwards
Elbow creases rotate inward
If in an “open shoulder” handstand (flat back or hollow back), shoulder blades smoosh together toward your spine
Wiggly, unsupported shoulder position = harder to balance
How to Tell if Your Shoulders are Externally Rotated
Based on the examples above, you may notice some recurring themes on hand, arm, and shoulder blade positioning in our externally rotated shoulder positions. Here are some easy self-tests to confirm if your shoulders are properly rotated in your backbends.
In Open Shoulder Positions (ex. bridge, puppy pose, straight handstand, hollow back handstand)
Armpit Check - Are the outside of your armpits should be wrapping forward toward the front of your chest? Do you feel a stretch in the outside of your armpits?
Shoulder Blade Check - Are your shoulder blades separated and hugging to the side of your ribs?
Elbow Check - If you bend your elbows, would they point forwards and not out to the sides?
Note: In any arms-overhead style position (aka shoulder flexion) such as these, your shoulder blades are doing more than just “wrapping” to the side of your ribs (they are rotating upwards, slightly posteriorly tilting, wrapping, and externally rotating). The Pole PT has a great blog post about scapula position in overhead arm position as used in pole dancing, but this is totally applicable to our floor-based backbends as well!
In Closed Shoulder Positions (ex. Scorpion Forearm Stand, Contortion Handstand)
In “closed shoulder” positions, our arms are not raised completely overhead, so our scapula position is a bit different. In these positions, it’s more helpful to think about the position of your arms instead of your shoulder blades.
Bicep Check - Are your biceps rotating to point toward the direction your fingers are pointing to? (more relevant for handstands)
Elbow Check - Are your elbows shoulder width apart and squeezing together so they don’t sneak/slide any wider as you’re holding your pose? (more relevant for forearm stands)
Test It Out! How Does it Feel?
Go ahead and try some of your backbend-y (or flat back, but open shoulder) shapes in both potential shoulder orientations and note how each feels. Do you feel a deeper stretch when externally rotating your shoulders and upper arms? If adding a backbend, can you notice a slightly deeper arch in your upper back, or increased shoulder flexibility? Do you feel the increased stability from engaging your shoulders to maintain this external rotation while you hold your pose?
Related Content
Recommended Recorded Workshops

Who this class recording is for:
This recorded workshop is intended for “beginner” students who want to build their back, shoulder, and hip flexibility (and strength!) to push up into a bridge (aka Full Wheel). You’ll learn how to strengthen and stretch your whole backbending chain - with an extra emphasis on the shoulders.
What this class includes:
A quick full-body warm-up to get you ready to stretch
A full 45-minute follow-along stretching routine you can follow 1-3 days per week to work on your backbending flexibility
An additional 5-20 minutes of bridge-specific skillwork you can add on to that routine to specifically work on your bridge press (so you can tailor your training to fit your own schedule)
Recommended props:
Yoga mat
2 yoga blocks
A strap (which can be stretchy or stiff - a towel or sweatshirt would work as well)
Note: Because of Squarespace’s file size limitations (which is what I use for this wonderful website!), upon purchase you will receive a PDF with a link to the recording. You can then stream the recording online from the private link.

Who this workshop recording is for:
This workshop is designed for students who have some preexisting back/shoulder flexibility (can push up into a bridge), and are interested in taking it farther. This is a great introduction to contortion-style back flexibility training where you’ll not only learn strengthening drills to deepen your flexibility (because the vast majority of “advanced” flexibility training is really strengthening work!), you’ll learn classic contortion pose variations of bridges.
Suggested Prerequisites:
Students are expected to be able to comfortably hold a bride with straight arms. Crazy backbendiness welcome, but not required. The backbend-y variations included in the tutorials can be modified for varying degrees of back flexibility.
If you can’t yet comfortably hold a bridge with straight arms, I suggest checking out the Building Up to Your Bridge workshop recording instead.
This 90-minute* workshop covers:
An hour long follow-along contortion conditioning class, including
A full body warm up with extra emphasis on back and shoulder mobility
Active flexibility drills to strengthen and stretch your full backbending chain, with dedicated drills for the hips, lower back, upper back, and shoulders
“Choose your own adventure” style skillwork practice: more than 20 minutes of detailed contortion bridge tutorials are included and you can choose which ones to practice during any given training session. Tutorials include…
Review of proper muscle engagement in bridges
Arm and leg variations you can apply to any of your bridge shapes
Straight leg “rainbow” bridges
Spider bridges
Elbow bridges
and more!
This workshop was filmed with the intention of fitting a 75-minute practice, but students may choose to trim it down, or extend it and work on more skillwork for up to a 90-minute practice.
Note: This workshop is also available as part of a 2-workshop “Contortion Bridges” recordings bundle!
Required props:
2 yoga blocks
Long strap (can be elastic or stiff)
Upon checkout, you will receive a PDF with a link to the workshop recording (Squarespace limits file upload sizes so I can’t actually upload the whole recording here). The recording is for your personal use only, not to be shared with others - thank you!