
Pushing Up Into a Bridge: Progression
Pushing Up Into a Bridge: Progression
A while back I wrote a blog post, The Ultimate Bridge Pose Progression Guide, outlining some of the intermediary bridge poses to practice to work towards a full straight-arm bridge (aka wheel pose). But I still often see questions about how specifically to develop the shoulder flexibility to progress from a yoga-style glute bridge to a full, straight arm bridge. Spoiler alert: you probably need to work on your strengthening along with your stretching (especially your shoulders)!
Being able to push up and hold a bridge requires some pretty full body active flexibility:
Strong glutes to press your hips into extension and support your low back
Flexible hip flexors to take some of the backbending pressure out of your low back
Strong core, lower back and upper back muscles to support your arch
Flexible pecs and lats to allow for greater overhead arm flexion
Strong deltoids and triceps to push up into your bridge
Strong and flexible rotator cuff muscles to stabilize your shoulders and support external shoulder rotation
Flexible and strong wrists to accommodate the potentially heavy wrist extension from having flat palms
For the purposes of the post, I’m going to specifically focus on gaining the shoulder flexibility and strength required to help press up. This post assumes you already have enough low back strength and flexibility to comfortably hold a “yoga bridge” or glute bridge with your hips pressed into extension. If you’re not quite there yet, you can still do many of these shoulder conditioning exercises, but I wouldn’t recommend trying to skip ahead to trying to fully press into a bridge until your yoga bridge and/or headstand bridge is comfortable.
Start with a warm up (like always!)
Before you dive into any of these conditioning exercises, make sure you’ve done some form of full-body cardio warm up for at least 5-10 minutes, and done some shoulder-specific mobility drills, back-specific mobility drills, and a brief wrist warm up.
Then transition to some gentle passive stretches for pecs and lats
Because overhead flexibility is often limited by tight pectorals (chest) and latissimus dorsi (outer back/shoulder/armpit), it’s nice starting with some gentle passive stretches for both of those areas before we move on to our harder, “active” exercises.
For Tight Pecs: Elbow on the Wall Chest Stretch

Start with your elbow and forearm on the wall, elbow bent 90 degrees, with your elbow at shoulder height
Step your wall-side leg forwards as you lean your chest forwards to feel the stretch in your chest or the front of your shoulder
Hold for ~20 seconds
Repeat the stretch with your elbow 1-2 inches higher than shoulder height for a slightly different stretch
Note: if you feel tingling in your fingers, if your hand starts to go numb during this stretch, or pinching in the top of your shoulder - come on out (that might be a sign you’re pinching or tugging on a nerve a bit too much). Dr. Jen Crane (aka @cirque_physio) has a great nerve glide you can try before this stretch to see if that makes the tension lessen, OR you can make a fist with your hand (instead of a flat palm) and not lean quite as hard into the stretch to keep it on the gentler side. Tingling/numbness/pinchiness is not something to push through!
And if you’ve got really tight pecs, you might want to pick another chest stretch or two like one of these to add to your stretching routine.
For Tight Lats: Puppy Pose
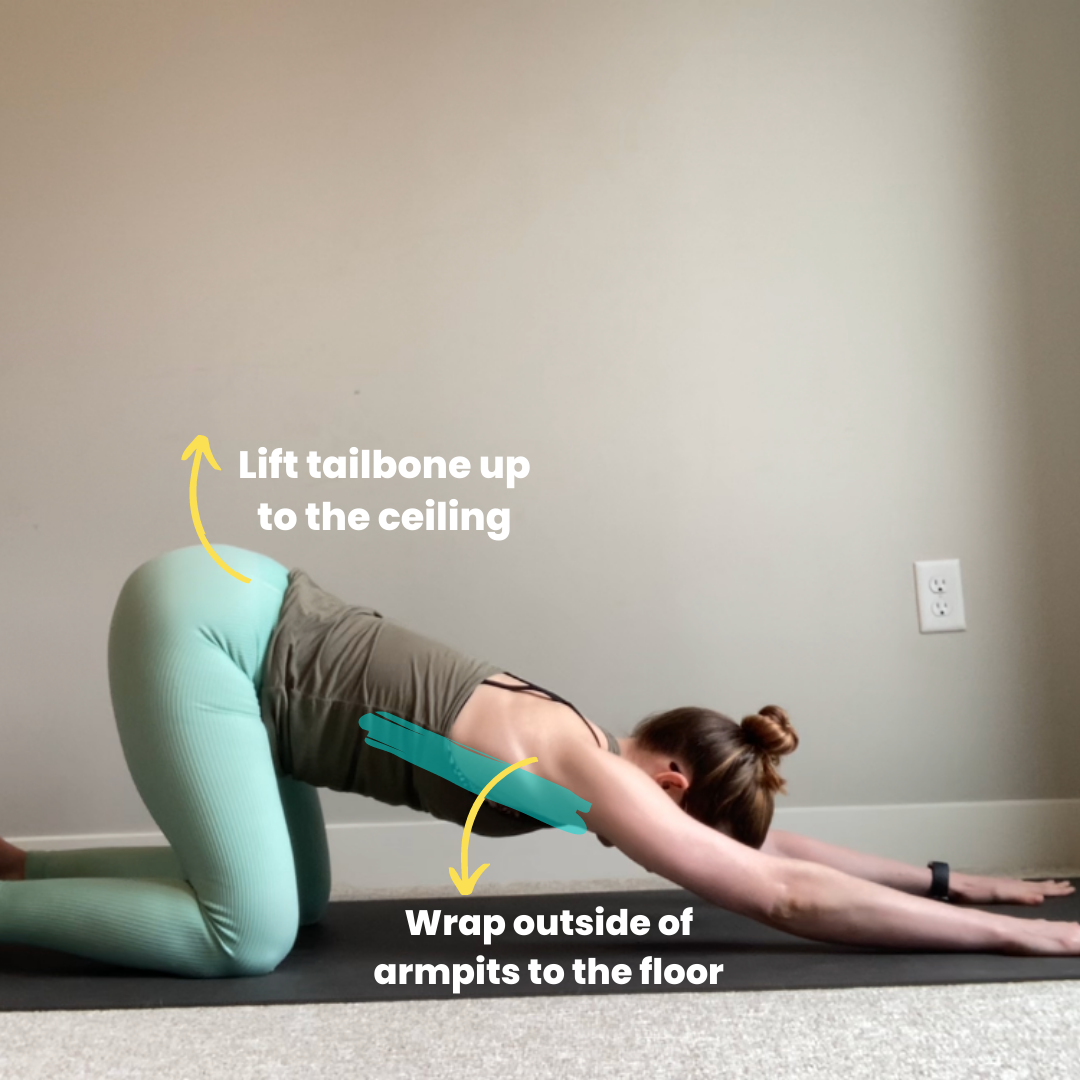
Start on hands and knees
Walk your hands forwards, keeping your butt stacked on top of your knees, arms straight, and relax your head/chest to the floor
Try to wrap the outside of your armpits down toward the floor - this helps slide your shoulder blades toward the sides of your ribs, away from your spine. This should help you feel the stretch in the outside of your armpit area as opposed to pinching the top of your shoulder
Hold for ~20 seconds
Time for the active flexibility work for strong and open shoulders
All of these drills help strengthen our overhead shoulder flexibility, specifically while our shoulders are in an externally rotated position (which is the same position they’ll be in in a bridge!). Like the puppy pose stretch above, you’ll notice many of these involve “wrapping” the outside of your armpits forward or toward your chest to achieve the proper shoulder position. This video is a good comparison of what internal shoulder rotation (shoulder blades smooshing together toward our spine: a no-no for bridges) vs. external rotation (shoulder blades hugging the side of our ribs) looks like.
Wide Arm Strap Pulses

Start standing, holding a strap with hands wide and arms straight (does not matter if the strap is stretchy or stiff).
Externally rotate your shoulders (try to hug the outside of your armpits forwards toward the sides of your chest) by pointing your thumbs behind you. Not sure if your shoulders are in the right position? If you bend your elbows, your elbows should point to the front, not out to the sides.
Keeping your arms and back straight (don’t let those elbows bend or your chest flare out), pulse your biceps backwards for 10-20 seconds
Want to make it harder? Start with your hands closer together (working your way to doing these pulses with hands shoulder-width apart).
Wide Arm Block Pulses

Start standing, sandwiching two yoga blocks (the long way) between your hands, with arms straight, armpits reaching forwards (external shoulder rotation)
Keeping straight arms, and a light squeeze on your blocks so you don’t drop them, pulse your biceps backwards for 10-20 seconds
Want to make it harder? Do your straight arm pulses with just one yoga block between your hands
Childs Pose Arm Lifts

Start in a Child’s Pose with both arms straight, reaching forwards
Keep your left hand on the floor for support, but rotate your right arm so you are making a thumbs up sign to the ceiling
Keeping your left arm straight, lift and lower it, with control, 10 times
Switch sides and repeat for 10 lifts on the right arm
Need to make it easier? Start with both hands an inch or two closer to your knees, with your chest lifted higher away from the floor
Low Cobra Arm Lifts

Start in a low cobra position, with your belly on the floor and chest propped up with your elbows under your shoulders.
Reach your left hand across to tap your right wrist - this is just bringing your forearm across at a diagonal so we can use that forearm for balance/support
Reach your right arm forwards so that it’s straight, and make a thumbs up sign with your thumb to the ceiling
Keeping your chest lifted and collarbone pointing forward, lift and lower your right arm with control 10 times. Then switch arms!
Puppy Pose Resist-Relax

Start in a puppy pose, with arms straight, hugging the outsides of your armpits toward the floor
Resist the stretch by pressing hands into the floor, engaging your arms and chest, sucking your belly button into your spine, rounding through your shoulders and upper back - hold that tension for a moment
Then relax back into your arched puppy pose (optional: lift your head if you want to add a backbend through your neck)
Repeat for 3 slow reps of rounding-then-arching
Finally, we’ll add some push up style drills
Wall Elbow Block Push-Ups

Start kneeling, an arm’s length away from the wall, with a yoga block the wide way between your elbows
Reach your hands forward to shoulder height, placing palms shoulder width apart on the wall
Without letting your back arch, bend your elbows to try to bring your elbows and forearms to tap the wall
Repeat for 8-10 wall push ups
Want to make it harder? Start with your hands higher (still shoulder width apart). The higher your hands, the more challenging it is to keep proper form (flat back, elbows hugging the block) while you do your push ups
Down Dog Push Ups (Wide Elbows)

Start in a downward facing dog with a flat back, straight arms, and index fingers pointing forwards. Your heels can be lifted and knees bent if you have tight hamstrings (trying to prevent your back from rounding is the most important!)
Start to bend your elbows out to the side, lowering your head towards your hands. Only bend as much as you still have the strength to push back up to start! (You can even see in the GIF that I’m shaking - these are hard y’all, so keep them small if you need to)
Repeat for 4-10 reps
Down Dog Push Ups (Narrow Elbows)

Start the same as above (in a downward facing dog)
This time, keep your elbows and triceps squeezing in toward your sides as you bend your arms, as if you were going to drop your elbows to the floor (again, this can be a small bend if this is very challenging!)
Press into your hands to straighten your arms back to your downward dog
Repeat for 4-10 reps
Tabletop Reaches


Start sitting on the floor with your knees bent and feet hip width apart. Plant one hand at least a foot behind you, fingers pointing away (the other arm can reach forwards for balance)
Press up into a one-armed reverse tabletop by pressing into your planted palm and feet to lift your hips as you squeeze your glutes. Your goal for the top position is to have knees stacked over ankles, and your working shoulder stacked on top of your palm (you may need to adjust the starting position of your hands/feet). Slowly lower your butt back to the floor
Repeat for 5 hip lifts with one arm planted, then switch hands and do 5 more on the other arm
Want to make it harder? The progression for this exercise would be starting to add an arm reach with your free arm. As your press your hips up, reach your free arm up overhead, making sure to keep pressing into your supporting arm for balance.
Pushing Up Into Headstand Bridge

Start lying on your back, with knees bent, feet hip-width apart near your butt
Plant your hands overhead with fingertips at forehead level (generally, the closer you bring your hands to your shoulders, the harder pressing up is - the farther from your shoulders, the easier!).
Engage your glutes to lift your hips as you press into your feet and hands
Keep pressing into your hands to lift the back of your shoulders and head, dropping your head back to rest the crown of your head on the floor (note: even though you have your head on the floor, still try to keep the majority of your weight in your feet and hands - despite the “headstand” name, we don’t want this to feel like a heavy headstand. Similarly, if you don’t yet have the arm strength to completely lift your head off the ground for a moment to transition to your headstand, I would recommend skipping this drill, rolling through this with your head on the floor would not be a good time for your neck)
Slowly lower back to the floor by pressing into your hands and feet to lift your head off the ground, tuck your chin toward your chest, and melt your shoulders and back down
Repeat for 4-10 reps
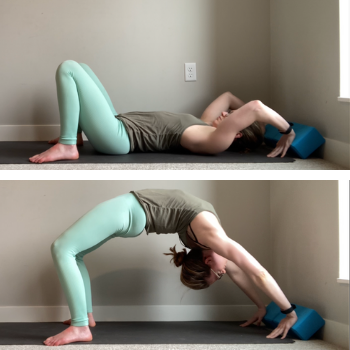
Back-Supported Bridge Push Up


Finally - something that will feel more like the real thing! This exercise may take some trial-and-error trying to find the appropriate prop for the level of support you need. I suggest starting with something tall you can lean back on, like a chair, ottoman, or bench. Then as you get stronger, finding a lower supporting surface to increase the challenge, like a yoga wheel, or stack of yoga blocks (but be careful about stacking blocks since it can be wobbly).
Find a support surface that you can comfortably lie back on and still reach your feet and hands to the floor. Feet should be hip-width apart, and hands shoulder-width apart, with fingers pointing toward your toes
Press into your feet and hands to push up into your bridge, and slowly lower with control
Repeat for 4-10 reps
Headstand Bridge Push Up

Start in your headstand bridge (remember, most of the weight should be in your hands and feet)
Press into your hands and feet as you start to straighten your arms into your full bridge, then slowly lower back to your headstand bridge
Repeat for 4-10 reps
Want to make it harder? Hold your bridge pose at the top for 1-2 seconds before lowering (with control!) back to your headstand bridge
Now try your full bridge push up!
If your shoulders aren’t too pooped and your headstand and supported bridge push ups were feeling comfortable, now’s the time to go for your full bridge press up.
Let’s review the proper starting and ending position:


One thing worth noting that we haven’t “taken advantage of” in the previous drills is playing with foot width and external hip rotation. Generally, it’s easier to push up into a bridge with feet slightly wider than hip width, and hips slightly externally rotated - but it’s easy to go too far (which is why in all the conditioning I suggest keeping “proper” hip-width placement). But if you want to make these a bit easier, you can take your feet a little wider (no wider than mat width, and don’t let feet splay out wider than 30 degrees).
IF you experience any wrist discomfort AND you took some time to warm up your wrists before smooshing all your bodyweight into them, there are a couple of wrist-friendly bridge modifications you can make. I’d suggest leaning yoga blocks against the wall and trying your press up with your palms on the yoga blocks and fingers reaching to the floor. Keeping your fingertips on the floor is a bit les muscle-y than wrapping your fingers around the yoga block, but you’re welcome to try it both ways.
Got questions? Ask ‘em below!
Not sure how something’s supposed to feel? Have questions about modifying one of these exercises? Have other tips for things that helped you get your push up to bridge? Share in the comments below.
Related Content
Recommended On-Demand Class

Who this class recording is for:
This recorded workshop is intended for “beginner” students who want to build their back, shoulder, and hip flexibility (and strength!) to push up into a bridge (aka Full Wheel). You’ll learn how to strengthen and stretch your whole backbending chain - with an extra emphasis on the shoulders.
What this class includes:
A quick full-body warm-up to get you ready to stretch
A full 45-minute follow-along stretching routine you can follow 1-3 days per week to work on your backbending flexibility
An additional 5-20 minutes of bridge-specific skillwork you can add on to that routine to specifically work on your bridge press (so you can tailor your training to fit your own schedule)
Recommended props:
Yoga mat
2 yoga blocks
A strap (which can be stretchy or stiff - a towel or sweatshirt would work as well)
Note: Because of Squarespace’s file size limitations (which is what I use for this wonderful website!), upon purchase you will receive a PDF with a link to the recording. You can then stream the recording online from the private link.