
The Ultimate Bridge Pose Progression Guide
The Ultimate Bridge Pose Progression Guide
Being able to do a bridge is a common back flexibility goal, but if you can’t just “do a bridge” you may not know where to start! Below is a simple progression of pose variations you can use as goals to practice and build the strength and control to eventually do a full bridge.
In this post, we’ll cover:
Let’s get started!
Warming Up for Your Bridge
If you’re doing any bridge work more advanced than a regular “yoga style” bridge (where your hands are still at your sides and they’re not bearing any weight), you’re going to have to warm up your wrists, back, and shoulders. Really any “serious” flexibility work beyond “light stretching” should involve a 5-10 minute warm up to get your blood flowing and your muscles working!
A 10-15 minute follow-along yoga video is actually one of my favorite warm-ups when training at home, but if yoga isn’t your jam or you want to do your own thing, make sure your own warm up includes the following:
General Warm Up
Start with 5-10 minutes of any kind of aerobic warm up. This could be a follow-along YouTube video, a series of jumping jacks, pushups and squats, going for a run, you name it. The idea is to literally get your blood flowing and to get your muscles moving
Wrists
Bridges can be quite “wristy” - especially if you don’t practice them regularly. Our wrists aren’t typically used to holding up so much body weight like they are in a bridge, so it’s important to help warm them up.
Wrist circles in the air - start just circling your hands/fingers in the air, rolling out your wrists. Do 5-10 circles in each direction
Wrist circles on the ground - start in a “tabletop” position on all floors, with palms on the floor under your shoulders, and knees under your hips. Lean into your palms and do three, slow and controlled circles in each direction with the following hand placements:
[Palms down] Fingers pointing forwards
[Palms down] Fingers pointing out to the sides of your mat
[Palms down] Fingers pointing in towards the center of your mat
[Palms down] Fingers pointing back towards your knees
Then flip your hands over so your palms face up and continue to do the following wrist circles. (If these feel too intense, you can scoot your knees closer to your wrists so you can sit your hips back and take some weight out of your wrist crease).
[Palms Up] Fingers pointing back toward your knees
[Palms Up] Fingers pointing out towards the sides of your mat (“awkward sea lion”)
[Palms Up] Fingers pointing in towards the center of your mat (“awkward bulldog”)
Core & Back
Bridge pose is traditionally a low-back “dominant” pose. Since you naturally already have a curve in your lumbar spine (your low back), this is often where people start to dip into first in terms of flexibility with their bridge. That’s not a bad thing at all, it just means we want to spend extra attention on warming up our low back so that it is strong and supported and we aren’t just “crunching” vertebrae together as we bend.
My favorite low back warm ups are back extensions. You can do these locust-style, lying on your belly with your hands reaching straight back towards your toes, lifting your chest off the ground like a reverse crunch. Or you can do them superman-style reaching both arms ahead, and lifting your arms and legs at the same time. Aim for two sets of 10-20 back “crunches” like these.
A quick note about “the rest of your core” (aka your abs): If you’re doing basic bridge work, you’re fine without an ab warm up. You’ll be intentionally engaging your abs as you press up into whatever version of a bridge you’re working on, and that mind-muscle connection should be enough. But if you’re moving on to the more advanced bends, it may be helpful to “wake up your abs” with 3-6 minutes of ab work (planks, crunches, etc.) to really make sure that they’re engaging to support you while you’re bending.
Shoulders
For all versions of a bridge, at the very least you’ll want to spend a couple of minutes warming up your shoulders with some mobility exercises and light conditioning like:
Shoulder circles
Arm criss-crosses
Palm pulses
Scapular push ups
Hitchhikers
If you are specifically working on the foundational shoulder strength & flexibility to be able to push up into a bridge, check out the exercises suggested in the blog post Pushing Up Into a Bridge: Progression.
If you can already comfortably hold a bridge and are working on more “shoulder-y” versions of your bridge (like trying to stack your shoulders over your fingers/wrists), you’ll want to include additional shoulder stretching and conditioning specifically working on overreach flexibility, like:
“Getting arrested” against the wall stretch
Puppy pose
Puppy pose with active press
Cobra hitchhikers
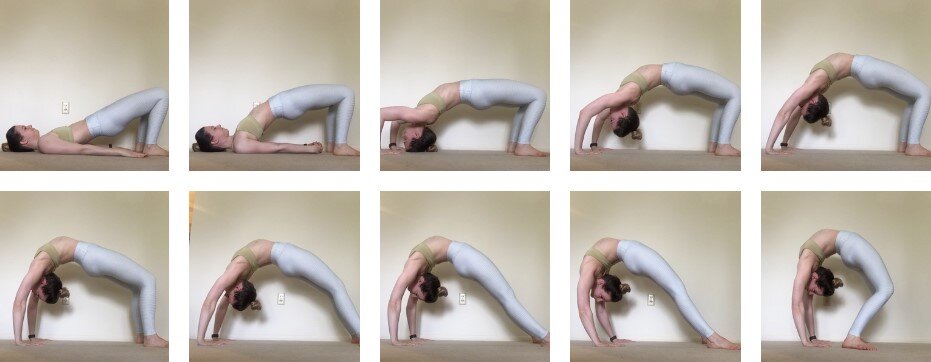
Bridge Pose Progressions
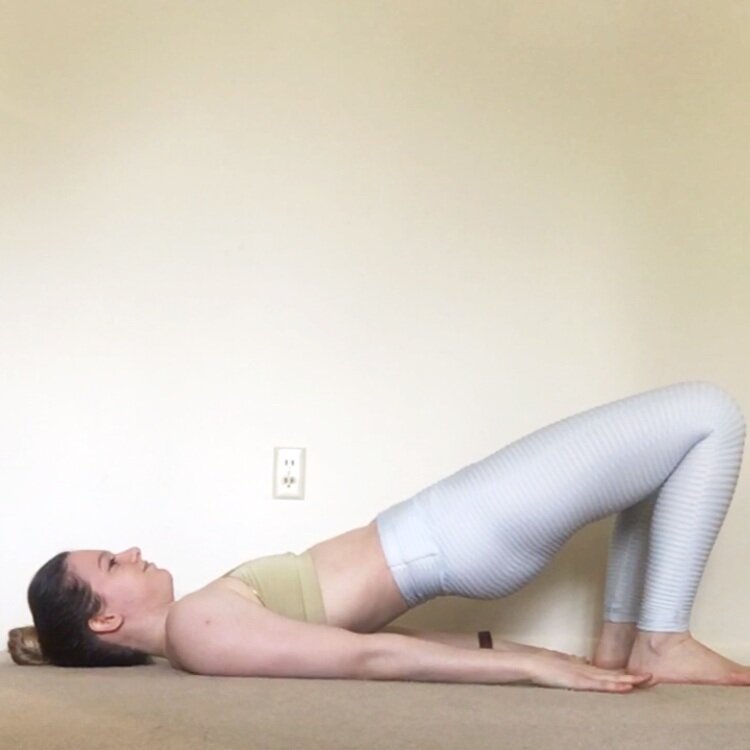
Yoga Bridge (Plank)
How To: Plank Yoga Bridge
Start lying on your back with your knees bent and feet flat on the floor. Your feet should be about hip width apart and your heels planted a couple of inches away from your butt
Tuck your tailbone to lift it up off the ground, and engage your core by sucking your belly button in to your spine - it’s a good habit to start ensuring you’re always lightly engaging your abs/core as you backbend, and this is easier to start here before we move on to more advanced backbends
Keeping that tailbone tuck and your abs engaged, press into your heels and squeeze your glutes to lift your hips off the ground. Lift your hips just a couple of inches while keeping your shoulder blades firmly on the floor. Our goal end position is to have a nice straight line running from your knees, down your torso, to your shoulders on the floor - kind of like an upside-down plank position. Don’t let your back arch just yet, for now we’re just working on control - engaging our glutes and our core as we lift
Hold for 5-15 seconds (make sure you’re breathing), then slowly lower your hips back to the floor

Yoga Bridge (Arched)
How To: Arched Yoga Bridge
Push up into a plank yoga bridge like above (remembering to suck your belly button into your spine to engage your abs!)
Keeping your abs engaged, press your heels into the floor and squeeze your glutes to push your hips towards the sky, you’ll notice this starts to introduce an arch into your low and potentially mid back as your shoulder blades start to lift off the floor
Palms can stay flat on the floor, or you can shimmy your shoulderblades towards your spine to open your chest, working to grab hands and interlace your fingers
Keep a long neck - you shouldn’t be smooshing your chin right into your chest
Our goal end position is an open chest, engaged abs, slight arch in the back, and strong glutes
Hold for 5-15 seconds and slowly lower to the floor

Headstand Bridge
Once you’re comfortable keeping your abs and glutes engaged in a gentle backbend, it’s time to start working towards a more “traditional” bridge!
How To: Headstand Bridge
Start lying on your back, knees bent and feet flat on the ground, about hip width apart
Bring your hands and fingertips, palms down, up by your ears. Your elbows should be pointing up to the sky. (Avoid bringing your fingertips all the way down to touch your shoulders - this pose will be easier to press into with your hands closer to the top of your head)
Engage your abs by sucking your belly button into your spine (hopefully engaging your abs is becoming a backbending habit already!)
Press into your palms to lift your body, dropping the crown of your head back towards the floor as you lift
Let some of your weight settle onto the crown of your head for support. We still want the vast majority of your weight to be pressing into your palms and your feet to help protect your neck. If that means you can only comfortably hold this pose for a couple of seconds (because bent arm strength is hard yo!), that’s totally fine! Work on slowly increasing your endurance to hold this for longer over time
Make sure it is the crown of your head that is making contact with the floor - not the back of your head, and not your forehead - we want to keep your neck in a safe position so it’s not getting crunched. And again, most of your weight should still be in your palms and feet, your head and neck should not be taking a lot of weight in this pose
Hold for 5-15 seconds, then press into your hands, tuck your chin towards your chest, and slowly lower to the floor
“Regular” Bridge
How To: Bridge
Start lying on your back, knees bent and feet flat on the ground, about hip width apart. Bring your hands up by your head, fingertips at about ear height
Suck your bellybutton into your spine to engage your abs
Press into your hands to press palms into the floor and feet into the ground as you push your hips towards the ceiling
Tada! You’re doing a bridge! It may not be the prettiest of bridges (yet!), but being able to lift your entire torso off of the ground using bent arms is a body weight strength feat worthy of celebrating
Hold for 5-15 seconds, then tuck your chin towards your chest and slowly lower to the ground
If pressing up to your full bridge is difficult, I wrote a whole blog post with suggested drills that will help continue to develop the shoulder flexibility and arm strength needed to push up into your bridge.
Straight Arm Bridge
Our next goal once you can comfortably support your body weight is to work towards straightening your arms.
How To: Straight Arm Bridge
Press up into your regular bridge (making sure your abs are engaged and you are breathing!)
Press into your palms to try and push your chest/ribs towards the ceiling as you straighten your arms
Hold your straight arm bridge for 5-15 seconds before tucking your chin towards your chest as you lower to the floor
Variation: to start to work on opening your shoulders more, once you have straight arms you can experiment with some gentle rocking back and forth. In your straight-arm bridge, push into your feet to try and press your armpits away from your knees just an inch or two for a second, then release. Take a couple of gentle rocks forward-and-back pushing your shoulders/armpits more open, and then relaxing back to your more comfortable bridge
If starting to straighten your arms feels uncomfortable on your wrists (if you have tight shoulders and your hands are very far away from your heels, your wrists may be getting quite the stretch as you straighten your arms!), try this shape with your feet elevated a couple of inches. Putting your feet on a folded up panel mat, a low ottoman, or a yoga block, will help raise your hips and reduce the angle of the fold at your wrists. I like to press up into a bridge on the floor, then walk my feet onto whatever platform I’m using (it takes more arm strength to press up if your feet are already on a higher surface). Just make sure whatever you’re using under your feet won’t slide away from you! If you’re using yoga blocks, you could do this with the blocks right against a wall so they have nowhere to slide.
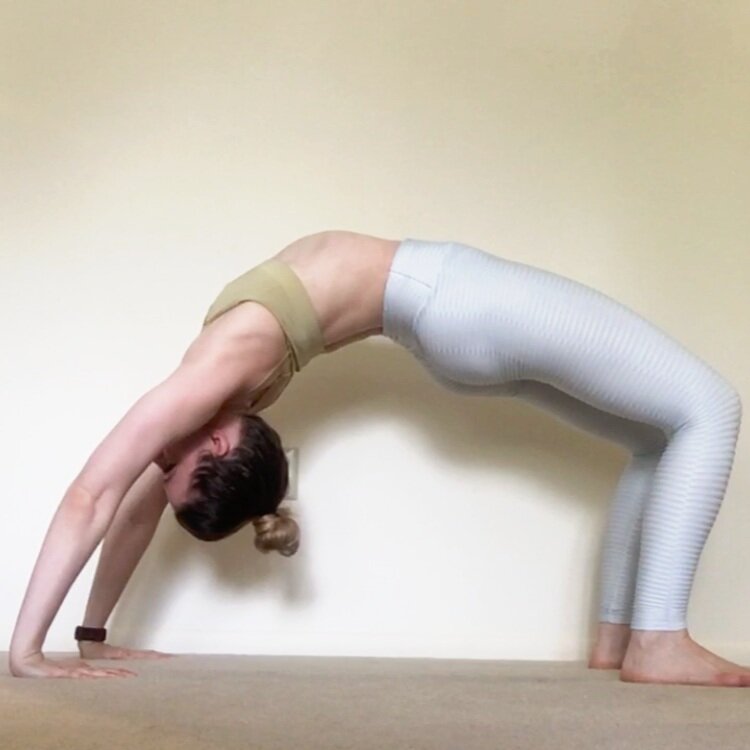
Straight Leg Bridge (“Rainbow Bridge”)
How To: Rainbow Bridge
Push up into a “regular ol’ bridge” and straighten your arms
Walk your feet a couple of inches away from your hands (maybe 4-6 inches out) to make a wider/longer bridge
Press into your feet to straighten your legs as you push your armpits/shoulders forwards towards your wrists
This straight-leg position is our “rainbow bridge” - it’s a lovely shape!
Hold for 5-15 seconds (keeping your abs engaged, and breathing as always) before tucking your chin to your chest, walking your feet back closer to your hands, and lowering to the ground
Our ultimate goal is to be able to use straight legs to push our shoulders forwards (“opening your shoulders”) so that they line up over your fingers/wrists.

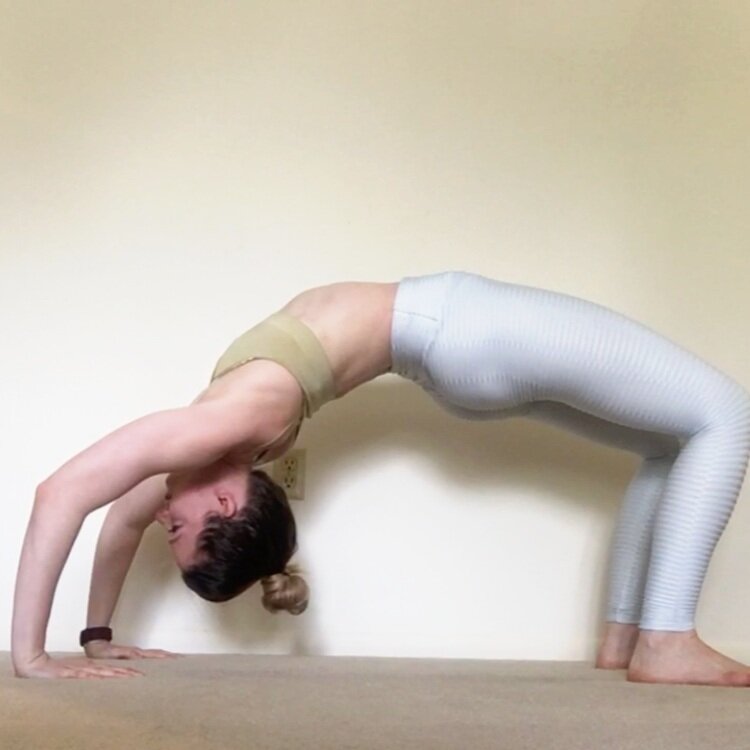
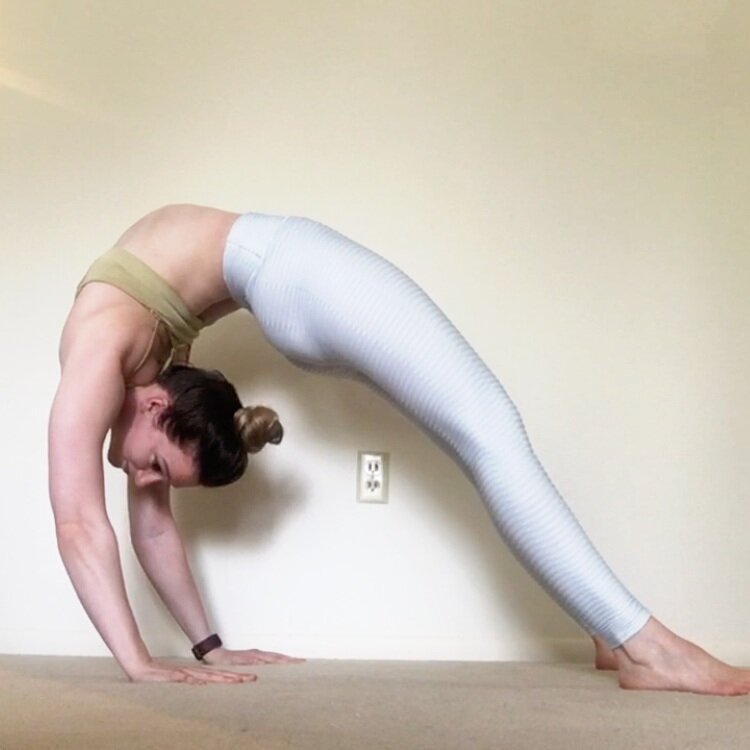
Shoulders Over Wrists Bridge
How To: Open Shoulders Bridge
From your “regular ol’ bridge” push into your feet to try and push your armpits and chest away from your heels
You can do this with straight legs (as shown below) or with knees still slightly bent. Keeping your knees a little bent will be a little friendlier on your low back
Raising your feet up a couple of inches (on a stacked panel mat, yoga blocks, a low ottoman) will also make it easier to push your hips and chest forwards to stack more weight over your hands. You can start with feet raised until you can get that sweet sweet alignment, then work on lowering your feet closer to the floor until you can push your shoulders open with feet flat on the floor.
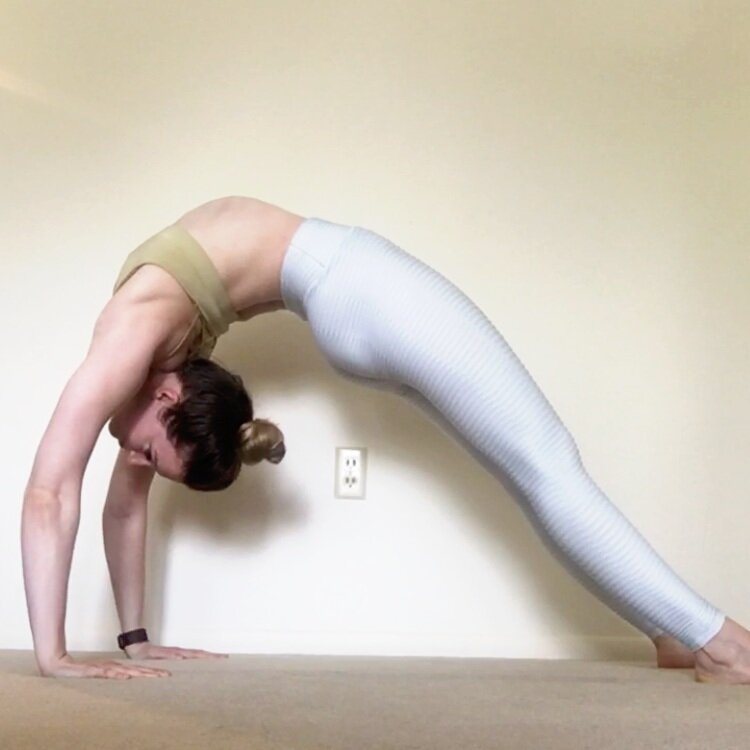
Shoulders Over Wrists Bridge (Straight Legs)
How To: Rainbow Bridge with Shoulders Over Wrists
Start in your rainbow bridge (with straight arms and straight legs)
Bend your knees and walk your feet an inch or two closer to your hands, then re-repress into your feet to straighten your legs
Repeat until you’ve found the appropriate distance to hold with straight legs, and shoulders starting to stack over fingertips or over your wrists
Big ol’ disclaimer: These next two bridge variations are very deep.
Do not attempt them without a coach/instructor unless you have worked with one previously and have solid shoulder strength, flexibility and control. You can absolutely push yourself too far and fall and hurt yourself.
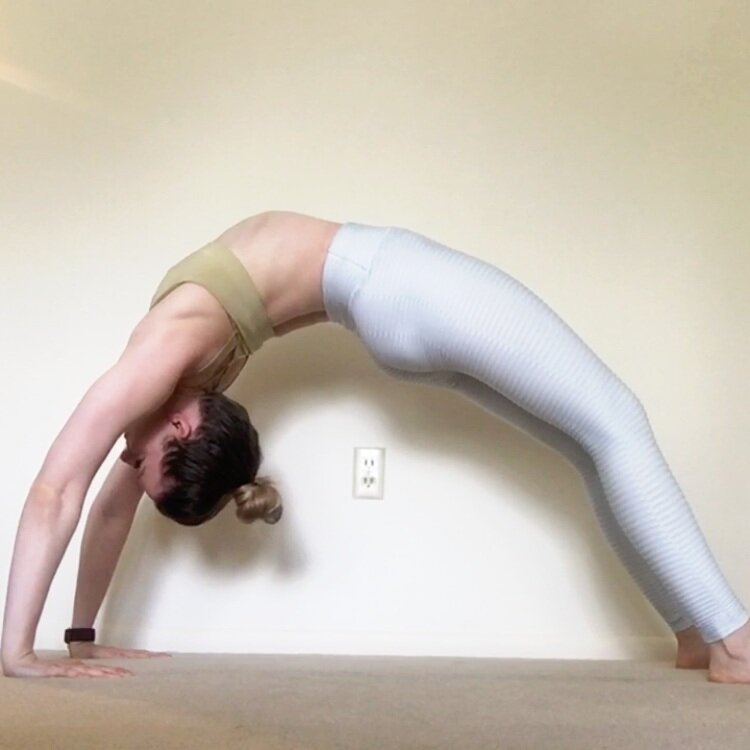
Shoulders Past Wrists Bridge
How To: Deep Rainbow Bridge
From your shoulders-over fingers/wrists rainbow bridge, walk your feet in even closer to your hands
Push into your feet to work towards straightening your legs
Firmly press hands into floor to keep strong arms to protect your shoulders
Only push as far as you can comfortably feel balanced. There is absolutely a risk of pushing too hard where your arms can no longer support you, so be careful and listen to your body. Don’t over-push
If you are attempting this bridge alone without a coach (again - not recommended - a coach can help safely spot you and watch for where your bend is to help you get more comfortable in this range of motion before you run off and practice solo), do it with your chest facing the wall so you can lean your chest into the wall for support.
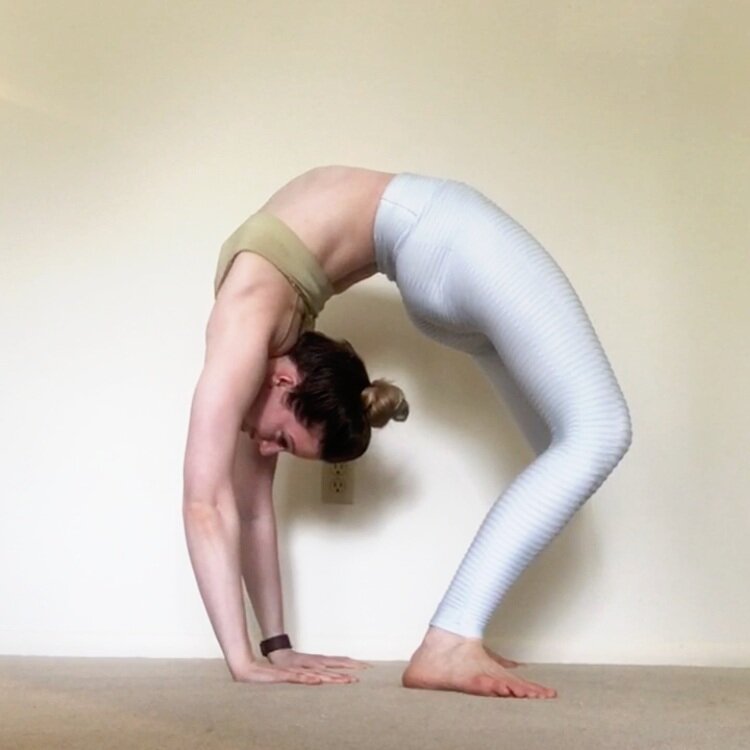
Narrow Bridge
How To: Narrow Bridge
Starting in a regular bridge, start walking your hands in towards your feet, then your feet in towards your hands. Really that’s all there is to it - at this point if you have the back flexibility and strength to be working on these advanced bridges it’s more a matter of doing other low back and shoulder work to increase your flexibility/strength in those areas, and then just taking advantage of those sweet sweet gains in a new bridge shape!
This is a fun shape to work with your chest against the wall. You can try and walk your heels in suuuuuper close, leaning into the wall for support, or raise your hands on one or two (or more) yoga blocks to move the bend around in your back. But that’s another post topic for another day!
Bridgework FAQ
My wrists hurt when I press into a bridge - what can I do?
Start with a wrist warm up! Make sure you’re doing a couple rounds of wrist circles in multiple directions to warm up your wrists. Bridges (and any poses where you bear a lot of weight in your hands, like handstands) can be pretty “wristy” - especially if you don’t have the shoulder flexibility to stack your shoulders (and therefor your forearms) on top of your wrists/hands.
The most comfortable position will be having your forearms perpendicular to your palms (so a 90 degree bend at the wrist). If you are working towards straightening your arms but this is causing a “severe” (acute) angle between your wrist and forearm, raise your feet up on blocks to help stack your elbows and forearms over your wrists.
My feet and knees point out to the side a little, is that OK?
Totally fine. It’s natural for the legs to want to externally rotate slightly in backbends. Having your feet and your knees slightly angled out is OK. As you get more comfortable and more advanced in your bridge practice, start working on counteracting that by engaging your inner thighs as if they were going to internally rotate - this will make you much stronger in your bridge in the long run.
How do I get my elbows to be more straight?
This is a combination of arm strength (it takes a lot to be able to push yourself all the way up to straight arms!) and shoulder flexibility. See question below “how do I get more open shoulders” for some shoulder tips.
If you’re finding your elbows are flaring out to the sides, you could tie a yoga strap around your forearms just below your elbow (allowing your forearms to be shoulder width apart), and work on pressing into a bridge while the strap is helping hold your elbows in.
How do I get more open shoulders in a bridge?
Ah, the question I see posted almost daily in r/flexibility! I’ll write a whole separate post on this topic (because it’s a long one!) and link to it here when that post is live. But in the meantime, adding in specific shoulder opening conditioning exercises (like hitchhikers and active puppy press) and shoulder stretches (like puppy pose and the “getting arrested” stretch) will help.
Got Questions? Ask 'em below!
Got questions? Reach out to me on Instagram (@daniwinks) or comment below.
Related Content
Recommended Recorded Workshops:

Who this class recording is for:
This recorded workshop is intended for “beginner” students who want to build their back, shoulder, and hip flexibility (and strength!) to push up into a bridge (aka Full Wheel). You’ll learn how to strengthen and stretch your whole backbending chain - with an extra emphasis on the shoulders.
What this class includes:
A quick full-body warm-up to get you ready to stretch
A full 45-minute follow-along stretching routine you can follow 1-3 days per week to work on your backbending flexibility
An additional 5-20 minutes of bridge-specific skillwork you can add on to that routine to specifically work on your bridge press (so you can tailor your training to fit your own schedule)
Recommended props:
Yoga mat
2 yoga blocks
A strap (which can be stretchy or stiff - a towel or sweatshirt would work as well)
Note: Because of Squarespace’s file size limitations (which is what I use for this wonderful website!), upon purchase you will receive a PDF with a link to the recording. You can then stream the recording online from the private link.

Couldn’t make it to the Feb 6 Bridge Clinic workshop? Lucky you can still get a copy of the recording!
Who this workshop recording is for:
Yogis, pole artists, aerialists, and general flexibility practitioners who have a comfortable bridge, but are struggling to access their shoulders and thoracic spine to help move the bend to their upper back.
Recommended for students who can comfortably hold a bridge with straight arms (legs can still be bent), but feel like all your bend is still coming from your low back.
What you’ll learn:
Proper shoulder and arm position for maximizing shoulder flexibility
What the heck is “external rotation” and why is it such a big deal for upper back and shoulder flexibility
Active flexibility drills for shoulder and back conditioning to help strengthen and increase your range of motion in your “over reach” and upper back
Bridge variations that encourage more upper back engagement
A full 60-minute stretching routine you can follow-along to keep working on your backbending progress
Recommended props:
2 yoga blocks (or something you can use to place your hands on and space your arms for some of the exercises)
Strap (yoga strap, theraband, scarf, or even a pair of leggings can work as a strap - it doesn’t matter if it’s stretchy or stiff)
Some free space by a wall (some of the exercises we’ll be doing involve leaning against the wall)
Note: Because of Squarespace’s file size limitations (which is what I use for this wonderful website!), upon purchase you will receive a PDF with a link to the recording. You can either stream the recording online, or download to your phone or PC for a higher-quality viewing experience.