
Back Stretches for Full Spinal Flexibility
Back Stretches for Full Spinal Flexibility
Back Stretches Beyond Backbends
When talking about back flexibility, it’s important to remember that there are many ways our spine helps us move, not just backbending! If we consider all of the different ranges of motion our spine can move in, we have:
Backbending / arching backwards (spinal extension)
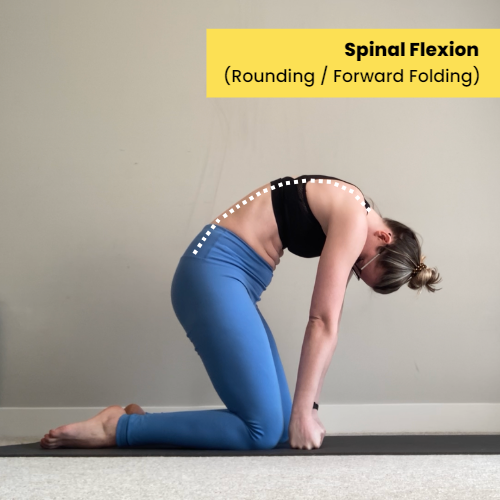
Rounding forwards (spinal flexion)
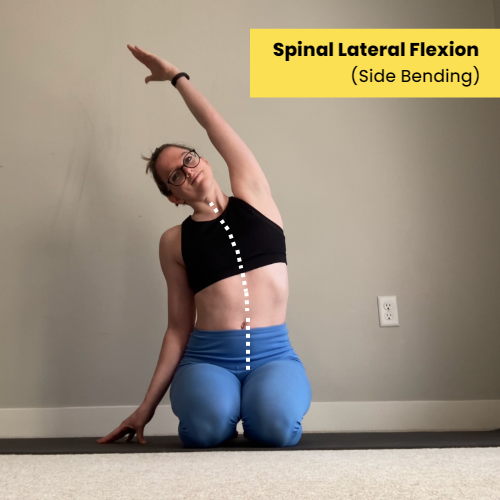
Sidebending (lateral flexion)
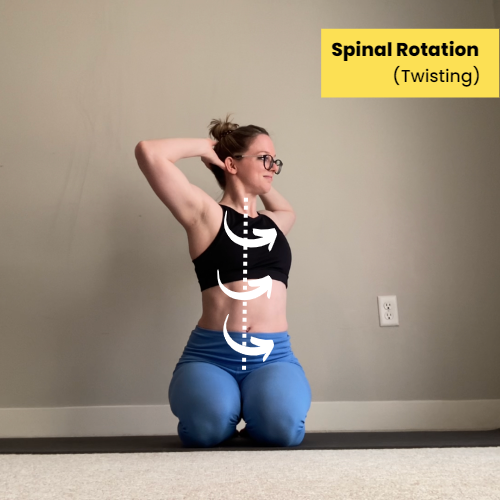
Twisting (axial rotation)

Often when students look to find back stretches for their routine, they focus on just one range of motion (ex. “I’ll do a cobra pose for my ‘back stretch’”) and forget to consider the other ranges of motion our spine likes to move in. Including stretches that support all the actions of our spine (rounding, arching, side bending, and twisting) not only help each of those individual ROMs stay healthy, but there is some crossover in how working in one range can help your spine open up in another range, like how including spinal twists can help with your upper back backbending.
So if you’re looking to “stretch” your back in the most well-rounded sense, it can be helpful to do some exercises for each of those different ranges of motion!
Important reminder: stretching should never hurt. If any of the exercises below hurt (especially in your lower back), cause any tingling sensations in your extremities, or make you feel nauseous - stop. Those aren’t sensations to push through, those are signs from your body you are pushing too hard! Try to see if you can comfortably do the drill in a smaller range of motion, or skip it if the discomfort persists.
See All These Stretches in a YouTube Video:
(or keep scrolling to see the written breakdown)
Stretches to Help with Spinal Extension (Backbending)
Oftentimes when people talk about “back stretches” they think of poses like cobra, upward dog, or a bridge (aka full wheel). While we could certainly say those poses require back flexibility, they don’t actually stretch our back muscles. When we arch our back, we shorten/contract most of the muscles in our back. So “back bending” could really be thought of as “front lengthening.” Although at the end of the day, it’s rarely muscle tightness on the front body that limits back flexibility, but rather active core strength (being able to use our muscles to safely support a deeper backbend) that limits how much our body will allow us to arch.
That’s an important distinction to keep in mind because that means most of the typical backbending type stretches/drills will likely feel different than most stretches. Unless your abdominals are extremely sore/tight, you might not feel a “traditional” stretching sensation during these drills - that’s OK.
Back Extensions
There are zillions of variations of variations of this drill (like these), so I’ll cover a “basic” one to start with, and if you like it you try some others!

Start lying on your stomach, feet hip-width apart (slightly wider is fine if that’s more comfortable), arms reaching back by your sides
Lightly engage your abs by sucking your belly button toward your spine, and keeping your feet on the floor, try to lift your chest an inch or two off of the floor
Slowly lower back down
Repeat for 8-15 reps
The “keeping your feet on the floor” is what differentiates this exercise from a Superman (which is also great if you like those!). I prefer the feet-on-the-floor version because it makes your back do most of the work, as opposed to your glutes (which kick in more if you let your legs lift).
Cobra Push Ups

Start lying on your stomach, feet hip-width apart on the floor. Place your palms on the floor by the sides of your chest, elbows bent pointing towards the ceiling (as if you were at the bottom of a push up)
Engage your core by sucking your belly button in towards your spine. Then (not using your hands yet!) slowly try to lift your chest off the ground as high as you can without putting pressure on your hands
Once you’ve lifted as high as you can using your back muscles, then you can press into your hands to help - either pressing up to a low cobra (lifting your chest as much as you can while keeping your belly on the floor), or if it feels OK on your back, pressing all the way up to a high cobra (lifting your whole torso off the mat)
If you’re working on your upper back flexibility specifically, I’d suggest only pushing up to your low cobra pose, which better targets thoracic (upper back) spinal extension. Low cobra tends to send all of the backbend down to the lower back
Slowly lower your upper body back down to the floor. If you want an extra challenge, see how little weight you can press into your hands (making your back do more of the work to slow your descent)
Repeat for 5-10 reps
Supported Upper Back Stretch
You’ll want a foam roller, yoga block(s), or yoga wheel for this stretch. Depending on the size of your support prop, this stretch will feel different, so try it with different props (if you have ‘em) and see which one feels best.

Start sitting on the floor with knees bent, feet on the floor. Lean backwards and place your “support prop” of choice under your upper back under the bottom of your shoulder blades. Take your hands behind your head to support the weight of your head, but keep your elbows pulling towards each other, so they point up towards the ceiling.
Lift your hips up off the ground as you let your upper body arch back over your support prop. Depending on the size of your prop, your head may or may not touch the floor - both situations are OK
If you’d like to add more of a backbend, you can drop your hips back down towards the floor
Hold the relaxed stretch for 20-30 seconds
Stretches to Help with Spinal Flexion (Rounding Your Back)
Narrow Cat/Cow (this also totally helps with spinal extension as well!)
Just like with back extensions, there are many different ways to do cat/cow depending on what your goals (like these). This variations with your hands closer to your knees helps emphasize spinal flexion (rounding of your back)

Start kneeling on hands and knees. Walk your hands back so they’re almost touching your knees. If this feels challenging/uncomfortable on your wrists, you can do this exercise on fists (to allow wrists to flatten)
Round your back by tucking your tailbone, tucking your chin toward your chest, and pushing your palms (or fists) into the floor. Feel your shoulder blades separate and try to reach the vertebrae between your shoulder blades as high toward the ceiling as you can!
Arch your back by relaxing your arms, lifting your head, dropping your belly, and tilting your tailbone towards the ceiling
Repeat, rounding and arching, 5-10 times
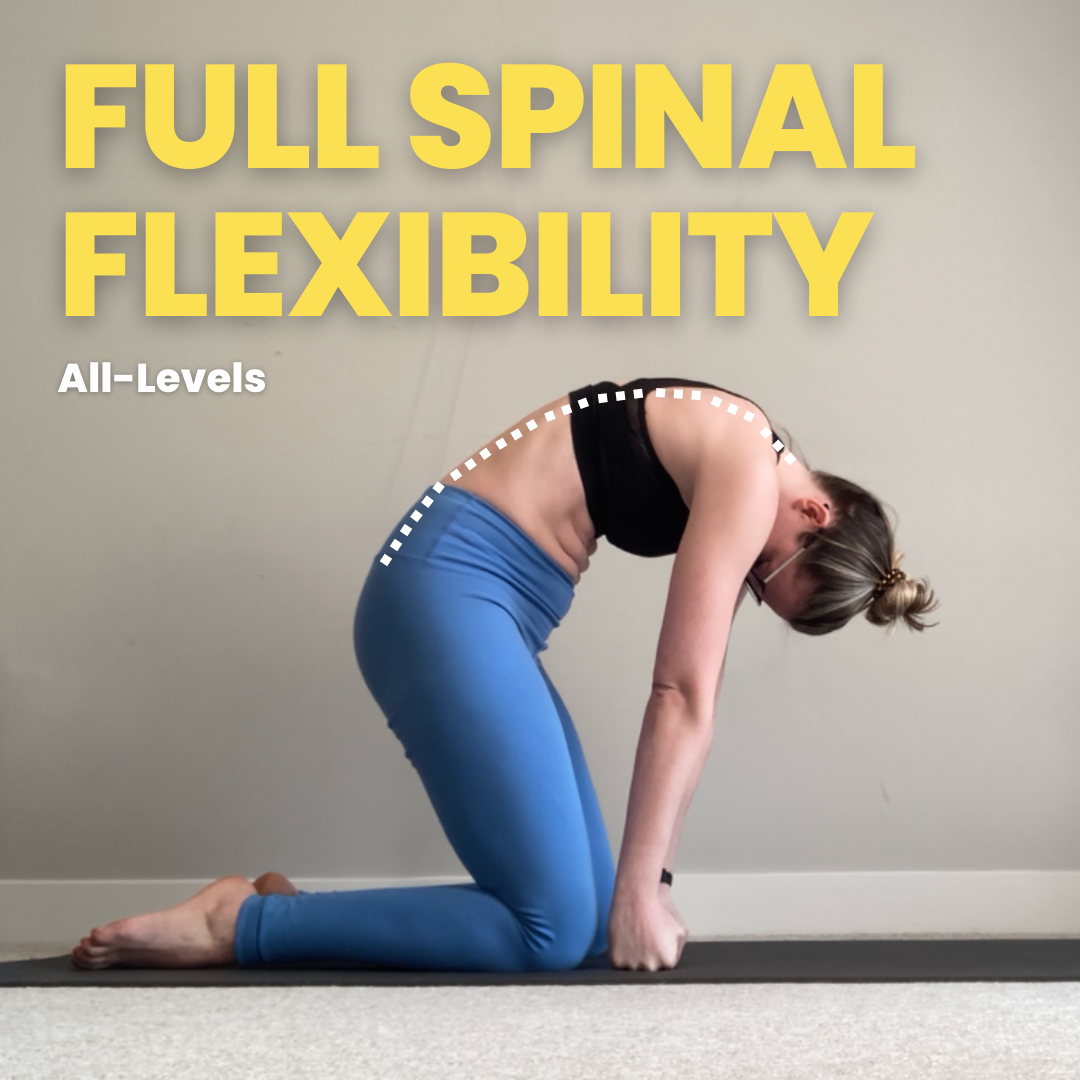
Zombie Roll Ups
This exercise is very similar to a Jefferson curl (if you’re familiar with that), but I prefer to do them with bodyweight as I describe below because this is often gentler on our spine.

Start standing with feet hip-width apart. Loosely cross your arms in front of your chest and bend your knees (if you are someone with tight hips/hamstrings - bend your knees a lot!)
Slowly start to roll down into a forward fold:
Tuck your chin towards your chest to start rounding through your neck
Then let the weight of your head and arms start to let your upper back to round as you continue to curl downwards
Continue to round all the way down your middle and lower back as you forward fold even farther
You can relax once you’ve leaned as far forwards as is comfortable (if this feels like an intense hamstring stretch, bend your knees even more - that might mean you end up relaxing your belly on your thighs, which can feel nice)
Slowly roll back on up to standing, one vertebrae at a time, reversing how you came down to your forward fold: tuck your pelvis to start stacking the vertebrae in your lower back, then take it up into your ribs, then shoulders, then neck and head come up last
Repeat, slowly rolling (rounding!) down to a relaxed forward fold, and back up to standing 3-8 times
Stretches to Help with Spinal Lateral Flexion (Side Bending)
Seated Overhead Reach

Start sitting in a comfortable position on the floor, on a block, or on a chair
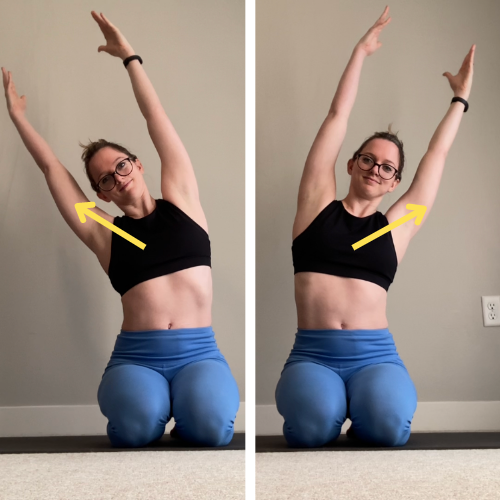
Reach your left arm down to the floor for balance/support as you reach your right arm overhead and lean to the left. If you keep your chest lifted and waist vertical, this will focus more of the stretch in your upper side body (especially your lats!). If you lean more towards the floor, side crunching through the waist, this will bring some of that stretch lower into your side body (obliques)
Hold for 20-30 seconds, then switch sides
Seated Overhead Reaches (Active)
Start sitting in a chair, on the floor, or on a block
Reach both arms up overhead as you start to tilt to one side. Just like with the exercise above, you can control whether you want to keep this more of an upper back or lower back sidebend by controlling how far you lean
Hold reaching to one side for a couple of seconds, then lean to the other side
Repeat for 5-10 slow-and-controlled reaches to each side
Stretches to Help with Spinal Rotation (Twisting)
Seated Twist

Start in a comfortable seated position (on the floor, a block, or a chair). Place your hands behind your head and let your elbows splay out to the sides
Inhale and sit up as tall as you can, lengthening your spine and reaching the crown of your head toward the ceiling. Exhale and twist to one side
Inhale twisting back to the center (lengthening up as much as you can!) and exhale twist to the other side
Repeat for 5-8 twists to each side
Wall Lunge Twist
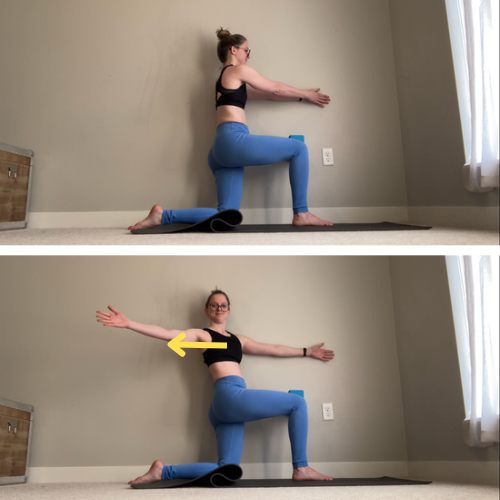
Start kneeling in a 90 degree lunge next to a wall, with your right leg forwards, left knee on the floor near to the wall. Take a yoga block and squeeze it between your right knee and the wall - you’re goal is to keep that right knee pressing towards the wall during the twist
Reach both arms forwards with arms straight, palms together, left arm lightly pressing into the wall
Slowly twist to the right, opening your right arm out to the side and as far back as you can comfortably reach (if you get any tingles in your right hand, instead of keeping that arm straight, bend your elbow and place your hand behind your head, reaching with your elbow)
Then twist back to your starting position (chest forwards, arms together)
Repeat, twisting open and closed, 5-12 times, then switch sides
Related Content
Recommended Workshop Recordings
This workshop is intended for students of all flexibility levels interested in working on their full spinal flexibility, meaning stretching and strengthening all the major ranges of motion of our spine.
What this recording includes:
A quick full-body warm-up to get you ready to stretch
A full 45-minute follow-along stretching routine you can follow 1-3 days per week to work on your back flexibility, including both passive and active stretches targeting:
Spinal extension (backbending)
Spinal flexion (twisting)
Spinal lateral flexion (sidebending)
Spinal rotation (twisting)
Note: this is not a backbending workshop. While plenty of stretches for backbending flexibility are included, this workshop is more focused on “feel good” stretches for a full range of motion in our spine (which encompasses so much more than bakcbends). If you’re really just interested in backbending flexibility, I’d suggest you check out either the beginner-friendly Building Up to Your Bridge or intermediate Beginning Contortion Bridges workshop(s) instead.
Recommended props:
Yoga mat
1-2 yoga blocks
A bit of wall space
Note: Because of Squarespace’s file size limitations (which is what I use for this wonderful website!), upon purchase you will receive a PDF with a link to the recording. You can then stream the recording online from the private link. Access to the recording never expires.

Who this class recording is for:
This recorded workshop is intended for “beginner” students who want to build their back, shoulder, and hip flexibility (and strength!) to push up into a bridge (aka Full Wheel). You’ll learn how to strengthen and stretch your whole backbending chain - with an extra emphasis on the shoulders.
What this class includes:
A quick full-body warm-up to get you ready to stretch
A full 45-minute follow-along stretching routine you can follow 1-3 days per week to work on your backbending flexibility
An additional 5-20 minutes of bridge-specific skillwork you can add on to that routine to specifically work on your bridge press (so you can tailor your training to fit your own schedule)
Recommended props:
Yoga mat
2 yoga blocks
A strap (which can be stretchy or stiff - a towel or sweatshirt would work as well)
Note: Because of Squarespace’s file size limitations (which is what I use for this wonderful website!), upon purchase you will receive a PDF with a link to the recording. You can then stream the recording online from the private link.