
Easy Contortion Performance Makeup for People Who Are Crap at Makeup
Easy Contortion Performance Makeup for People Who Are Crap at Makeup

Let me start off by saying I’ve never been very makeup-inclined. I didn’t grow up wearing much makeup, and eyeshadow alone intimidates and flusters me. Nowadays my daily makeup routine is “use some eyeliner and swoop on some mascara” and BAM I’m ready to face the day.
Thankfully I’ve gotten a lot more comfortable with crazy stage makeup (face paint, rhinestones, you name it) through practice, but my “go to” contortion performance look is still actually quite simple in the grand scheme of things. This is a great “look” because it doesn’t take an entire makeup cabinet to pull off, and can easily be adjusted for different color schemes, or scaled up for more drama if you’re comfortable with eyeshadow.
Here’s what you’ll need:
Need to have:
Black liquid eyeliner
Black mascara
Blush
Lipstick or lip stain
False eyelashes
Eyelash glue
Rhinestones
Tweezers (for putting on the rhinestones)
Nice to have:
BB cream, foundation, concealer, if you need something for basic face cover up
Bronzer or a Contour Palette
Highlighter
Eyebrow mascara
The first time you try this, it may take 15-20 minutes as you’re practicing - but once you get good at it (and depending on if you need to apply any face products or not), you can easily bust through this routine in 5-10 minutes.
How To: Performance Makeup in 15 Min Or Less!
0. Start with a clean face
Wash your face to remove any makeup you already have on (or, let’s be honest, just the oily sheen that’s been accumulating all day), that way you’ll be starting with a clean “palette.”
This is also the point where I’d suggest putting on your costume - for most of my costumes I like to wear them before/while I’m doing my makeup so there is zero chance of me accidentally smudging it if I’m trying to put it on afterwards. It can also be helpful to see the “finished product” as you go if you’re trying to coordinate colors with your costume.

1. Do your face
If you are graced with a clear acne-and-redness-free complexion, then this is a piece of cake: you can just slap on some blush.
OPTIONAL:
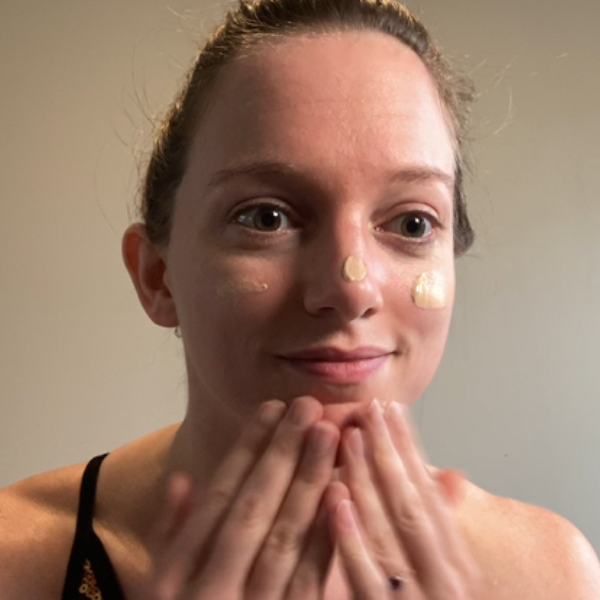
For the rest of us, using something to help even out your skin tone is nice. I’ve never worn foundation (it’s filed under “makeup that intimidates me” along with eyeshadow), so I use BB cream from NYX which is basically slightly more coverage than a tinted moisturizer (I’d share the link but it looks like it’s been discontinued!). I just put a little dab on each cheek, my nose, my chin, and my forehead, and blend it in with my fingers as if it was moisturizer. If I’ve got some heavy undereye circles or acne spots on my jawline (so much for acne being a teenage problem…) I dab on some concealer (Maybelline Multi-Use Concealer) and smudge the edges with my finger to blend it in
IF you have a “contour” palette (sometimes I use this NYX Contour Palette in Fair) or some highlighter and bronzer as part of another palette (I used some as part of an - also discontinued - Klara Cosmetics blush/highlighter/bronzer trio), you can do some “lazy face contouring” to make you look less washed out:
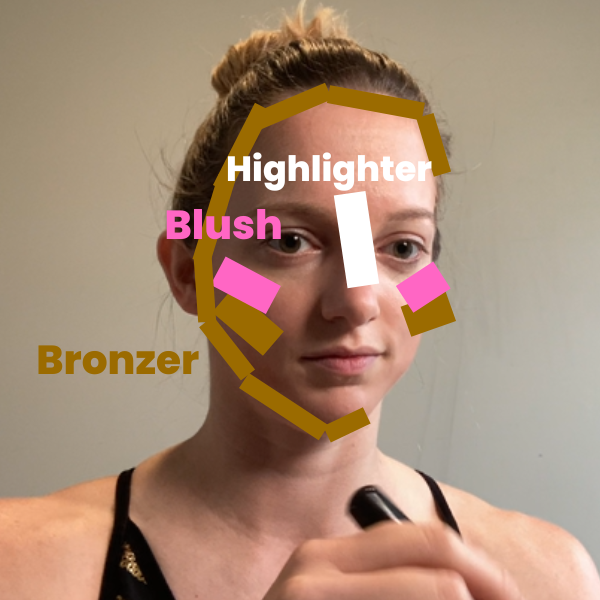
bronzer or dark contour shade in your sucked in cheeks, and then outlining the outside of your face from under your chin all the way up to your hairline - do this with a light hand and a big fluffy brush, the idea is you’re just adding a bit more natural shadow (otherwise you’ll end up looking like a Dia de Los Muertos calavera…)
highlighter on the bridge of your nose (I’ll also brush some one my eyelids if I’m not using eyeshadow)
NOT OPTIONAL: Throw on some blush. Use more than you think you need. Stage lights are crazy bright and wash out your face so you need to be a bit heavy handed. Apply blush from mid-cheek to outer cheek with a big fluffy brush. Layer as much as you need until it looks like you’ve used too much (that’s when you know you’ve got the right amount!)
2. Do your eyes
Like I said, to keep this simple we are ignoring eyeshadow and just doing fancy eyeliner and jazzing it up with rhinestones.

Line the top of your upper lash line with black liquid eyeliner, keeping it as close to the lash line as you can (I use Wet n Wild Megaliner Liquid Eyeliner - it was the cheapest I could find and it is fantastic so I’ve re-bought it for years). You don’t have to line it all in one fell swoosh, you can do tiny dabs and connect-the-dots if that helps you keep a steadier hand. Then for the fancy part: extend the upper lash line into an exaggerated cat eye: draw a line from the outer corner of your eye to just shy of where your eyebrows would extend if they grew any longer. Once you’ve got your oh-god-this-looks-too-long cat eye on top, add a shorter line underneath, also starting at the outside corner of your eye and extending out to the side. If any of your lines come out smudged, or you realize one side looks very different from the other, you can use a Q-tip to help wipe of the offending eyeliner and re-draw it again. Don’t worry if it looks silly now, I promise it’ll look better once you’ve added your fake lashes and some rhinestones.
Swipe on some black mascara (I use essence cosmetics Lash Princess) onto your top lashes. Don’t worry about your bottom lashes
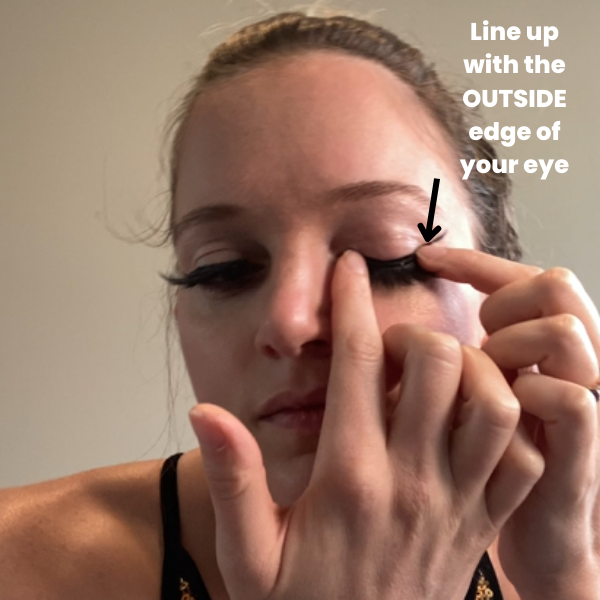
Next up it’s time to add your false eyelashes - I just use whatever I found last time I was at Marshall’s (they always have a bunch on sale, so I stock up when I go. The ones I’m using in this video are KISS “Teddy” lashes). I don’t recommend using the lash glue that comes with your false lashes, while include actually good adhesive, in my experience most are garbage. Because you’ll be using lash glue for the rhinestones too, I recommend using DUO in White/Clear - a little tube will last a while! Apply a thin layer of glue to the underside edge of your lashes and wait 20-30 seconds for it to become tacky (this will help it stick better to your eyelid). Double-check if there's an “inside” and “outside” side of the lashes, and line the outside side up with the outside edge of your lash line (always the outside - not the inside!). Press and hold the lash to your eyelid, gently pushing it down toward your lash line, for 20-30 seconds. Sometimes you get lucky on your first try and it stays in place great, other times the inside edge might start peeling away, in which case you can dab on a bit more glue and try to push it down for another 30 seconds.
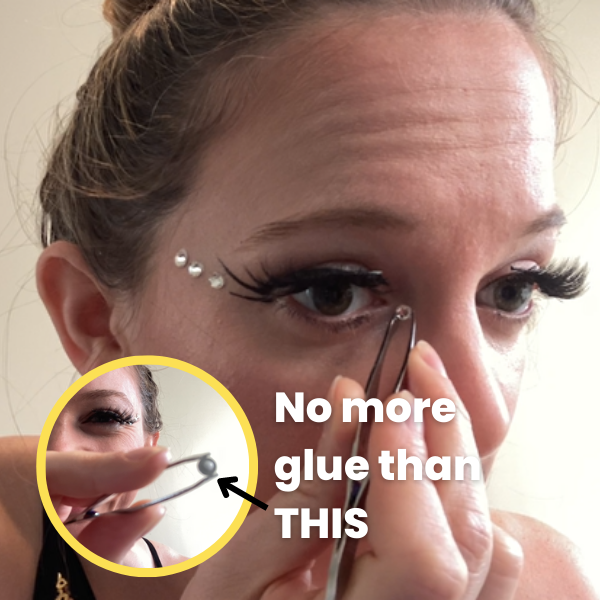
The real “magic” with any circus look (in my opinion) is with the sparkle - this is where we put on a shitload tasteful amount of rhinestones. I get my rhinestones from Michaels (the craft store), but you can also order them online (like these). Look for ones that don’t have craft adhesive on the back if you can (it’s not a problem if you do get the adhesive-on-the-back kind that come on a sticker sheet, but you do have to peel the adhesive off before you try to use them). Grab a rhinestone with a pair of tweezers (don’t use your hands unless you want lash glue all over your fingers, and then your face…), dab on a tiny dollop of your eyelash glue (a drop so small it doesn’t cover the whole bottom of the rhinestone), let it get tacky for 10 seconds (this is less important now since the gems are so small compared to the lashes) and stick the rhinestone to the outside of your eyelid. For this look, you’ll want to make a line of 3 rhinestones following the aggressive cat eye you lined your eye with earlier, and 1 rhinestone on the inner corner of each eye.
Finally - optionally - it is nice to darken your eyebrows to make sure they show up on stage. If you have thin brows or light-colored hair, some stage lights can make your eyebrows disappear and you end up looking a bit alien (not ideal). I use I use this NYX tinted eyebrow mascara, although I’ve also just used brown-ish eyeshadow and applied it along the inside of my eyebrow to darken them a bit - that totally works in a pinch!
3. Do your lips

I saved the easiest part for last! No stage makeup is complete without a bold lip. You can use a lipstick or lip stain (or any combination of the two). This NYX Liquid Suede Cream Lipstick in Kitten Heels is my go-to because it’s a great dramatic red that doesn’t make me look like a clown, and unlike “regular” lipstick it doesn’t blead or crack at all so I don’t have to worry about maintaining it if I’m doing a long performance (like a couple of hours of ambient contortion).
Before you run off to show everyone your new gorgeous face, do double-check that you didn’t get any lipstick on your teeth!
4. Go perform and do wonderful things!
That’s all there is to it! Stage makeup doesn’t have to be wildly elaborate to look professional, polished, and fabulous.
Related Content
Recommended On-Demand Workshop
![[NEW AND IMPROVED] Beginning Chest Stands Workshop](https://images.squarespace-cdn.com/content/v1/5ea57caad08f387b2e9827bd/024e46c0-69d6-4ccd-bf64-6e165d8d8373/Beginning+Chest+Stands+workshop+thumbnail.png)
Updated November 2025! Note: this workshop has been re-recorded (new and improved!) from its original 2021 version
Who this workshop recording is for:
This workshop is designed for students who have some preexisting back/shoulder flexibility (can comfortably get their chest to the floor in a puppy pose) who want to learn the classic contortion “chest stand” backbend. This is a great introduction to contortion-style back flexibility training where you’ll not only learn strengthening drills to deepen your flexibility (because the vast majority of “advanced” flexibility training is really strengthening work!), proper abdominal and neck engagement in different poses, but also progressions and variations to work towards chin and chest stands.
Variations of drills are given for various flexibility levels, so you can continue to challenge and grow your back flexibility as your get stronger and flexier!
Prerequisites:
Students must be able to push up into a bridge, and to comfortably hold either an arms-forwards or arms-backwards puppy pose with hips stacked over the knees, and chest touching the floor. “Comfortably” means you can breathe comfortably and hold for several breaths in this position.
If you don’t let have that level of back and/or neck flexibility, start with one of these workshops to help build that up first:
This 75* Minute Workshop Covers
An hour long follow-along contortion conditioning class, including
A full body warm up with extra emphasis on back flexibility
Active flexibility drills to strengthen and stretch your full backbending chain, with dedicated drills for the hips, lower back, upper back, and neck
“Choose your own adventure” style skillwork practice: more than 45 minutes of detailed chin and chest stand progression tutorials are included, and you can choose which ones to practice during any given training session. Tutorials include…
Review of proper muscle engagement in chin/chest stands for SAFE practice
Use of support props like blocks and/or yoga wheels to modify poses
Kick up practice & balance drills
Leg variations for different chest stand “shapes”
This workshop was filmed with the intention of fitting a 75-minute practice, but students may choose to trim it down, or extend it and work on more skill work for up to a 90-minute practice (longer practice is not recommended).
Required props:
Two yoga blocks
A sturdy chair or low table/bench
Long strap (can be stretchy or stiff)
Some wall space
Upon checkout, you will receive a PDF with a link to the workshop recording (Squarespace limits file upload sizes so I can’t actually upload the whole recording here). The recording is for your use only, not to be shared with others - thank you!