
Gentle (Passive) Stretches for Internal Hip Rotation
Gentle (Passive) Stretches for Internal Hip Rotation
Last week we talked about internal hip rotation in the “active” sense, why this range of motion is important in both everyday life (and potentially in your flexibility-related hobbies), and how to train the active mobility to move through as much of a safe range of motion while strengthening your stabilizing muscles.
Read Last Week’s Blog Post: Strengthen While You Stretch: 6 Drills for Active Hip Internal Rotation

Common ranges of motion for internal hip rotation (both active and passive)
We also mentioned how your active range of motion can only ever get as deep as your passive range of motion (although for most people, it’s often much smaller unless they intentionally train it) - so if you have a reduced range of motion when it comes to internal rotation (IR) in your hips in general, you’re going to need to include passive stretches to help your hips open up.
How much is a “good” range of motion for internal hip rotation? For passive ROM (using your hands or a partner’s hands to assist the movement, 30-50 degrees is most common in healthy adults, with 45 being a good average to shoot for. Active ROM is typically smaller, with 35 degrees being more the norm.
So this post we’ll specifically be working to try to increase our relaxed/assisted hip IR to help work towards 45 degrees.
Relaxed Stretches for Hip Internal Rotation
All three of these stretches are meant to be relaxed (you could easily make them active by engaging your muscles to deepen or resist the stretch, but for the purposes of this post, we’ll try to keep them as “passive” as possible so we can relax into the stretch). As a reminder, stretching should never hurt. Hip anatomy varies from person to person, so if any of these stretches feel “pinchy” or painful, try a smaller range of motion, or skip them completely! We never want to force stretches in general, but this is even more important when the limitation may be due to a hard limitation (bone hitting bone) and not a soft limitation (muscle tightness).
1. Belly Down Foot Splay
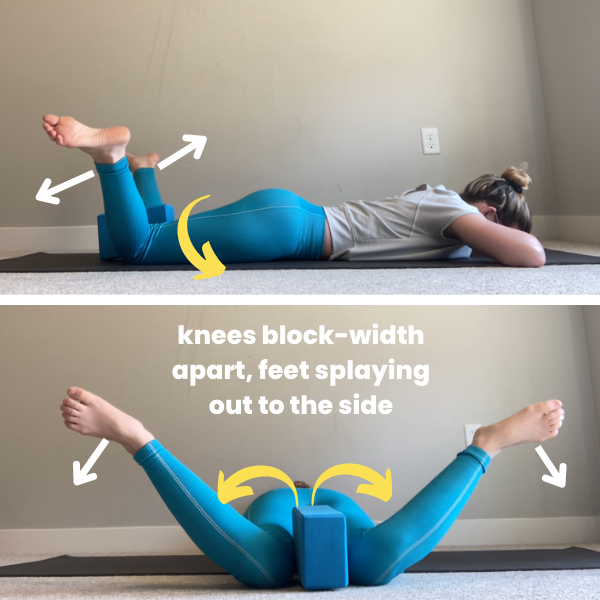
Begin by lying on your stomach on the floor with a yoga block on the “skinny” width between your knees
Bend your knees so your feet point towards the ceiling (feet can be pointed or flexed, whichever feels more natural). Leaning your knees into the yoga block for support, let your feet start to splay out to the side. Keep your knees bent 90 degrees so your ankles stay in line with your knees
Hold this passive stretch, letting gravity pull the weight of your shins and feet towards the floor, for 20-30 seconds
Note: if you experience any knee pain, try bringing your knees closer together (lose the yoga block), or farther apart (use a wider setting on the yoga block). If knees/hips still feel any pain or pinching sensation, skip this exercise
2. Lying Down Windshield Wiper Hold
Folks who have taken classes with me know I love “windshield wipers” to help reset our hips. This passive leg flop is one of my favorite relaxed stretches to do at the end of a challenging leg session to give our rotators (both internal and external) a little extra stretch.
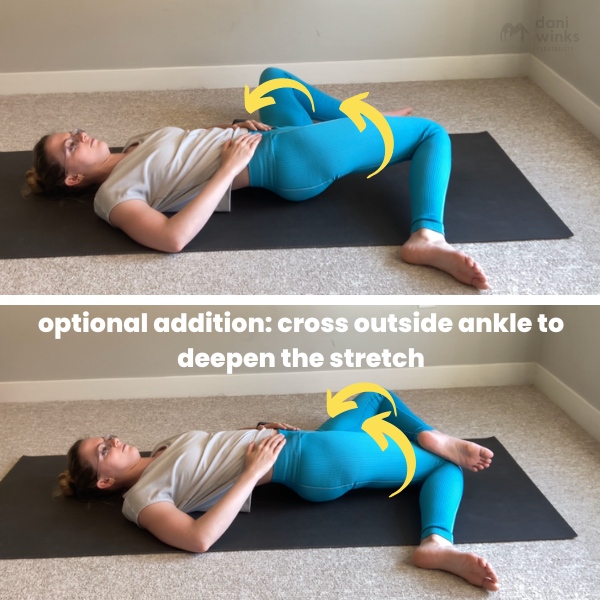
Start lying on your back on the floor, knees bent, feet planted wider than hip-width apart (mat-width if you’re on a yoga mat usually is a good width! If this feels funky in your knees, feel free to experiment with feet closer or farther apart)
Keeping feet on the floor, flop both knees over to one side. Don’t worry if they don’t touch the floor, just let gravity pull your legs towards the floor. The outside leg is in external hip rotation and the inside leg is in internal hip rotation.
Want to take it deeper? Once your knees are flopped to one side, you can cross your outside ankle over the inside knee to add some bodyweight to deepen the stretch in in the inside leg hip (increases the internal hip rotation stretch)
Hold this passive stretch for 20-30 seconds, then flop knees over to the other side and repeat on the other side
3. Back Lying Reverse Pigeon
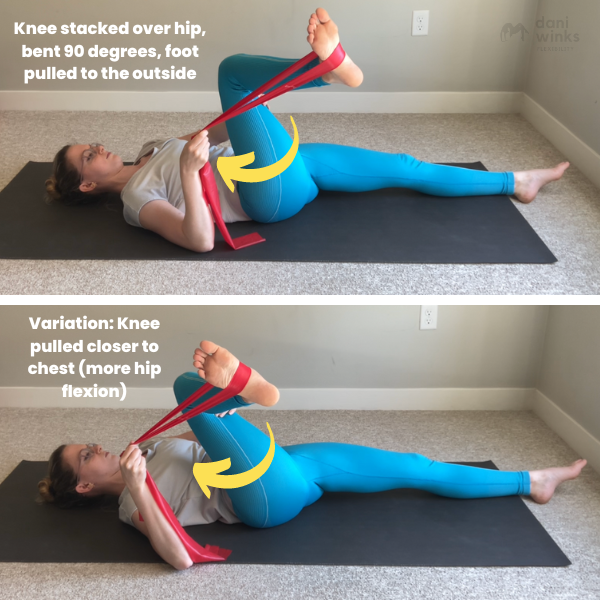
Pigeon pose is a great stretch for our external hip rotation, but have you ever worked on your “reverse” pigeon taking your foot in the other direction? It’s a whole different stretch! While you could technically do this like a traditional seated pigeon, that does require a lot of hip rotation - this variation below lying on your back is easier to adjust for different flexibility levels.
Start lying on your back on the floor. Pull one knee towards your chest and loop your strap around the bottom of the lifted foot (how far you pull the knee in is up to you - start with the knee at hip height, and if the stretch feels good, you can pull the knee in even more towards your chest)
Keeping your knee fixed in the same spot, use the strap to help internally rotate your thigh and pull your foot towards the outside of your body
Hold this passive stretch for 20-30 seconds, then switch legs
What About Active Stretches and Mobility Work?
Working on strengthening your muscles at their end range is hugely beneficial to working on your flexibility! Passive stretching alone is rarely the answer. So adding some of the active hip mobility drills in last week’s post would be a great way to strengthen and “save” the flexibility gains made by your passive stretching.
Related Content
Recommended Class Recording

Note: this class is also a part of a 2-class bundle! If you also want to work on your front splits too, you should check out the “Starting Splits” Front & Middle Splits recording bundle.
Who this class recording is for:
This 45-minute class is intended for “beginner” to “begintermediate” students interested in working on their middle splits and straddles. For more intermediate/advanced students who are 3 inches or closer to the ground in their middle splits, I suggest you check out the 60-minute Middle Splits (Box Splits) workshop instead which has even more active flexibility drills in a longer class format. This workshop is a better fit for students who’s hips are 4 inches or higher away from the floor when doing a middle split.
Even if you are a super beginner and can’t touch your toes, this video has stretches and modifications for a variety of levels.
What this class includes:
A quick full-body warm-up to get you ready to stretch
Active flexibility exercises focusing on the two main muscles groups needed for middle splits and straddle pancakes: adductors (inner thighs) and hamstrings (with a healthy dose of glute and hip flexor strengthening for support!)
A full 45-minute stretching routine you can follow 1-3 days per week to work on your middle splits (due to the amount of strengthening involved, I don’t recommend doing this routine every day - your body will benefit more from rest days!)
Recommended props:
A chair (or a bench or low table)
Yoga blocks - totally optional, but they are a wonderful prop, especially if you’re a beginner. If you don’t have blocks, I recommend practicing next to a chair, your bed, or a wall so you can reach your hand out for balance if you need to
Note: Because of Squarespace’s file size limitations (which is what I use for this wonderful website!), upon purchase you will receive a PDF with a link to the recording. You can then stream the recording online from the private link.