
Why Do My Elbows Splay Out in Forearm Stands?
Why Do My Elbows Splay Out in a Forearm Stand?
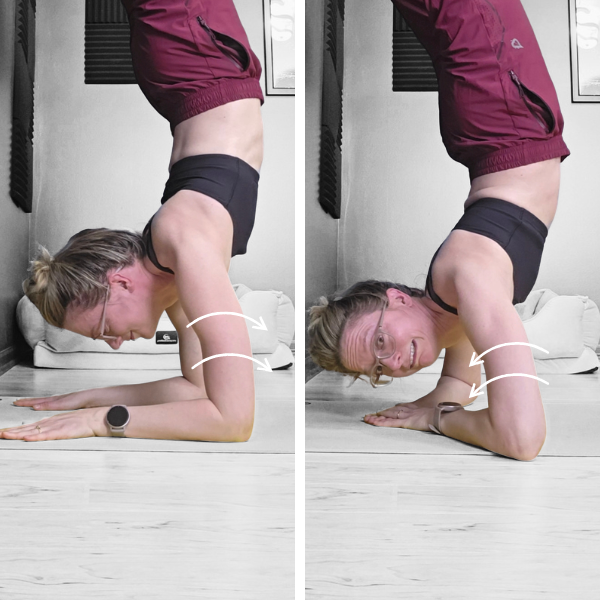
So you’re setting up for your forearm stand: you’ve got your elbows shoulder width apart, forearms firmly pressing into the ground, shoulder shrug muscles engaged! Then you kick your feet up, and oh no - your elbows are slooowly starting to slide out to the sides, no matter how much you squeeze them in! What’s going on?
The “elbow splay” is a challenge many students face, even folks with relatively flexible shoulders.
The two biggest reasons this happens are:
Insufficient flexibility in the lats (and occasionally pecs), limiting overhead shoulder flexibility
Insufficient strength in the rotator cuff to help keep the shoulders “externally rotated” in an arms-overhead position
Often, it’s a combination of both of these challenges that end causing the elbow sploot.
The Role of the Lats and Rotator Cuff Muscles in a Forearm Stand
Our lats are the big shoulder/back muscles that connect our lower back to the insides of the upper arm bone. These are the muscles that help us do pull ups, and they can get a stretch when reaching the arms overhead (which is the arm position we end up in in our forearm stands). Because these muscles connect to the inside of the upper arm bone (they attach to the bicipital groove where one of your biceps tendons attaches), they can assist in shoulder internal rotation.
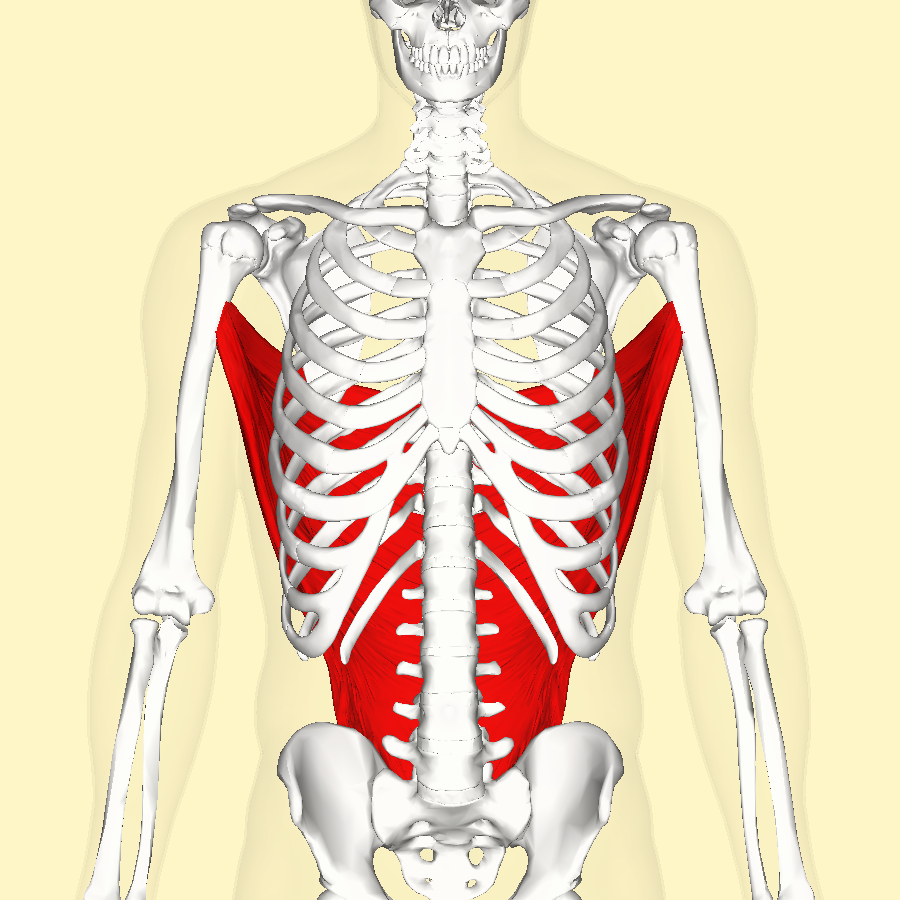
Image credit: Anatomography, CC BY-SA 2.1 JP, via Wikimedia Commons
But that also means when they are tight and we lift the arm overhead, they tend to pull the upper arm/shoulder into internal rotation. Here’s (roughly) what that looks like with the elbow bent so you can see the rotation of the arm:
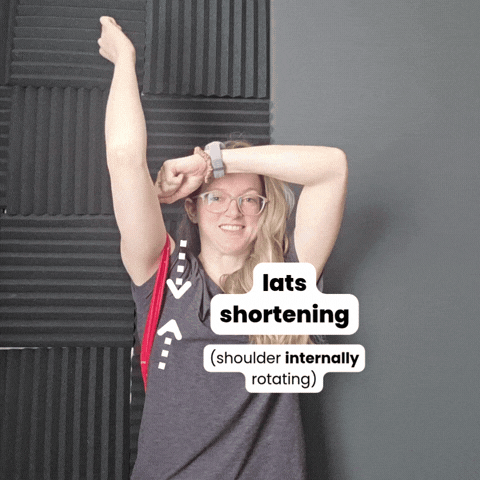
Notice how much the band has to stretch to externally rotate the arm (bicep towards the ceiling). This same stretch needs to happen in our forearm stands (because we end up in a similar arms “overhead” position when we kick up and bring our torso more vertical). In a forearm stand, the tightness in our lats trying to pull our biceps to face each other (tugging the hands in and splooting the elbows out. Here’s what that looks like when we’re upside down on our forearms:
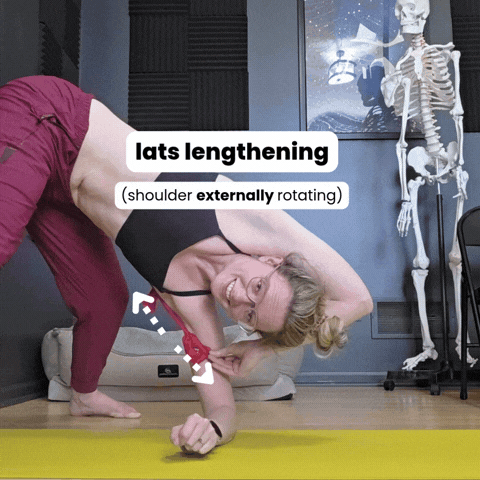
(And yes, that was as awkward to try to film as it looks).
The other group of muscles we want to understand are our “rotator cuff” muscles. These are a group of 4 muscles that connect our upper arm bone to our shoulder blade.
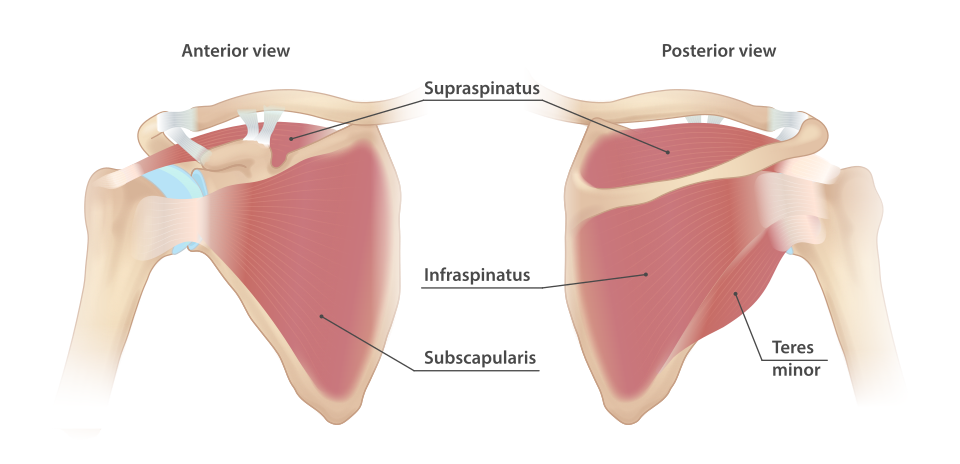
Image credit: InjuryMap, CC BY-SA 4.0, via Wikimedia Commons
This muscle group is responsible for both stabilizing the ball-and-socket joint of the shoulder, as well as controlling the rotation of the upper arm relative to the shoulder blade (hence the name “rotator cuff”). In the context of our forearm stand, these muscles help us keep our upper arm twisted forwards (and elbows back), and help resist the urge to let the upper arm rotate inwards (elbows splooting out to the sides), when the tight lat muscles start pulling us into that postion.
So let’s take a look at some helpful drills that address both of these challenge areas:
Recommended Drills
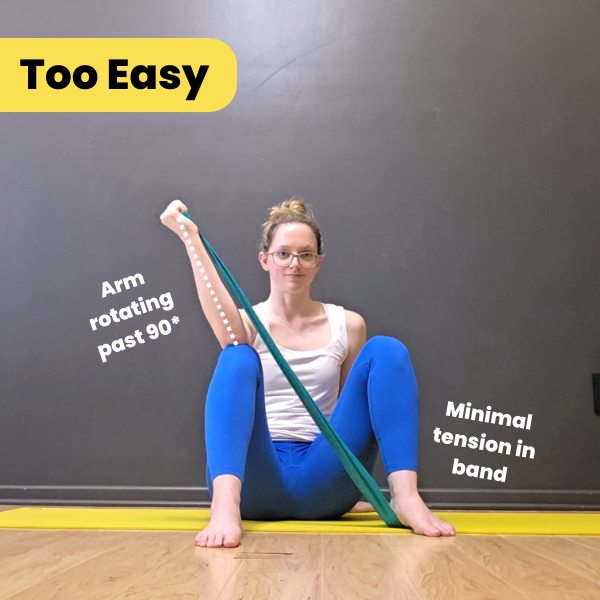
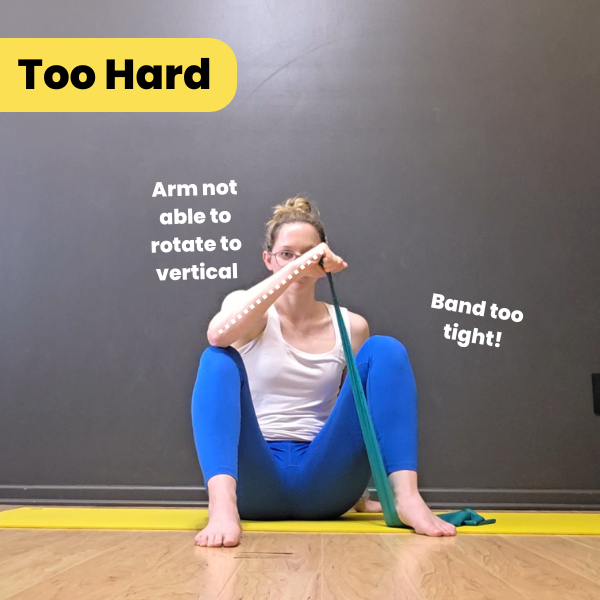
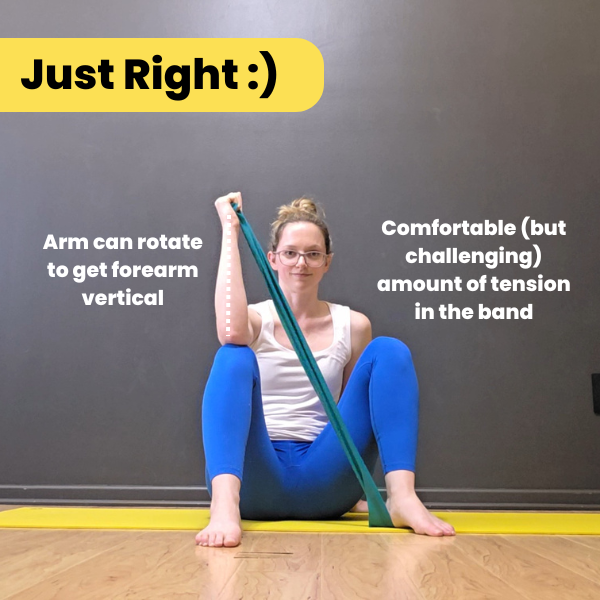
1. Banded Open Sesames
This is a great drill to start warming up the rotator cuff muscles that help with shoulder external rotation. You will need a light TheraBand style resistance band for this exercise. If you don’t have a resistance band, try these Open Sesames instead.

Start sitting on the floor with both knees bent in front of your chest, feet flat on the floor. Holding the end of a resistance band in your right hand, bend your right elbow 90*, placing it on top of the right knee, arm rotated so the forearm parallel to the floor. Take the other end of the resistance band and smoosh it under your left foot to hold it in place. Start with a little bit of slack in the band
Keeping the elbow bent 90*, rotate the right arm to bring your fist up towards the ceiling, stretching the band - you should feel a squeeze in the back of your shoulder blade or outer upper arm as those rotator muscles work to rotate your arm
Hold the band stretched for a moment, then lower the forearm back to parallel to the floor. Repeat for 10-15 reps
Make it easier/harder: It may take some trial and error to choose the right strength resistance band, or how much slack/tension you need in the band for this drill. We want enough tension for it to be challenging to get the forearm vertical (fist up to the ceiling), but not so much tension that it’s limiting how much we can actually rotate the upper arm. If you can’t get the fist all the way up to a vertical forearm position, try more slack in the band, or a lighter band (or no band!). If it feels easy, try starting with more tension in the band, or use a stronger resistance band.
2. Butcher Block Stretch
This is a classic stretch for the shoulders (and can even be used for upper back flexibility as well). To help stretch the shoulders/lats/pecs in an elbows-not-splayed-out position, we’ll use yoga blocks to help space our elbows and hands.
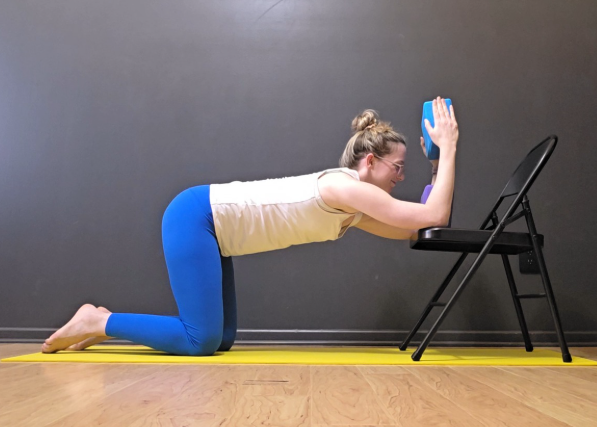
Start kneeling by the edge of a chair or bench, holding a yoga block (long-ways) between your elbows, and another (also long-ways) between your hands. Bend your elbows and place them on the edge of the chair, walking your knees back so you have space to drop your chest and armpits towards the floor
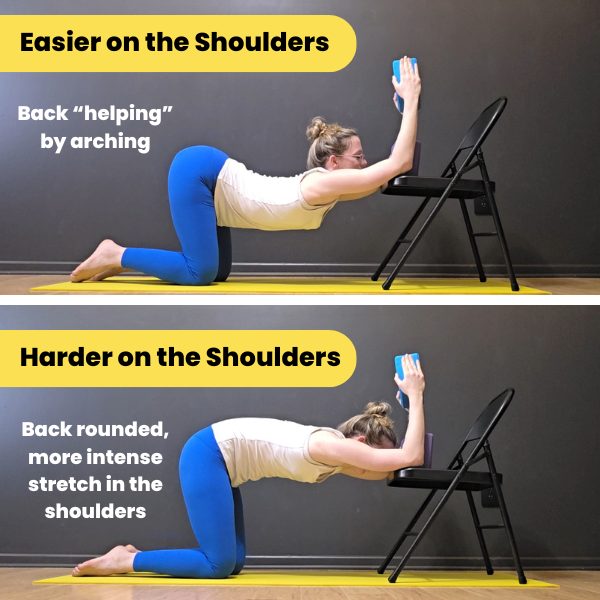
In the end position, you should have hips stacked over your knees (letting them sit back a little bit for balance is fine, but we want the thighs to be mostly vertical, not letting your butt sit on your heels), armpits facing the floor, elbows bent 90* with hands pointing up towards the ceiling. You should feel a stretch in your outer armpit (lats), or possibly your chest if that’s a tight area for you. You might also feel engagement in the top of the shoulders. If you feel a pinching or a hard blockage sensation in the top of the shoulders, try to push your elbows down into the chair more actively, or lessen how much you’re leaning until you don’t feel that pinch
Hold for 30 seconds
Make it harder: For folks with more shoulder and back flexibility, you can make this stretch more challenging (for the shoulders) by not letting your back arch. Instead of relaxing everything towards the floor in this pose, tuck your tailbone and puff up the back of your ribs to slightly round your back (if you’re familiar with a “hollow body” ab engagement, that’s basically what we’re going for here). Keep your abs engaged as you try to sink your armpits towards the ground into the stretch, but resisting letting your belly drop and resisting letting the back round
3. Block Sandwich Lifts with a Strap
I usually sneak block sandwich lifts into virtually any class where we’re working on shoulder flexibility. This variation using a strap is a great strengthener for our rotator cuff, helping to keep it staying engaged even when we’re lifting the arms overhead (and that engagement gets more challenging!). This is basically turning that “lift your arms up” experiment we tried earlier into an actual strength-building drill :)
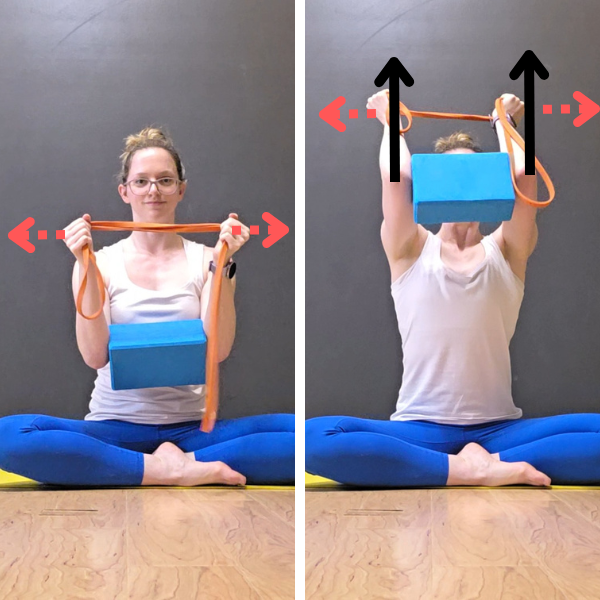

Start sitting in an upright position with elbows bent, holding a yoga block (long-ways) between your elbows, and holding a resistance band between your hands (hands the same width apart as your elbow block). Start with the elbows low, pulling a small amount of tension in the band with your hands to hold the band taught (does not have to be a super strong pull)
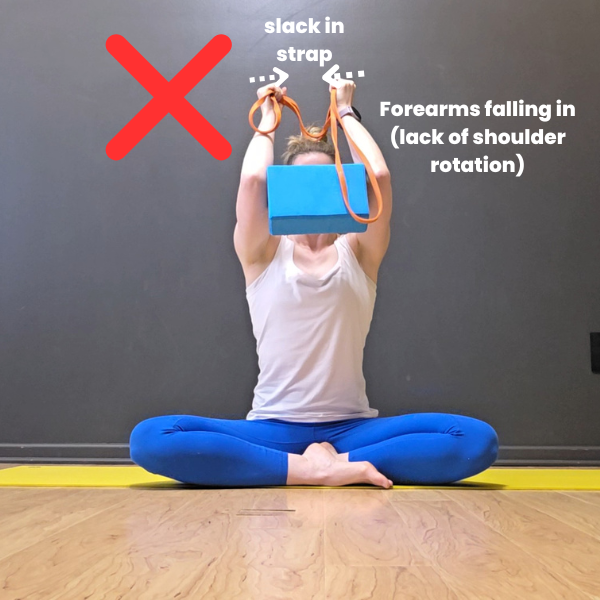
Keeping your spine neutral (don’t let it arch!) and keeping your elbows bent (~90* elbow bend), lift the elbows as high as you can while keeping the band pulled taught with your hands. This should feel challenging, even if your elbows aren’t lifting very high! If the band starts to goes slack, that means we don’t have enough active shoulder external rotation to keep going, and you’re lifting too high.
Engagement note: try to avoid squeezing the elbows into the block too hard, this can over-engage some of the muscles in the front of the chest that can actually make lifting those arms up even harder. The elbows only need to be lightly pressing in to hold the block in place, keep more of the squeeze-y, muscle-y emphasis on trying to keep the biceps rotated up as you lift
Lower the elbows back down. Repeat for 8-12 elbow lifts, keeping the band pulled taught the whole time
Make it easier: Skip the strap, use a block instead (then this drill becomes “regular” block sandwich lifts)
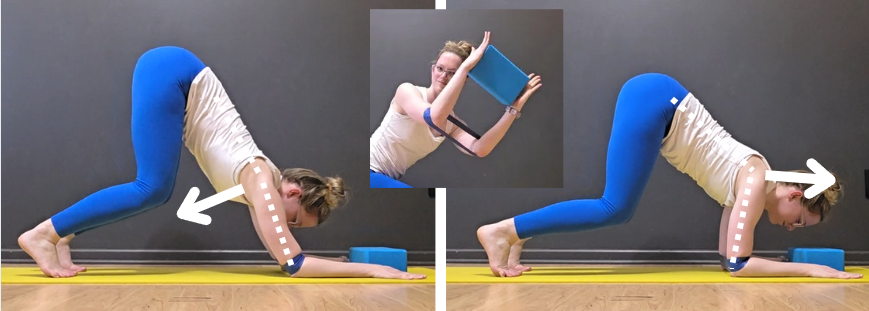
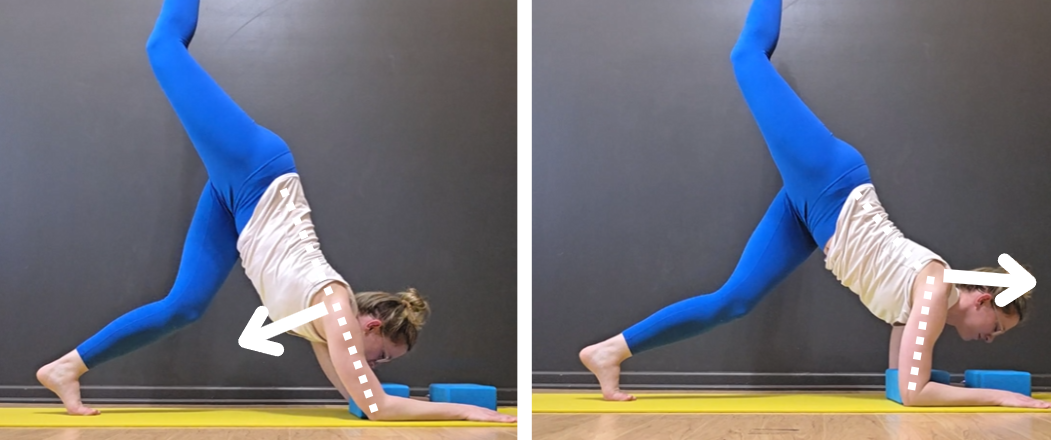
4. Dolphin Push Ups with Blocks
So now that we’ve done some more isolated strengthening for our rotator cuff muscles, let’s see if we can keep them working while we have more bodyweight in our shoulders, more similar to the demands our shoulders are in in an actual forearm stand - in dolphin pose! After all, dolphin pose is basically just a feet-on-the-floor forearm stand.
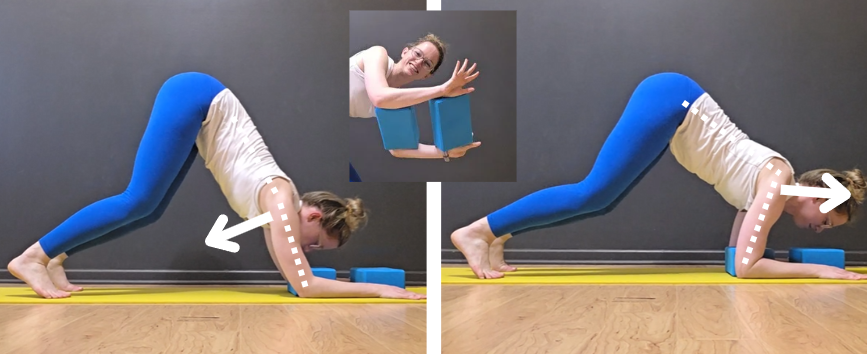
Start kneeling with forearms on the floor, with a wide yoga block between the hands and another wide yoga block between the elbows (so forearms should be parallel, and block-width apart)
Note: if you find the blocks awkward because they get in the way of your head, feel free to use something flatter (but similar width) like a book between your elbows
Tuck your toes and lift your knees and hips, walking your feet back as you press your chest back towards your thighs (this is basically a downward dog, but on our forearms instead of palms). Feel free to keep the heels lifted and a generous bend in the knees, because we are focusing on the shoulders for this drill, we don’t need to push into a crazy hamstring or calf stretch (but you’re welcome to straighten the knees and drop the heels if that feels comfortable). Our goal starting position is to have the hips high in the air, forearms firmly planted on the floor, pushing our chest and armpits back towards our legs - this is our “open” shoulder position. Depending on flexibility levels, you might get those armpits totally flat in this starting position, or there might be a little bend at the armpit - that’s ok! The goal is to start with shoulders as “open” as your current flexibility allows, even if that’s not a full 180* overhead reach
Keeping the hips high and elbows touching the elbow block, let the head and shoulders drift forwards towards your hands (this is “closing” the shoulders) - only drift as far as you can where you can still support your weight in your arms!
Once you’ve found your limit, press into your hands and push your chest and armpits back towards your thighs, opening those shoulders into as deep of a stretch as you can while still keeping contact with your elbows on your elbow block (not letting them be pushed wider)
Engagement note: To keep the elbows touching the block, we want to make sure we’re using our rotator cuff muscles (rotating the upper arms) and not just our pecs (adducting, or squeezing in the upper arms). If we think about this in terms of “squeezing in” the elbows, this can over-engage the chest muscles, which can make it harder to reach those arms overhead. Instead, we want to think about more of “keeping the upper arms twisting,” more like you’re trying to push the outsides of your forearms towards the outside of your mat, and it’s this twist that just happens to keep your elbows in touching the block. It’s a nuance cue, but if you can get more of that arm rotating engagement and less of the elbows squeezing in for dear life, you’ll be ensuring you’re really strengthening the right support muscles in this drill!
Repeat for 6-12 reps
Make it easier: To help assist the rotator cuff muscles with keeping the elbows in, swap the elbow block with a stiff band looped around your elbows. Now just because you have a band helping physically hold your elbows in the “right” position doesn’t mean you get to relax and let it do all the work! Still imagine you’re trying to keep a block pinned between your elbows, and forearms strongly rotated parallel to each other so you’re still working on engaging your rotator cuff muscles during this drill
Make it harder: Add more weight into the shoulders by lifting a leg in the air as you do your leans / push ups. As before, still only lean as far in each direction as you can comfortably support!
Now Try Your Forearm Stand….
Now that you’ve spent some time warming up, strengthening, and learning to use your rotator cuff muscles in that arms-overhead position - try your forearm stand with the same engagements from the last exercise in mind, and see if you can feel more control in your shoulders keeping those elbows in line!
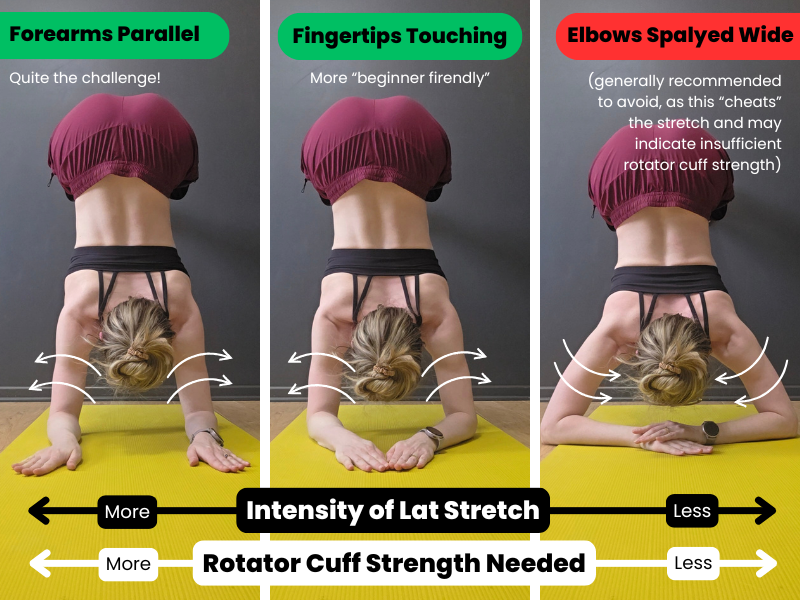
If they’re still going rogue, don’t panic - this kind of strength can take a while to build. In the meantime, consider an easier-on-the-rotator-cuff arm position for your forearm stands. Instead of forearms parallel to each other, keep the elbows shoulder-width apart as before, but bring the fingertips in to touch (I call this the “snow plow” position). This is actually my preferred arm position for teaching forearm stands to beginners because it is less demanding on the rotator cuff. By starting the shoulders in a less (but not none!) externally rotated position, this can be a less intense stretch on the lats, and make it easier to find that rotator cuff engagement once you’ve kicked up into your forearm stand. Just like with the forearms-parallel variation, you still want to strive to keep your biceps rotating towards the front to prevent the elbow splay.
Looking for More Help?
If you’re looking for more help when it comes to your forearm stands (or your shoulder flexibility in general), check out these other resources:
Related Blog Posts [Free!]
Pincha (Forearm Stand) Tips to Balance Like an Instagram Yogi - a great overview of the various engagements we use (beyond just our shoulders!) to help balance in a forearm stand
Shoulder Conditioning for Contortion Forearm Stands - additional conditioning drills for that arms-overhead shoulder strength/flexibility
5 Drills for Improving Overhead External Shoulder Rotation - more rotator cuff strengtheners to strengthen those support muscles!
Related On-Demand Workshops

Who this workshop recording is for:
This workshop is meant for students with some existing shoulder strength and flexibility who are interested in taking it to the next level: continuing to improve their shoulder and back flexibility, and learning how to apply it to a classic contortion floor inversion: the forearm stand (aka pincha mayurasana for you yogis!). Note: this is not a yoga-style class (although you may recognize some yoga poses in some of the drills)!
Suggested Prerequisites:
Being able to comfortably hold a dolphin pose with forearms and palms flat on the ground (knees can be bent). Crazy backbendiness welcome, but not required - the backbend-y variations included in the tutorials can be modified for varying degrees of back flexibility.
If you can already comfortably kick up to the wall, or are interested in further practice, check out the Continuing Forearm Stands workshop as well!
This 75-minute* workshop covers:
An hour long follow-along contortion conditioning class, including
A full body warm up with extra emphasis on back and shoulder mobility
Active flexibility drills to strengthen and stretch shoulders to prepare for supporting our bodyweight, and prepare back for comfortable (and safe) backbends
“Choose your own adventure” style skillwork practice: more than 20 minutes of detailed forearm stand variation tutorials are included and you can choose which ones to practice during any given training session. Tutorials include…
Forearm stand variations walking feet up a wall
How to kick up to the wall (and regressions if you can’t quite kick all the way up)
Flat back and backbend-y forearm balances
Balancing tips
* This workshop was filmed with the intention of fitting a 75-minute practice, but students may choose to trim it down, or extend it and work on more skillork for up to a 90 minute practice.
Required props:
2 yoga blocks
Long strap (can be elastic or stiff)
A sturdy chair or low table (something you can lean on for balance)
Plenty of wall space!
Upon checkout, you will receive a PDF with a link to the workshop recording (Squarespace limits file upload sizes so I can’t actually upload the whole recording here). The recording is for your personal use only, not to be shared with others - thank you!
Beginning Forearm Stands - this ~75 min contortion workshop is a great primer for anyone looking to build the foundational shoulder and back flexibility needed for both “open shoulder” and “closed shoulder” forearm stands. For students who already have a forearm stand practice and are comfortable kicking up at the wall, the Continuing Forearm Stands workshop is likely a better fit that focuses more on balance drills, and more challenging backbend-y shapes
QUICKIE Overhead Shoulder Flexibility Routine - for folks who only have 20-30 min to dedicate to their training, this routine has a great list of efficient drills to open your shoulders (including plenty of rotator cuff work!). Note: this is not a follow-along workshop, this includes individual how-to videos for each drill in the routine
Shoulder Anatomy for Flexibility Training - for you super nerds, this 2-hour workshop is an overview of everything I wish I knew about shoulder anatomy (and how it impacts our training) when I started my flexibility journey 13 years ago. This workshop is a mix of presentation/slides, as well as follow-along drills for the various areas covered