
10-Min Post-Run Stretching Routine
10-Min Post-Run Stretching Routine
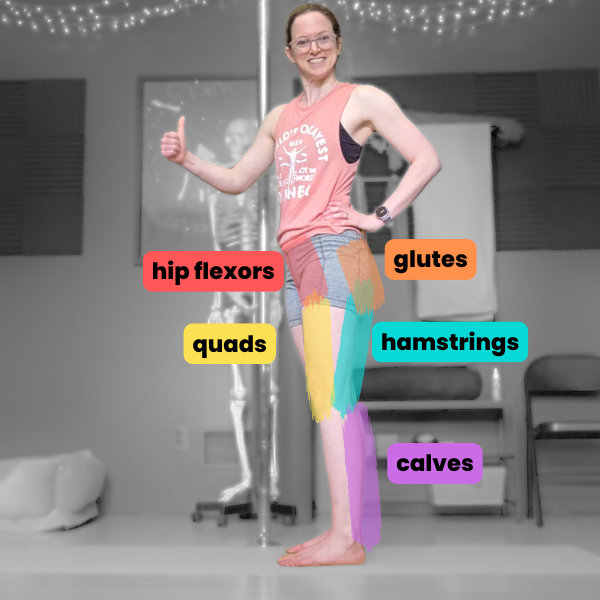
For all my runner or cyclist friends out there, here’s a great short stretching routine you can do right after your run/ride that hits the major lower body muscle groups worked: quads, hip flexors, hamstrings, calves, and glutes. You can “choose your own adventure” with this one, either sticking to the more “traditional” passive stretches for a feel-good stretch-out of the areas you just spent a whole workout contracting, or you can choose a more “active flexibility” approach and opt of the variations that include a strengthen-while-you-stretch component to mor effectively work on your flexibility of these areas.
No props needed for this routine, so you can do these stretches anywhere!
Follow-Along Video:
Stretches Breakdown:
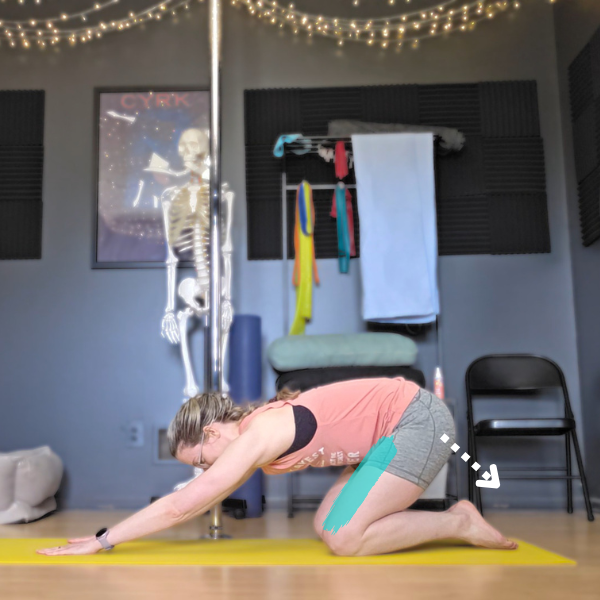
1. Quad Stretch (or Child’s Pose)
Stretch Focus: Quads + Hip Flexors
Avoid tilting the hips forwards and arching the low back
From standing, grab your left foot/ankle and pull it towards your butt until you feel a stretch through the front of your thigh (quads). Try to avoid tilting your hips forwards and arching your low back to lift the foot higher, we want the “foot pull” to only come from bending the knee, not from arching the low back
For more intensity, you can add a hip flexor stretch as well by tucking your tailbone and tilting your pelvis backwards
Hold for 20-30s, then switch legs
Active Variation: Standing Quad Stretch Contract-Relax Pulses
Start in the same foot grab as above
While continuing to pull the foot toward your butt, kick the foot into your hand to contract your quads while they’re in a stretched position. Hold the contraction for a second or two, then relax and see if you can pull the foot closer into a deeper stretch. Continue these slow and controlled (no bouncing!) contraction pulses (~1-2 seconds squeezing followed by ~2-3 seconds relaxed stretch) for 20-30s
Can’t grab your foot? No problem. Swap this standing foot grab for a kneeling Child’s Pose instead (how to).
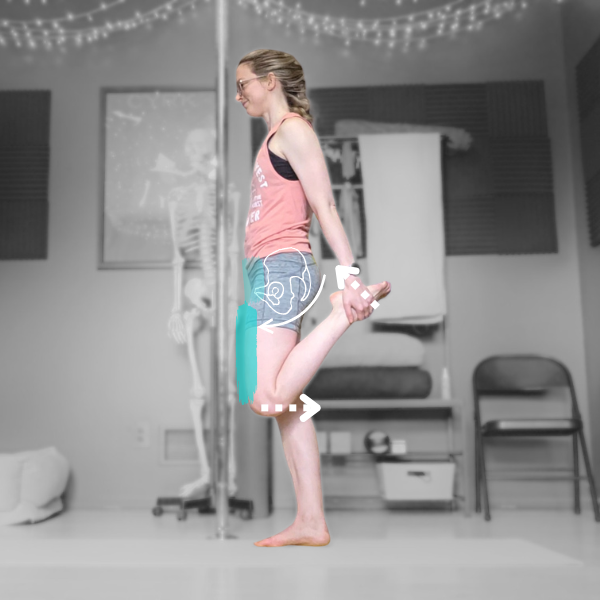
2. Sort-of-Single-Legged Forward Fold
Stretch Focus: Hamstrings
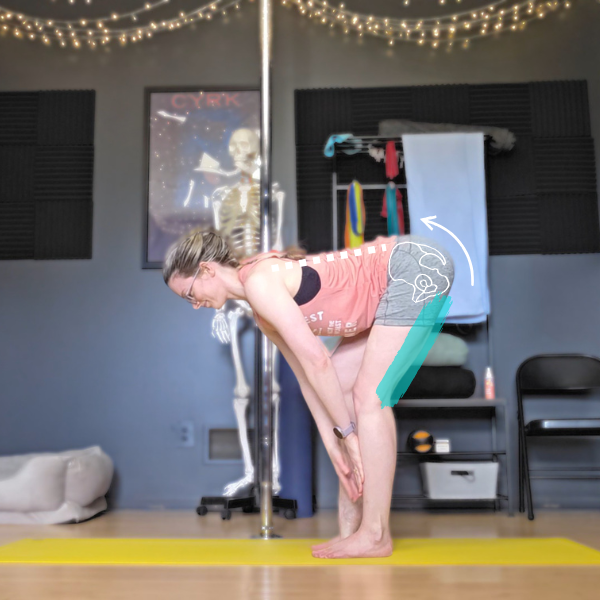
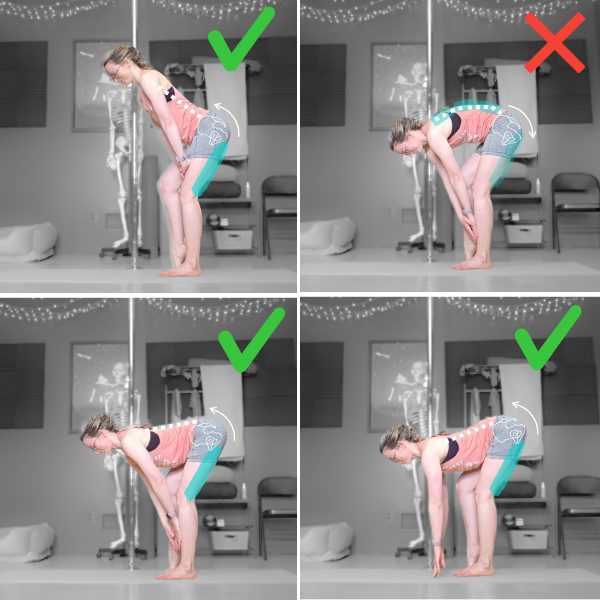
To isolate this stretch in your hamstrings (and not your back), try to keep your back as flat as possible, even if that means the forward fold is not as deep
Start standing with the majority of weight in your right foot, with the left knee bent (to lessen the stretch in that leg), and left toes on the floor for balance. You’re welcome to slightly bend the right leg as well if that feels better for this exercise - the goal is to get a good stretch in the right leg, and just use the left foot/leg for a bit of balance assist
Keeping a flat back, forward fold over the right leg until you feel a deep stretch in the back of the right thigh (hamstrings) - it’s OK if you feel this closer to the butt or closer to the back of the knee. If you only feel it in your calf, bend your right knee more. Hold for 30s, then switch legs
Active Variation: Sort-of-Single-Legged Good Mornings
Instead of holding the stretch for a period of time, turn this into a rep-based drill. Once you’ve found your forward fold, press the right foot into the ground as you lift your torso back up to standing (this will contract the hamstrings as they are going from a lengthened to a shorteened position). That’s one rep, repeat for 8-12 reps (then switch legs).
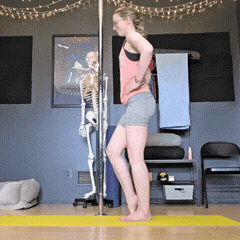
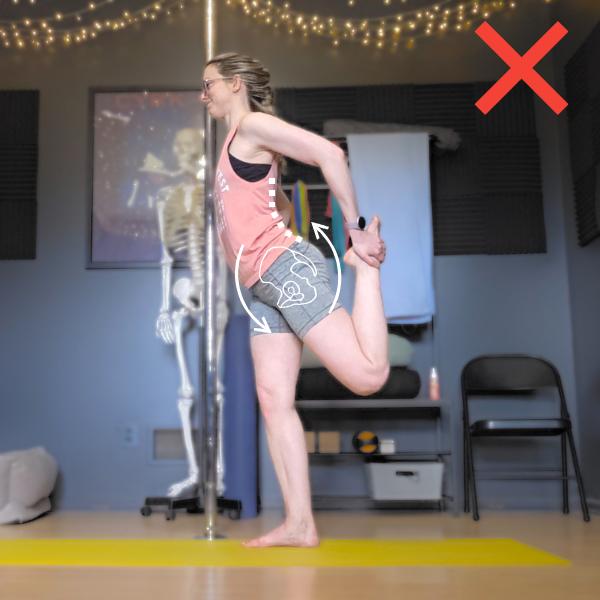
3. Standing Lunge with Heel Press
Stretch Focus: Hip Flexors + Calves
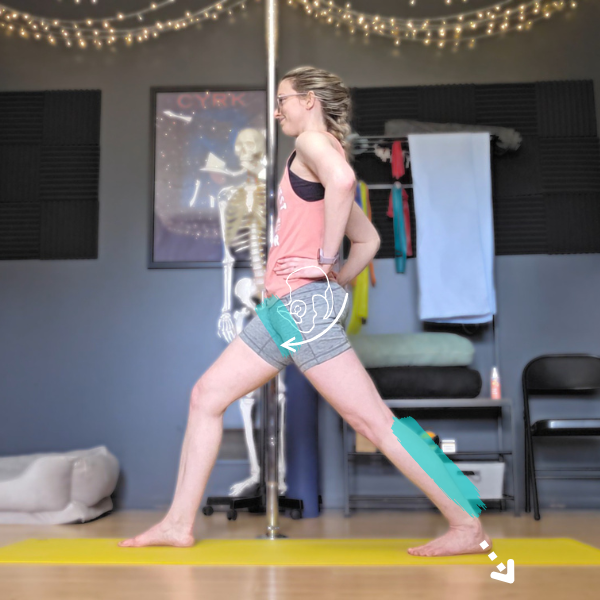
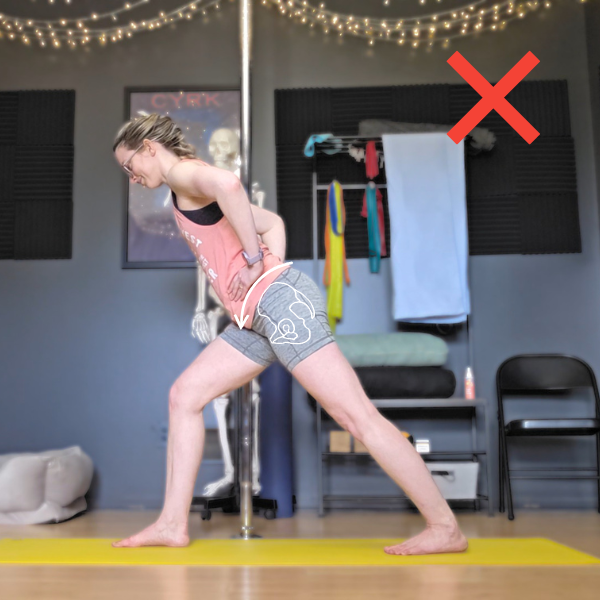
Avoid leaning forwards and tilting the hips forwards, as this lessens the hip flexor stretch in the back leg
Adjust the length of your lunge to try to find a comfortable stretch
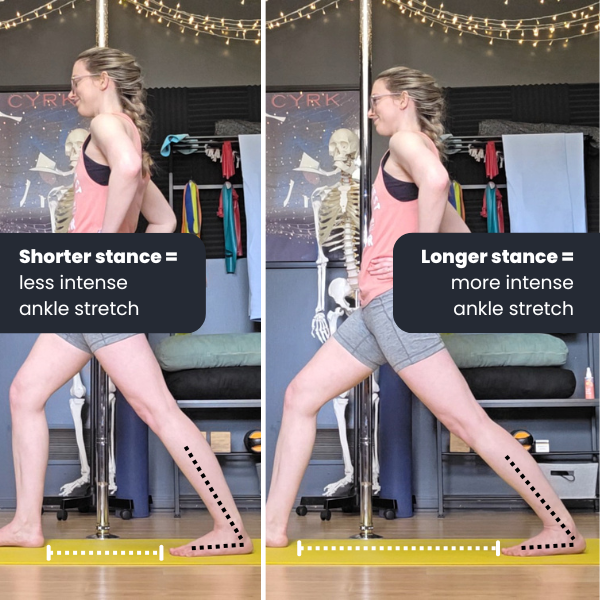
From standing, step your left leg back into a lunge, tucking your tailbone to tilt your hips backwards (you should feel a bit of a stretch through the front of the left hip, those are your hip flexors), and pressing the left heel down towards the floor to try to find a stretch through the left calves. You may need to experiment with the “length” of your lunge (how far apart the feet are) - it’s OK if your stance is more narrow, and it’s ok if your heel isn’t literally touching the ground.
Hold for 30s, then switch sides
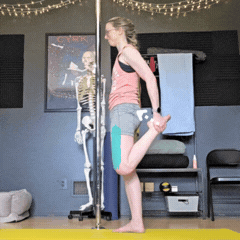
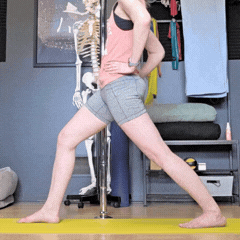
Active Variation: Standing Lunge Heel Lifts
We can make this lunge hold more active by adding some heel lifts (lightly strengthening/engaging the calves while they’re in a lengthened position).
Start in the same standing lunge as above
Keeping the back leg straight (bending the knee will change the calf stretch) and torso upright, press into the ball of your foot to lift your heel away from the floor, contracting your calf muscles
Then slowly relax your heel back down to the ground. Continue these slow heel lifts for 30s, then switch legs (if you’re finding your calves getting fatigued, start with just 10-15 seconds of heel lifts and just hang out in the passive stretch for the rest of the time)
4. Figure-4
Stretch Focus: Glutes
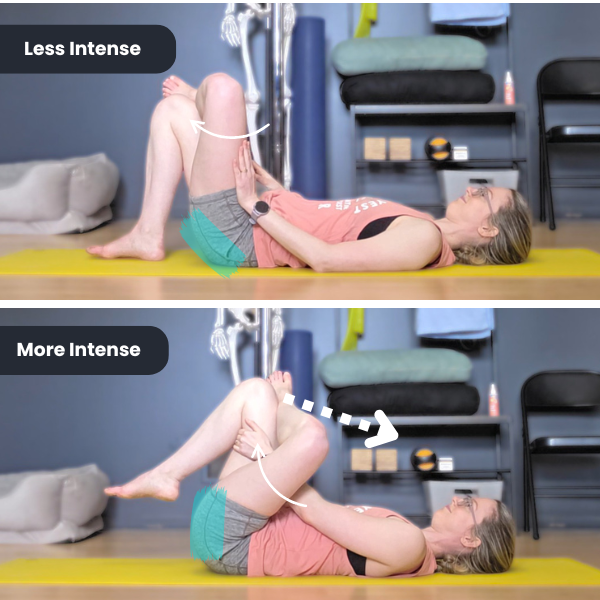
Start lying on your back with your right knee bent and foot on the floor. Cross your left ankle over the right knee, rotating your left thigh and angling your left knee to the outside (so your legs are in a “figure 4” shape). Some people may already feel an outer hip stretch in this position - if you’re already feeling a good stretch then you can absolutely hang out in this position.
For folks who don’t feel much of a stretch, you can go deeper by using your hands to pull your “figure 4” shape closer to your chest by pulling the right thigh or shin in. Try to keep the top of left thigh rotate to face the side (hip “external rotation”), as opposed to letting the thigh rotate in towards your chest as you pull the legs in. The goal is to feel a stretch in the glutes (and deeper hip muscles under the glutes) - for most people this means feeling a stretch a bit in the back/outside of the hip
For folks who have a lot of hip external rotation (some people naturally are quite bendy in this range of motion), if you still don’t feel a very deep stretch when pulling your legs in towards your chest, two adjustments you can make are: 1) pressing your sacrum down into the ground (as if you were going to drive your tailbone down into the floor, instead of letting it potentially lift your hips up off the floor by rounding your low back), and 2) using one of your hands to gently press the left knee away as you pull the right thigh and left foot in towards your chest
Hold for ~30s, then switch legs
Super multitasking bonus stretch challenge (not shown): For folks wanting to add an extra hamstring stretch while in this pose, you can straighten the supporting leg (right leg) instead of keeping it bent.
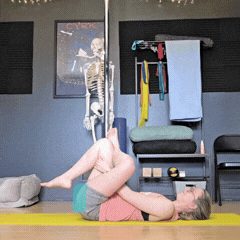
Active Variation: Figure-4 Contract-Relax Pulses
Start in the same Figure-4 stretch as above, with the right foot resting on the floor, or hands pulling the right leg towards the chest
While holding the right leg (and therefor left foot) in place, actively press the left knee away from your chest - you should feel a bit of a squeeze in the backside of your hip as those muscles work to reach the knee away (use your butt muscles, not your hands!). Hold for just a moment, then relax. Continue these slow pulses for the 30s duration of the stretch
5. [OPTIONAL] Front Split
Stretch Focus: Hamstrings + Hip Flexors
Really all the stretches above have already hit all the major lower-body muscle groups we hit when running, BUT for folks who are also working on hip flexibility for “fun” things like doing the splits, now is a great time to throw in a quick split hold. While this short routine is absolutely not optimized to get flat splits (something like this would be a better starting point for that), it’s still fun to sneak them in :)
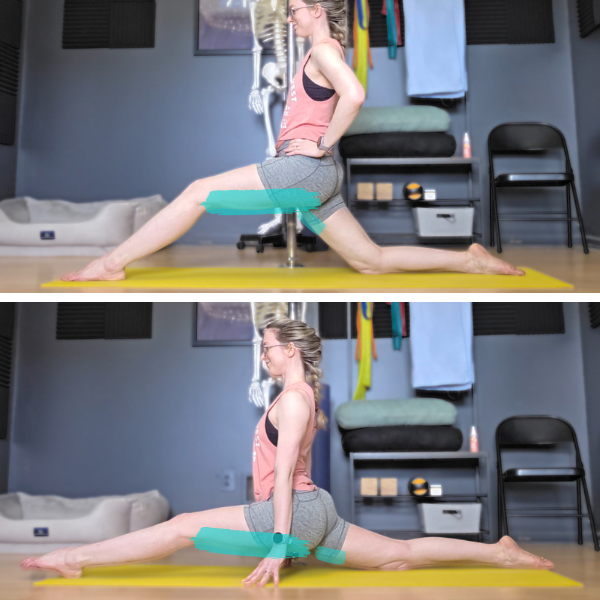

Start in a kneeling lunge with your left leg in front, right leg in back
Keeping your hips as “square” as you can (both hip bones pointing forwards) and torso as upright as you can (avoiding leaning forwards and tilting the hips forwards, as this lessens the stretch in the hip flexors in the back leg), slide the front foot forwards as far as flexibility (and balance!) will allow. It’s ok to keep a bend in the front leg as long as you’re feeling a good stretch. Depending on your flexibility, this might feel like a stretch in the hamstrings of the front leg (underside of the thigh, possibly even a bit on the inner thigh), or a stretch in the hip flexors and/or quads in the back leg (front of the back hip, maybe down the front of the thigh) - or a bit of both.
Hold for 30-60s, then switch legs
Looking for More Help?
Related Blog Posts [Free!]
8 Hip Flexor Stretches Using Active Flexibility - for some folks, hip flexor tightness can impact your running form (making it harder to extend your driving leg behind you), so adding an extra emphasis on working on that area can be helpful
10 Minute Splits Routine - for folks more interested in using their post-run stretch to focus more on front split training specifically, this mini routine would be a better choice than the generalist post-run-stretch drills listed above
Related On-Demand Workshops

Note: this class is also a part of a 2-class bundle! If you also want to work on your middle splits and straddles too, you should check out the “Starting Splits” Front & Middle Splits recording bundle.
Who this class recording is for:
This 45-minute class is intended for “beginner” to “begintermediate” students interested in working on their front splits. For more intermediate/advanced students who are 3 inches or closer to the ground in their front splits, I suggest you check out the Splits Clinic: Getting Flat Splits workshop instead which has drills aimed at slightly more flexible hips.
This workshop is a better fit for students who’s hips are 4 inches or higher away from the floor when doing a front split with their torso lifted.
Even if you are a super beginner and can’t touch your toes, this video has stretches and modifications for a variety of levels.
What this class includes:
A quick full-body warm-up to get you ready to stretch
Active flexibility exercises focusing on the two main muscles groups needed for square front splits: hamstrings and hip flexors
A full 45-minute stretching routine you can follow 1-3 days per week to work on your front splits (due to the amount of strengthening involved, I don’t recommend doing this routine every day - your body will benefit more from rest days!)
Recommended props:
A chair (or a bench or low table)
Yoga blocks - totally optional, but they are a wonderful prop, especially if you’re a beginner. If you don’t have blocks, I recommend practicing next to a chair, your bed, or a wall so you can reach your hand out for balance if you need to
Note: Because of Squarespace’s file size limitations (which is what I use for this wonderful website!), upon purchase you will receive a PDF with a link to the recording. You can then stream the recording online from the private link.
45 Min Starting Front Splits Workshop - a lot of the runners I work with are interested in working on “fancier” flexibility goals (like front splits). If you’re looking for a routine that has some good drills, this “starting splits” workshop is a great one. If you’re looking for something a bit shorter (say something you can more realistically squeeze in after a run), this 20-30 minute routine would be a better bet