
Bend Don’t Break: Neck Flexibility for Chin & Chest Stands
Bend Don’t Break: Neck Flexibility for Chin & Chest Stands
A common challenge students run into when wanting to start working on more advanced contortion backbends like chin and chest stands is a lack of neck flexibility and strength. These poses in particular are incredibly demanding on our neck, requiring not only a large amount of cervical extension (aka “arching/backbending through the neck”) to begin with, but also an incredible amount of strength in these muscles to keep the neck safe in these poses when you have a large portion of your bodyweight potentially smooshing down into your neck in a precariously arched position.
Note: the purpose of this post is NOT to demonstrate how to execute a chin or a chest stand. That is an advanced skill that should be worked on with a coach, and not something you try to replicate just watching a random TikTok video you saw on your own. Even among chest stands there are different engagement styles/techniques, and different intensities of strain placed on the neck - a coach can help you work through a progression that’s appropriate for where you’re at.
That being said, there ARE drills you can do outside of working with a coach to start working on building up more of the prerequisite neck strength and flexibility needed for deeper backbends - we’ll look at a couple in this post!
A (Simplified) View of the Neck Muscles in a Chest Stand
For the purposes of this post, we’re going to lump the muscles into our neck into two groups: the neck FLEXORS and EXTENSORS. (Note: This is absolutely an oversimplification, especially when it comes to the “deep” neck flexors vs. the rest of the neck flexors - but that’s more than we need to get into for this post today!).

Not all the neck muscles are show in the graphic above (including the aforementioned “deep neck flexors” - but it gives us a starting point of thinking about the neck. Source: OpenStax College, CC BY 3.0, via Wikimedia Commons
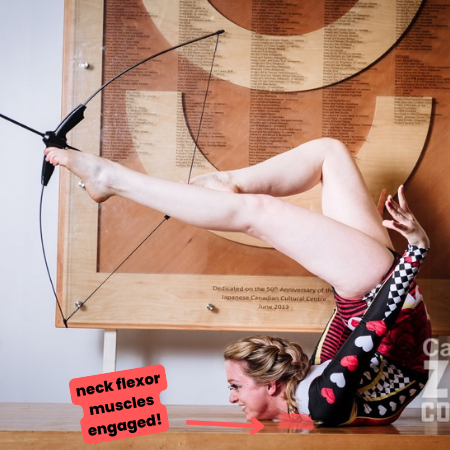
The neck flexors are the muscles in the front of the neck that help with neck flexion (tucking the chin to the chest) and help resist neck extension (resist over-arching the neck, like when we let the head fall back in a camel pose).

In the context of a chest stand, we need these muscles to be strong in a lengthened position to allow for more flexibility through the front of the neck in general, and to help prevent over-arching the neck when all of the weight of the torso + legs are smooshing into the neck. If the chin/neck is in a weight-bearing position in a chest stand, these muscles are basically the “breaks” for preventing the neck from bending too much and getting injured. The amount of strength needed to bear weight in that position is - in my professional opinion - rather crazy (which is why I prefer to teach NON neck-weight-bearing chest stands as a default - doesn’t mean it can’t be trained, but it is NOT where students should be practicing when just starting to learn chest stands).

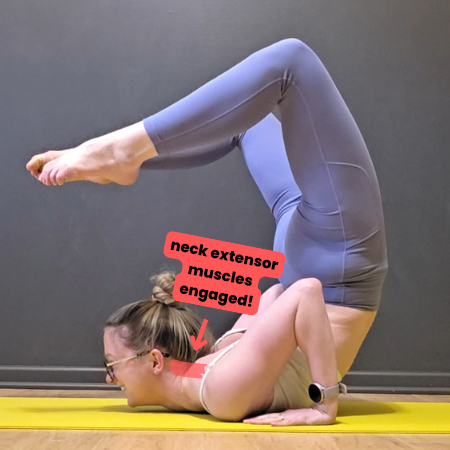
The neck extensors are the muscles on the back of the neck that help pull our neck into extension (arching the neck, pulling the back of the head toward the upper back). In the context of our chest stand, these are the muscles that can help deepen the arch in the neck, lifting the chin off of the ground so that we can curl our hips higher overhead in our chest stand without smooshing weight into the neck.

Even though both muscle groups are responsible for opposite actions, they are BOTH important supporters of deepening our neck flexibility in that arched position.
Recommended Drills
Below are a handful of drills to introduce you to the concept of strengthening the front and back of your neck for backbends. This is not necessarily a comprehensive list of everything you may need (again, reminding you to work with a coach!), BUT think of these as a great starting point.
DO start with a brief neck-specific warm up before diving into these drills (a couple of minutes of nods yes/no/maybe, neck circles, etc.) . Your neck will thank you not just jumping in cold!
1. Isometric Neck Smooshes
This is a nice way to start challenging the muscles in the front of the back extension with light resistance before we move on to more demanding drills.
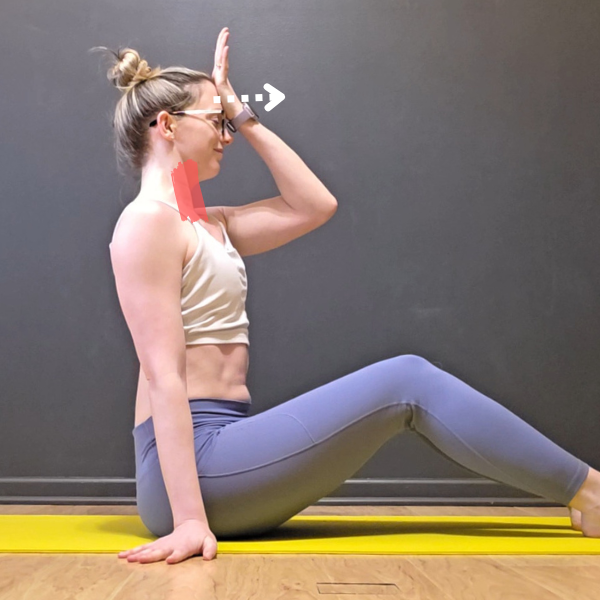
Start sitting up tall in a comfortable upright position
Isometric Flexor Activation: Place your palm on the middle of your forehead. Using your hand to hold your head in place (don’t let it actually move), press your head forward-and-down into your hand - you should feel a contraction in the muscles in the front of your neck (this doesn’t have to be a huge contraction, you can use other drills for more “serious” strength building). Hold for a slow count of 10, then release
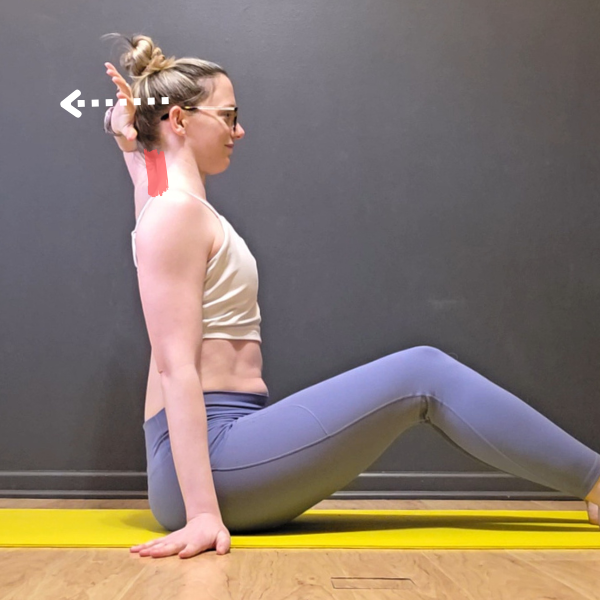
Isometric Extensor Activation: Move your hand to the back of your head. Still not letting your head move, press your head back-and-down into your hand (as if you were going to look up toward the ceiling) - you should feel a contraction in the back of your neck. Hold for a slow count of 10, then release
Repeat for 2-3 cycles of engaging the front of the neck, then back of the neck
2. Deep Neck Flexor Engagement
This is another gentle exercise to start building awareness and endurance in some of the muscles in the front of the neck. It may seem like one of the easiest ones in this list (we barely move at all), BUT it’s an important one from a coordination perspective. This exercise primarily targets the “deep” neck flexors, as opposed to the other larger, more superficial (closer to the skin) muscles of the front of the neck. These deeper muscles are like the “core” of the neck and help with stabilization. Isolation exercises like the one below can be helpful to make sure we’re strengthening the “right” muscles and teaching them to engage properly, and not accidentally compensating by letting the more superficial muscles do all of the support work (P.S. if you have a hypermobile neck, odds are these muscles could especially use some extra strength-focused tough love!)
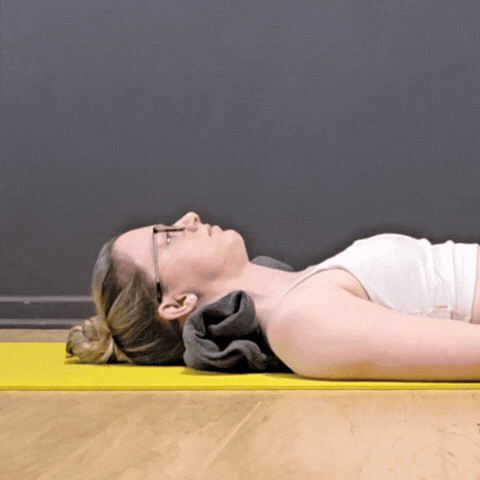
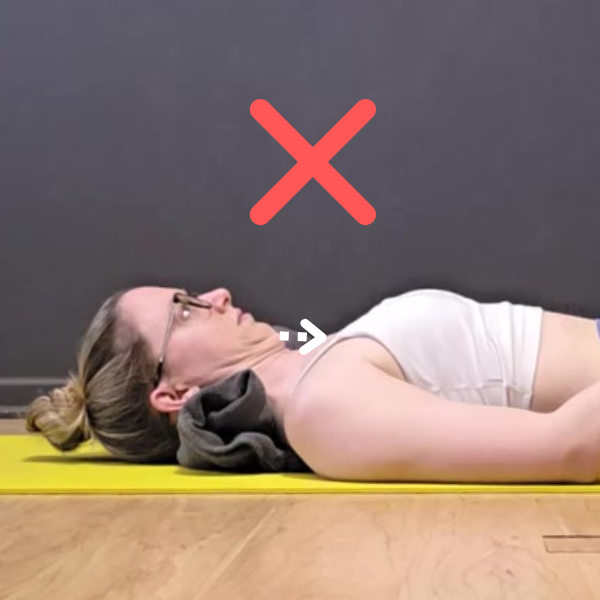
Be careful not to over-tuck the chin!
Start lying on your back on the floor, with a rolled up towel behind your neck, gaze up towards the ceiling. We want our neck to be in a “neutral” (slightly arched) position to start, with the towel filling in the gap between the back of our neck and the floor.
Start to slightly nod your chin towards your chest, lightly pressing the back of your neck into the towel - you should feel the deep muscles in the front of your neck start to engage and the back of your neck lengthen just a bit. The goal is NOT to tuck the chin completely or flatten the back of the neck all the way - generally that over-recruits the more “superficial”/ropey neck muscles (like the sternocleidomastoid) that we’re trying to let chill out
Hold for 10-15 seconds, then relax. Repeat for 3 rounds total
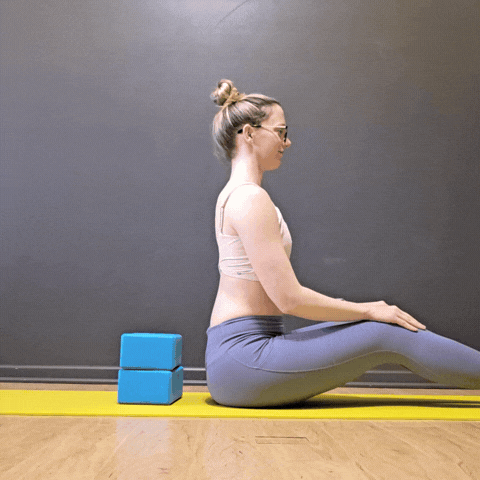
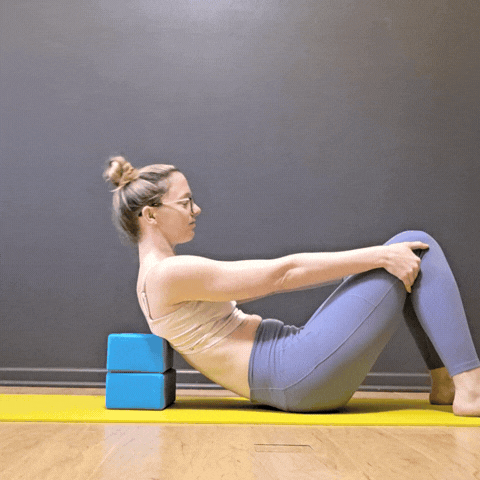
3. Neck Sit Ups
Think of this exercise as a sit up - but for all the muscles in the front of your neck (OK it’s not exactly the same because we’re going through a larger range of motion, but I stand by this comparison!). These are not only helpful for weight-bearing poses like chin and chest stands, but also great for head-falling-back poses like camel, or toes-to-head cobra or pigeon.
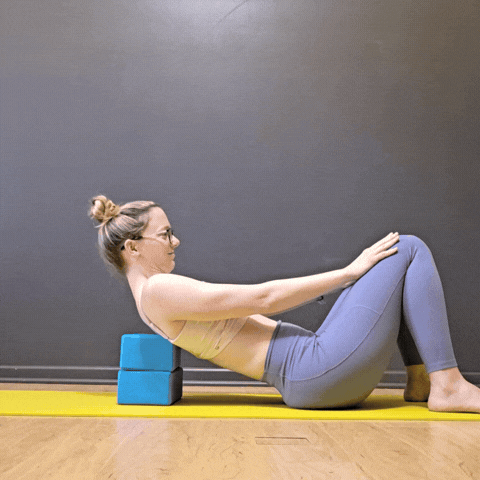
Start sitting on the floor. Lean backward over a stack of 2 yoga (flat) blocks. You want the prop support to be at the middle/top of your shoulder blades (high up your back for support, but still leaving space for your neck to remain “unsupported”). Keep your chin slightly tucked (head bowed slightly forward) to start as you get into position
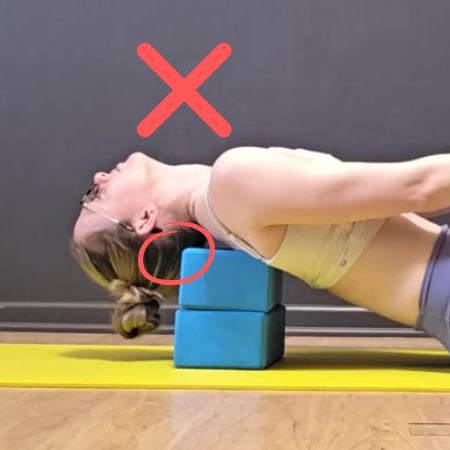
Slowly start to let your head fall back, feeling the muscles in the front of your neck contract to support the weight of your head. Only let the head fall back as far as you can where you still have the strength to lift it back up to your starting position. Don’t let the head fall so far that it starts to touch the floor, or rests on the back of the prop you’re using for support - our goal is to keep the muscles in the front of the neck engaged throughout this exercise, not let them relax at the “bottom.”
Note: it’s ok to allow a small amount movement of the chest and upper back in this exercise, but make sure all the movement isn’t just coming from opening your chest
Hold for just a moment at the bottom of the movement, then lift your head back up to start. That’s one rep, repeat for 8-12 reps.
Make it easier: First off, don’t worry if you can only lean your head back a small amount! But if leaning back on blocks is feeling crazy intense, start sitting upright and do your head “sit ups” by letting your head nod back (as if you were looking up at the ceiling) in a seated position
Make it harder: Remove the upper back movement. Instead of allowing your upper back to arch to assist, start with a “hollow body” ab engagement, slightly rounding your upper back, tucking your tailbone, and pulling the bottom of your ribs towards the top of your hips. Keep this light ab engagement throughout (don’t let the upper back bend as your head falls back).
If you really struggle with the tension in the front of neck in these, you might be over-using the more “superficial” neck flexors and under-using those “deep” neck flexors (that we worked on that towel drill right before) - this is something a coach can help you learn to troubleshoot!
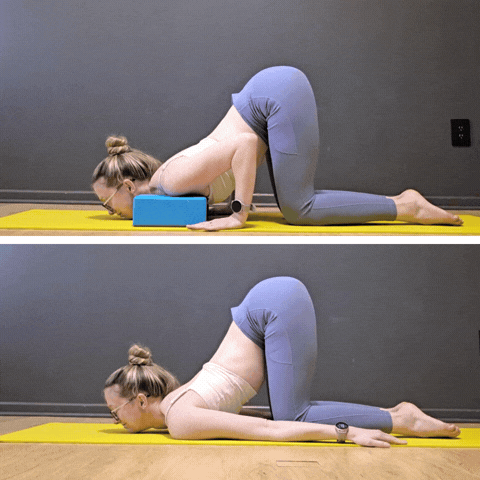
4. Belly-Down Chin Lifts
Now it’s time to shift our focus to the muscles on the back of the neck that help pull us into deeper extension, lifting our head off the floor in our chest stands.
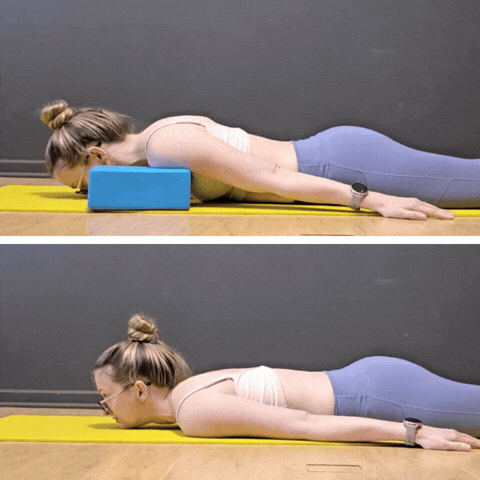
Start lying face-down on the floor with shoulders resting on something for support - this could mean pressing the front of your shoulders down into the floor, or if they can’t quite reach, putting a flat yoga block under each shoulder. (The purpose of the shoulder contact is to both practice the shoulder engagement support we can use in chest stands. It also to help prevent us “cheating” by lifting our chest instead of just our neck)
Keeping your shoulders pressed into the floor or blocks, lift your head as if you were going to look up toward the ceiling - you should feel the muscles in the back of your neck contracting to lift your head. Don’t let the shoulders lift off your support, only lift as high as you can while still keeping the shoulders “grounded”
Drop the chin back down to the floor. Repeat for 8-12 reps
Make it easier: Start with the forehead resting on the floor instead of the chin
Make it harder: For folks with more neck flexibility, you can start with your chin on a block and do your chin lifts on a block (so long as you can keep shoulder contact with the floor!)
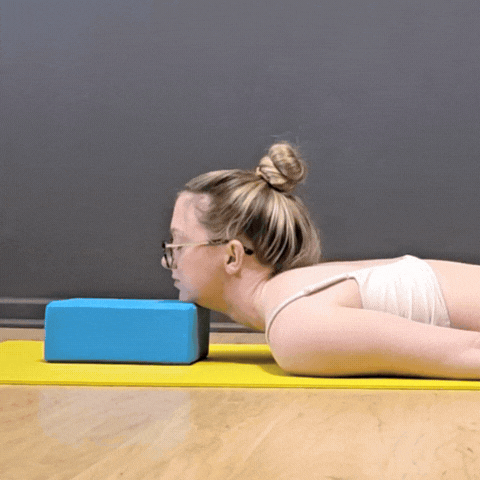
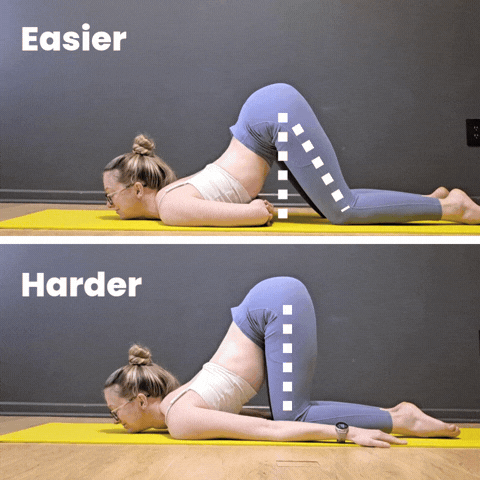
5. Modified Puppy Pose Chin Lifts
This is basically a harder version of the previous drill. It does require some preexisting neck and upper back flexibility, so if your neck already feels super crunched trying to come into the prep position for this drill, keep working on the other drills in this post instead. But for those of you at this level, this is a great drill because it starts to work on our neck strength in a position much more similar to what we use in an actual chest stand!
Start in a “modified” puppy pose: from a tabletop position, keeping hips stacked on top of knees, lower your chest towards the floor, resting the front of your shoulders on flat yoga blocks, or the floor (if you can reach them that low). If you are resting your shoulders on blocks, bring your hands behind the blocks as if you were going to do a tricep push up (elbows hugging in towards your sides, elbows pointing up). If your shoulders are flat on the floor, you can use the “push up” position or another chest stand base position you are comfortable in.
Keeping the front of your shoulders pressing into blocks or the floor, lift your chin off the floor, then with control let it lower back to rest on the floor. Repeat for 8-12 chin lifts
Make it easier: Instead of keeping the hips perfectly stacked over the knees (which is much more similar to the amount of upper back & neck flexibility required in a chest stand), you can make this less intense by reaching the chest forwards, and letting the hips drift forwards past your knees in your puppy pose set up (which will require less upper back and neck flexibility). Long-term, keep working on your neck (and the rest of your back!) flexibility to work towards doing this drill with the “more ideal” hips-over-knees hip stack.
Final Tip: Don’t Train Your Neck In Isolation
Remember, neck flexibility is just a PIECE of the equation. Just like a bridge, a chest stand really is a full body backbend, which requires an incredible amount of flexibility everywhere in the back (neck, upper back, AND lower back/hips), as well as learning proper support engagement in your shoulders and core (both the front and back of your core) - AND learning the coordination to do all of that at the same time.
So instead of just doing these drills as stand-alone conditioning, you’ll get the most bang for your buck if you incorporate them into your larger backbending training. Once you’ve done some engagement drills like these, see if you can then find those same support muscles in your more “demanding” backbends like your cobras, camels, puppy poses, forearm stands etc. This will not only further strengthen the muscles while they’re working in these shapes, but it’ll also help reinforce the engagements while you’re also shifting your attention to the other muscle engagements in those poses.
Looking for More Help?
Ok.
For the last time.
I promise.

The exercises in this post are generic recommendations and a great starting point for most people, BUT if you’re serious about contortion skills you should work with a coach. And that doesn’t have to be me! (Although I do of course have on-demand workshops on neck flexibility and chest stands, as well as “beginning contortion” class recordings in the Old Class Recording Library, and so plenty of contortion coaching in private lessons). There are many other contortion coaches from all over the world offering online training these days. Two that I’ve trained with personally and would whole-heartedly recommend are Amy Goh (@elastischool) and Tran Finn (@bendyeducator).
Related Content
Recommended On-Demand Workshops
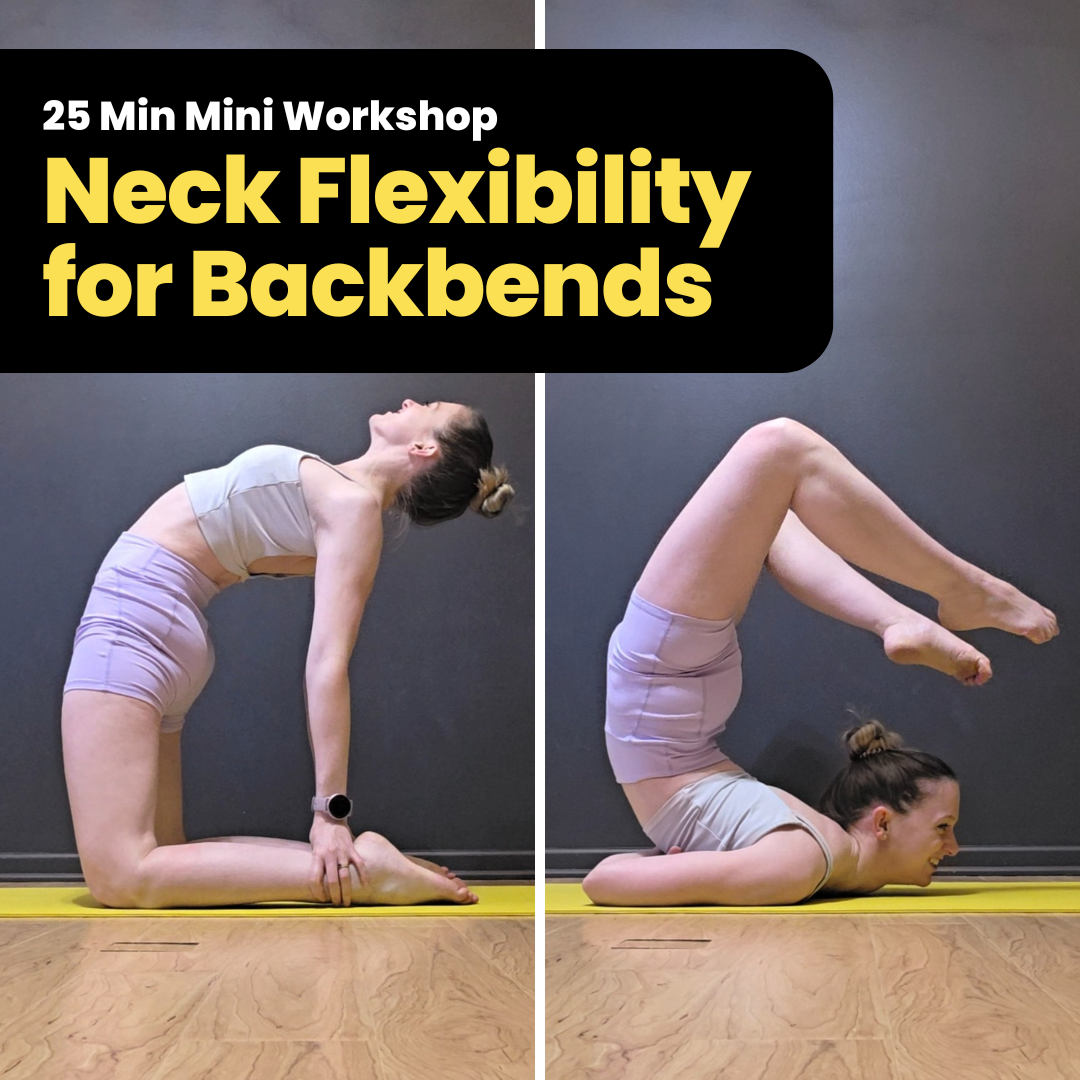
Who this class recording is for:
This mixed-levels mini workshop is for students looking to work on their neck flexibility for backbends like camel pose, cobra pose, or even those working on more advanced skills like chin and chest stands (Note: this is NOT a “how to do a chin/chest stand workshop,” if you’re interested in learning those skills, check out the Beginning Chest Stands Workshop).
This workshop is all about building strength and stability in the neck to support our neck in different backbends, not just smooshing the neck in different passive stretches.
Variations of drills are given for all flexibility levels, from beginners with little back flexibility, all the way to contortion-level training.
What this ~25 min follow-along workshop includes
A quick neck and back warm up to get you ready to train
A ~20 min follow-along routine of conditioning drills for the deep neck flexors, as well as the extensors of the back of the neck to support both “head down” and “head up” positions.
An additional ~5 minutes of skill work to experiment with adding neck engagement to various poses (cat-cow, camel pose, cobra pose, and puppy pose)
Recommended props:
Yoga mat
2 yoga blocks
[OPTIONAL] stretchy resistance band (light resistance, like a Theraband)
Note: Because of Squarespace’s file size limitations (which is what I use for this wonderful website!), upon purchase you will receive a PDF with a link to the recording. You can then stream the recording online from the private link.
![[NEW AND IMPROVED] Beginning Chest Stands Workshop](https://images.squarespace-cdn.com/content/v1/5ea57caad08f387b2e9827bd/024e46c0-69d6-4ccd-bf64-6e165d8d8373/Beginning+Chest+Stands+workshop+thumbnail.png)
Updated November 2025! Note: this workshop has been re-recorded (new and improved!) from its original 2021 version
Who this workshop recording is for:
This workshop is designed for students who have some preexisting back/shoulder flexibility (can comfortably get their chest to the floor in a puppy pose) who want to learn the classic contortion “chest stand” backbend. This is a great introduction to contortion-style back flexibility training where you’ll not only learn strengthening drills to deepen your flexibility (because the vast majority of “advanced” flexibility training is really strengthening work!), proper abdominal and neck engagement in different poses, but also progressions and variations to work towards chin and chest stands.
Variations of drills are given for various flexibility levels, so you can continue to challenge and grow your back flexibility as your get stronger and flexier!
Prerequisites:
Students must be able to push up into a bridge, and to comfortably hold either an arms-forwards or arms-backwards puppy pose with hips stacked over the knees, and chest touching the floor. “Comfortably” means you can breathe comfortably and hold for several breaths in this position.
If you don’t let have that level of back and/or neck flexibility, start with one of these workshops to help build that up first:
This 75* Minute Workshop Covers
An hour long follow-along contortion conditioning class, including
A full body warm up with extra emphasis on back flexibility
Active flexibility drills to strengthen and stretch your full backbending chain, with dedicated drills for the hips, lower back, upper back, and neck
“Choose your own adventure” style skillwork practice: more than 45 minutes of detailed chin and chest stand progression tutorials are included, and you can choose which ones to practice during any given training session. Tutorials include…
Review of proper muscle engagement in chin/chest stands for SAFE practice
Use of support props like blocks and/or yoga wheels to modify poses
Kick up practice & balance drills
Leg variations for different chest stand “shapes”
This workshop was filmed with the intention of fitting a 75-minute practice, but students may choose to trim it down, or extend it and work on more skill work for up to a 90-minute practice (longer practice is not recommended).
Required props:
Two yoga blocks
A sturdy chair or low table/bench
Long strap (can be stretchy or stiff)
Some wall space
Upon checkout, you will receive a PDF with a link to the workshop recording (Squarespace limits file upload sizes so I can’t actually upload the whole recording here). The recording is for your use only, not to be shared with others - thank you!