
Help! I Can’t Sit Up Straight with Legs Extended
Help! I Can’t Sit Up Straight with Legs Extended
Spoiler: It’s Not Just “Tight” Hips Holding You Back
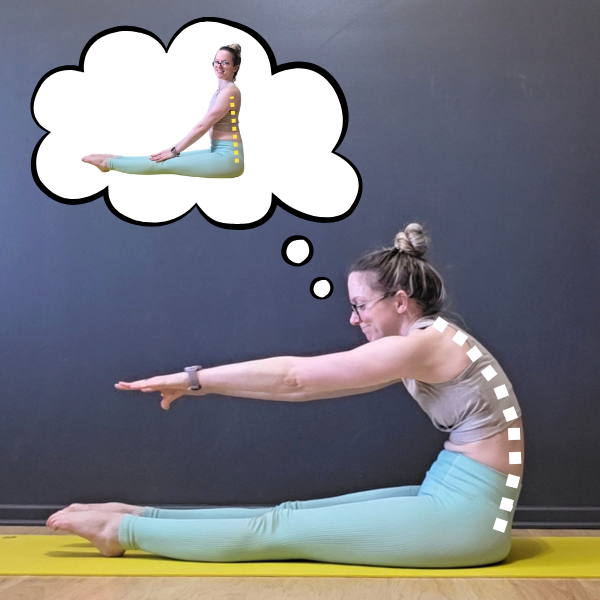
Do you feel like it’s impossible to sit up straight when sitting on the floor? This is a super common challenge folks with tight hips. But what if I told you the solution isn’t just stretching your hips more?
Whether we’re talking about sitting in a “pike” position (butt on the floor, legs together straight in front of you), or sitting in a “straddle” (butt on the floor, legs spread out wide), the two major things this requires are:
Flexible hamstrings* (and glutes) to allow your pelvis to allow you to extend your knees without tilting your pelvis backwards (which then causes your low back to round)
* Note: for folks interested in sitting in a straddle (legs spread wide), tight adductors (inner thigh muscles) can also make it hard to tilt the hips forwards and flatten out the back if you are opening your legs to your maximum, but in the majority of cases it’s the hamstrings that are the limiting factor, so that’s the muscle group we’ll focus on in this blog post.
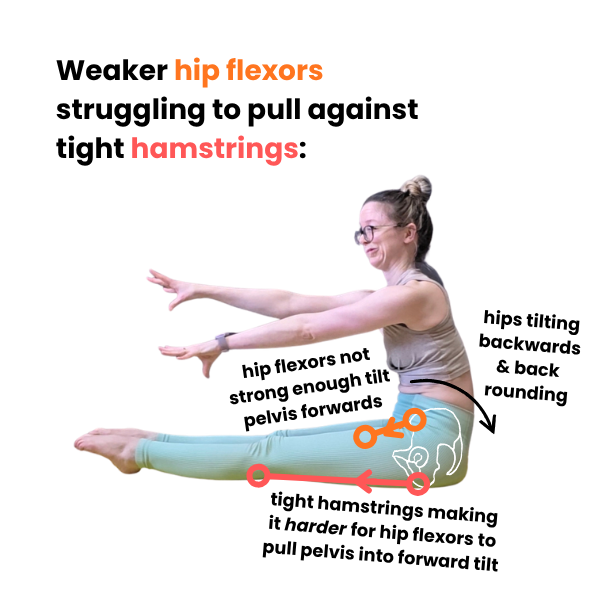
Strong hip flexors to pull your torso forwards over your thighs (against the tension of your tight hamstrings trying to pull it backwards!)
That means the solution needs to include BOTH stretching AND strengthening work to make this position feel more comfortable.
Let’s take a look at WHY both of these focus areas are important, as well as some drills that can help improve our strength + flexibility in this pose.
Focus Area 1: Increasing Your Hamstring Flexibility
(aka “stretch the BACK of your hips”)
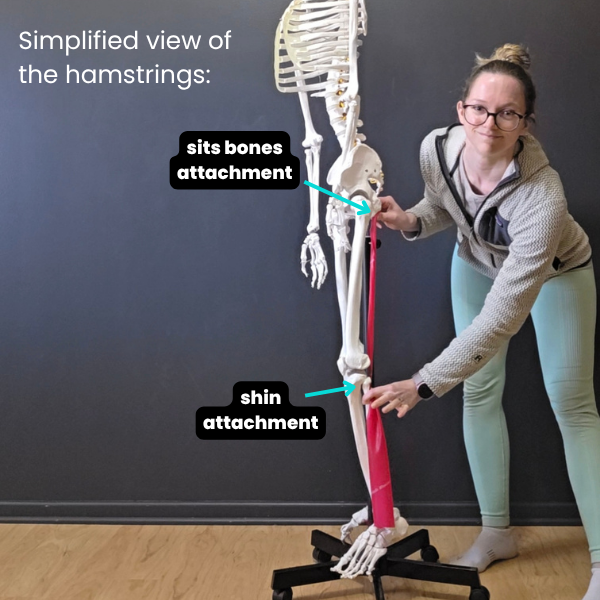
Typically tight hamstrings are the main culprit with making it hard to sit up with a flat back in this pose. Your hamstrings are a group of 3 muscles that run from the “sits bones” at the bottom of your pelvis, to the top of the backside of your shin bones by the knee:
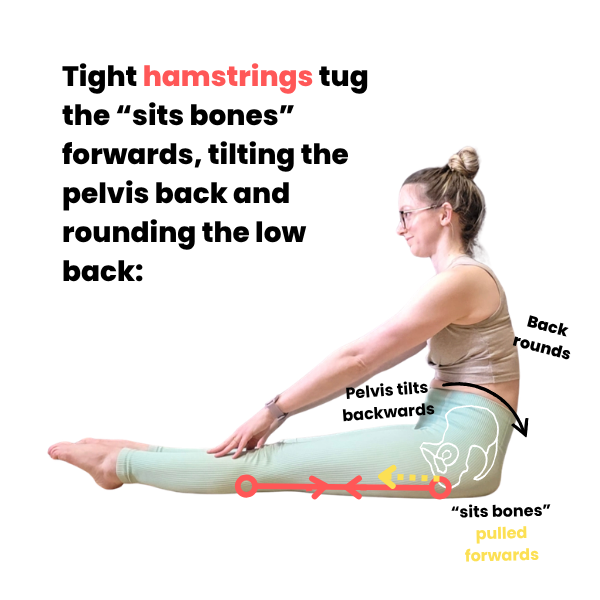
When these muscles are tight, if you extend your legs out in front, they tend to pull on the “sits bones,” tilting your pelvis backwards, and rounding your low back.
And here’s a view without all that pesky skin and muscle in the way…
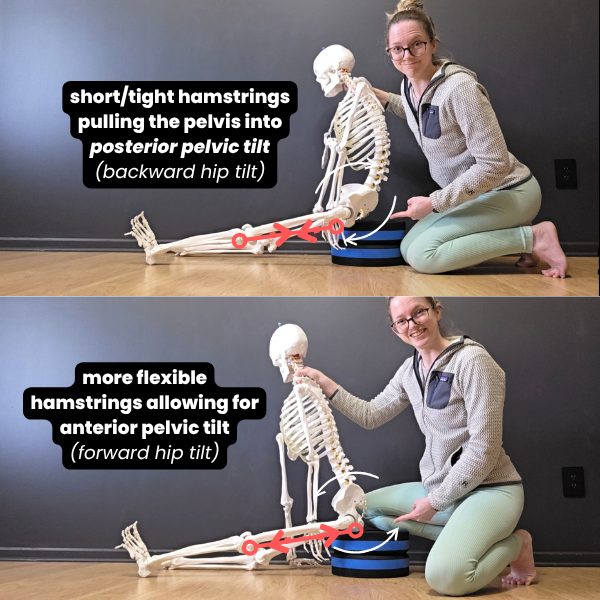
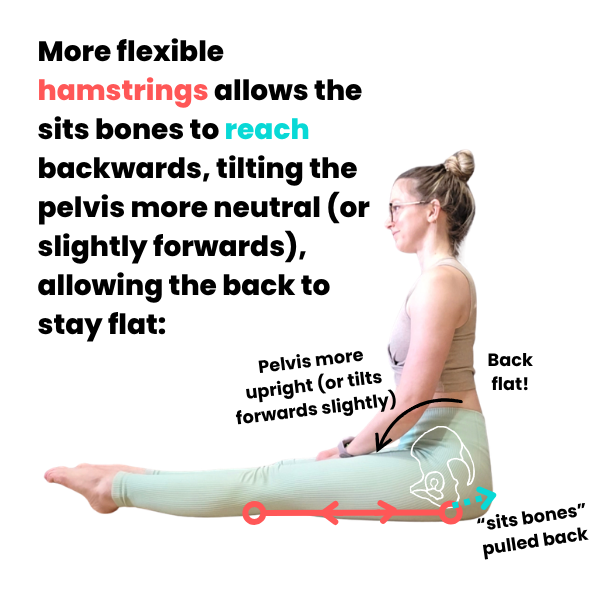
By working on hamstring flexibility, you can help the hamstrings get more comfortable with lengthening in that position, allowing you to pull the sits bones backwards in space to help tilt the pelvis more forwards/upright, which makes it more comfortable and easier to sit up with a straight back.
Helpful Drills For Hamstring Flexibility :
1. Legs-Up-the-Wall (OR Wall Heel Slides)
I strongly prefer hamstring stretches with the back on the floor because it makes it easier to keep the back flat and ensure we’re actually maximally stretching the hamstrings, and not just getting our hands closer to our feet by rounding the back.
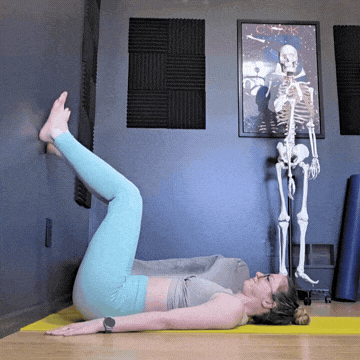
Start lying on your back with your butt near the wall (butt touching the wall = harder, butt slightly farther away from the wall = easier)
Keeping your back flat on the floor and back of the hips flat on the floor (don’t let your butt start to lift), kick your legs up the wall, with heels on the wall, straightening the knees as much as you need to to feel a stretch through the back of your hamstrings. The legs don’t have to straighten all the way, as long as you’re feeling a good stretch, you can keep a bend in the knees. Hold for 30-60s
OPTIONAL: Instead of a static hold, you can turn this into a more dynamic drill by slowly sliding your feet up the wall (straightening your legs into a more intense hamstring stretch), and then down the wall just a bit (bending the knees, letting some of that intense stretch go).
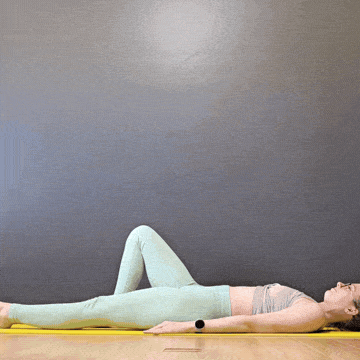
Supine Hamstring Stretch
This is another classic back-lying hamstring stretch, but for this one we’ll focus on one leg at a time.
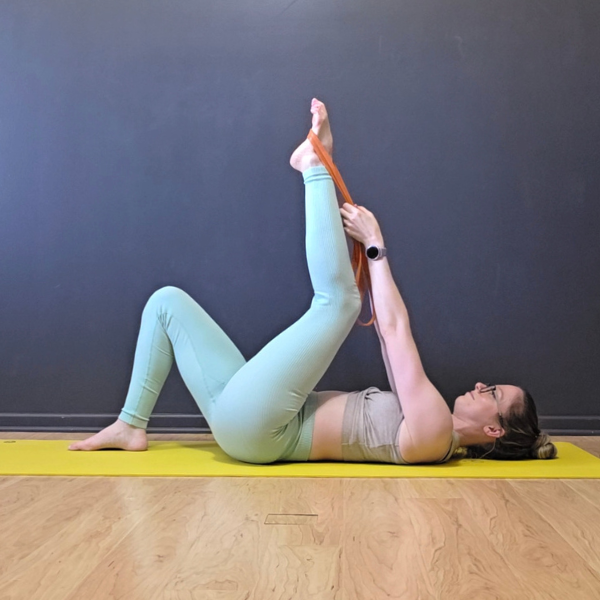
Start lying on your back on the floor, with right knee bent and right foot flat on the ground
Loop a strap over the bottom of your left foot and pull that leg towards your chest until you start to feel a stretch through the back of the left thigh (in the hamstrings). The left leg can be completely straight, or you can add a small bend in the knee, whatever feels like a better stretch for you. Hold for 30-60s, then switch legs
Note: If you’re feeling the stretch in your calves or just in the back of your knee pit instead of your hamstrings, point your toes (instead of flexing the foot). If you’re still feeling a stretch in your calves, try a round of gentle sciatic nerve glides (if you haven’t already done these as part of your warm up), and then come back to this stretch with pointed toes and more of a bend in your knee
Now that we’ve done some passive stretching, it’s time to shift our focus to strengthening the hamstrings while they’re in a lengthened position. If our hamstrings are weak in that stretched position, our nervous system perceives this as a risk and kicks in the stretch reflex to prevent us from lengthening the hamstrings further. So by focusing on building strength WHILE the hamstrings are in a stretch is an effective way to “teach” our nervous system that we are strong/safe in that position, so it can allow us to stretch deeper over time:
3. Seated Single-Legged Good Mornings
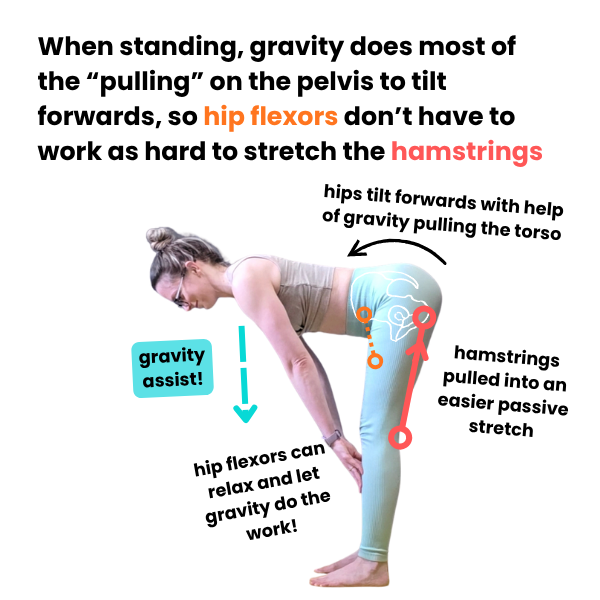
This is a great drill to help engage/strengthen the hamstrings while they’re in a lengthened position, one leg at a time. Doing this drill sitting in a chair helps us get a bit of a gravity assist when folding forward (not quite as intense as standing, but not as frustrating as sitting on the floor).
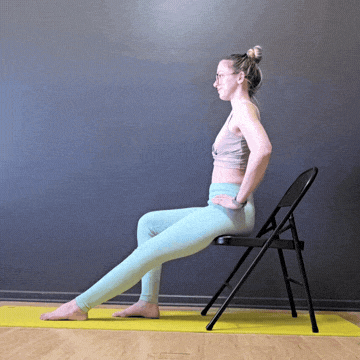
Start sitting on the edge of a chair (scoot all the way to the front of the chair), with right knee bent, and left leg extended out straight in front of you. The left leg can be completely straight, or you can choose to add a small knee bend in the left leg (this is the leg we’ll be focusing on first).
Keeping your back flat, lean forwards as far as you can over the left leg until you feel a strong hamstring stretch - remember, it’s OK to have a bit of a bend in the left knee as long as you’re still feeling a stretch!
Once you found the stretch in your left leg, press your left foot into the floor to engage your hamstrings as you lift your torso back up to sitting upright. That’s 1 rep. Repeat for 8-12 reps with the left leg in front, then switch legs
4. Standing Almost-Single-Legged Good Mornings
These are basically a more muscle-y version of the seated good mornings, where we have more weight in the working leg, and can potentially get into a slightly deeper stretch because we have gravity helping “pull” our torso toward the floor - both of which can make the hamstrings work harder in the stretch.

Start standing with almost all of your weight in your left leg, and right knee bent, with toes lightly touching the floor for balance (you can have your right foot directly to the side of the left foot as I’m showing above, or slightly forward or backward if that feels easier for you to balance). The left leg is going to be the working leg, so we want as much weight in that leg as possible, and the job of the right leg is just to help us balance
Keeping a flat back, forward fold as far as you can over your left leg until you feel a strong hamstring stretch (you can keep the left leg totally straight, or bend it slightly if that feels like you can get a better stretch with a bit of a knee bend).
Once you’ve leaned into as deep of a forward fold as you can (without letting the back round!), press the left foot firmly into the ground to help contract your hamstrings as you lift back on up to standing upright. That’s one rep. Do 8-12 reps with the left leg being the “working” leg, then switch legs.
A Quick Note About Sciatic Nerve Tension…
Sciatic nerve tension is a common challenge some students run into when working on hamstring flexibility. In addition to having tight hamstrings, folks with sciatic nerve tension also have something preventing their sciatic nerve from sliding and gliding through the back of the leg (or spine) like it’s supposed to, causing the nerve to contract nearby muscles to prevent a deeper stretch as a self-preservation mechanism. For folks who have this type of nerve tension (here’s how to test yourself), you’ll want to modify your training by:
addressing the nerve tension as much as you can in your warm up before moving on to deeper stretches (for most students, a round of nerve glides and/or tensioners is all you need!)
adjusting your positio to minimize nerve tension while in a stretch (for hamstring stretches, that typically means: keeping the feet pointed, adding a small bend in the knees, keeping the back flat)
To clarify: you can have nerve tension AND tight hamstrings. Most people with nerve tension also have tight hamstrings, it’s not just the nerve tension that’s limiting how much they can forward fold. That means you’ll still want to be working on your hamstring flexibility, especially the strengthen-while-you-stretch type active flexibility drills
Focus Area 2: Increasing Your Hip Flexor (and Quad) Strength
(aka “strengthen the FRONT of your hips”)
This is the other half of the equation (and the one folks often miss!). I addition to building more flexible (and stronger) hamstrings, we also need to make sure our hip flexors are strong enough to help keep our pelvis from tilting backwards in space. The hip flexors refer to various muscles that connect our lumbar spine (low back vertebrae) and the front of our hips to our thigh bones. You can think of them as the “helper muscles” that help pull our torso closer to our thighs (into a deeper hamstring stretch!).
This can be especially challenging for folks with tighter hamstrings when doing a seated forward fold vs. a standing forward fold, because when seated, we no longer have the “assist” of gravity to help us lean forward to touch our toes. When sitting, our hip flexor muscles have to work harder than when standing to help us sit upright (and, as you get more flexible, lean forwards). So if you’re someone who finds standing forward folds easier than seated forward folds, that’s a sign you need to work on that hip flexor strength!
The other group of “helper” muscles we want to strength are the quads. The quadriceps are a group of 4 muscles that help us straighten the knee (which then can pull the hamstrings longer / into a deeper stretch. We want these muscles to be strong enough to prevent the knee from bending just to avoid a deeper stretch. If you’re someone who struggles to keep your knee straight in a back-lying hamstring stretch when you pull your foot towards your head, that’s a sign you could probably use some more quad strength.
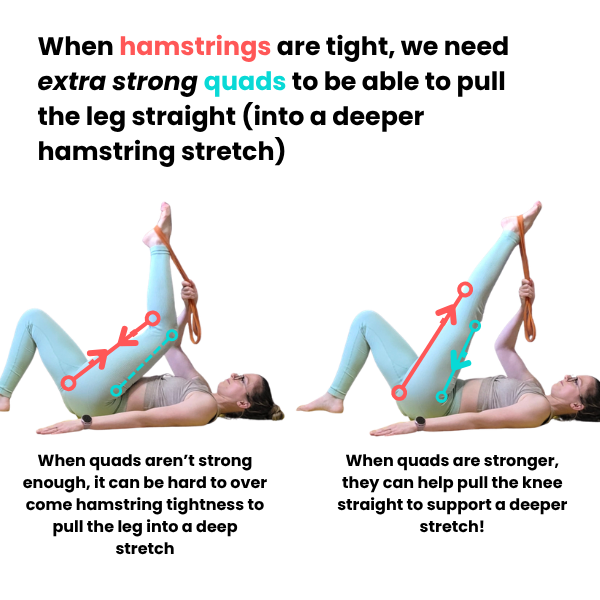
NOTE: That does NOT mean you need to have completely straight knees to be able to stretch the hamstrings! You can still get a GREAT hamstring stretch even with a bend in the knee as long as you still have enough quad engagement to not let the knee bend too much and avoid the stretch. As you’re still flexing the hip (pulling the knee towards your chest, or tilting the hips forwards), that will pull on the “sits bones” attachment of the hamstrings to pull them longer into a stretch. Especially for folks with tighter hamstrings, it’s often easier to hold proper stretching form (ex. not rounding the low back) by adding a knee bend, instead of trying to keep the knees completely straight. Other people who often benefit from keeping a bit of a bend in the knee are folks with hypermobile knees, and folks with sciatic nerve tension.
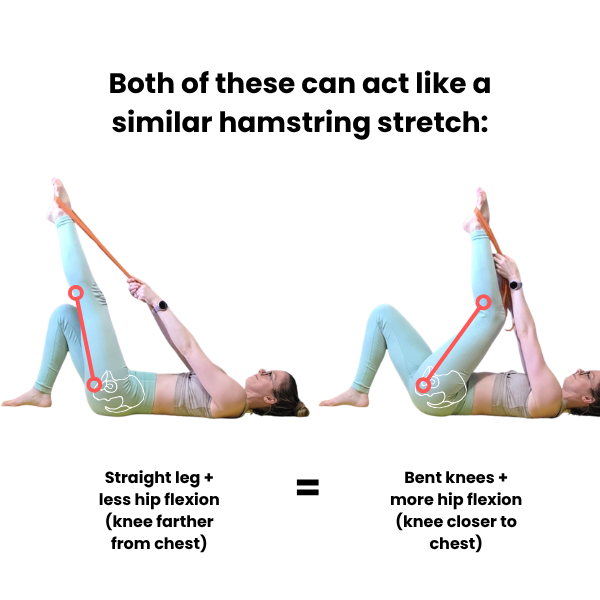

So long as you’re feeling that deep stretch through the back of your thigh (in the hamstrings), you can choose whichever version feels like a better stretch for you!
Even as a very flexible person, because I have some hypermobility in my knees and some sciatic nerve tension, I often choose to slightly bend my knees in hamstring stretches because those feel better in my body (and are safer + more effective stretches for me).
Drills For Hip Flexor & Quad Strength (in a Shortened Position):
5. Supine Froggy Kicks
Just like with some of the other hamstring drills, we’ll start with lying-on-the-back drills so we can spend more mental energy focusing on “proper” form and engagement of our legs (and not worrying about actively trying to keep the back flat). This first drill is a great one for building both quad and hip flexor strength to support a deeper hamstring stretch. Think of it as a harder / more active version of the “supine hamstring stretch” above :)
Start lying on your back on the floor, with right knee bent and right foot flat on the floor, and left leg straight and flat on the ground
Bending your left knee, lift your left knee towards your chest (this is the working leg) as far as you can without using your hands to pull. Make sure to keep your hips anchored to the floor, don’t let your butt start to lift off the ground
Keep squeezing the knee towards your chest (it’s OK if it’s not very close, just lift it as far as it’ll go), start to straighten the left leg. Straighten it as much as you can without letting the knee drift away from your chest - it may not straighten all the way. This should feel like a squeeze in the front of your hip (hip flexors) and front of your thigh (quads). You may or may not feel a hamstring stretch in the back of the left leg
Then slowly lower the left leg back down to the floor. That’s one rep. Repeat for 8-12 reps on the left leg, then switch legs
6. Supine End-Range Leg Lifts at the Wall
This drill also works on hip flexor and quad strength, but unlike the last drill this one really focuses in on the more challenging “end range” strength, making those muscles fire when they’re already in a shortened position (which can be quite hard!). Think of this as a more challenging / more active variation of the “legs up the wall” stretch above.
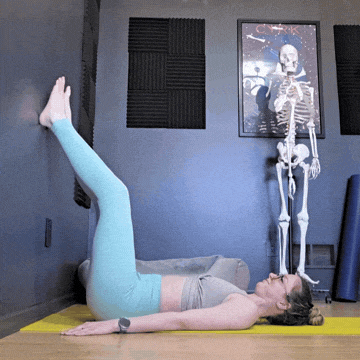
Start lying on your back by the wall, with butt several inches away from the wall (farther away = easier, closer to the wall = harder), and legs kicked up over your hips with feet resting against the wall. Your knees can be slightly bent (easier) or totally straight (harder). Choose a starting position where you aren’t feeling a very intense hamstring stretch (so to start, this should feel easier than the “legs up the wall” stretch)
Keeping your right foot on the wall for support, pull your left leg off the wall, keeping it as straight as you can (small knee bend is OK). Hold for a moment, then relax the leg back on the wall. That slow kick was 1 rep. Repeat for 8-12 reps on the left leg, then switch legs
Ideally we want these leg lifts to feel challenging. If you can pull your leg more than a couple of inches off of the wall, scoot your butt closer to the wall, or try it with a straighter (less bent) knee.
7. Seated Single-Legged Leg Lifts
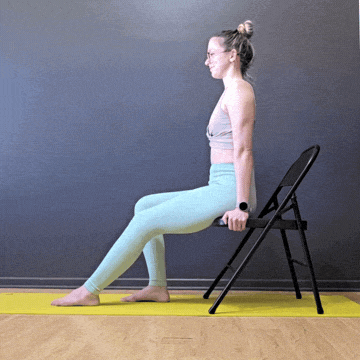
Now that we’ve challenged the hip flexors lying on our backs, it’s time to up the ante in a more upright position where they have to contract to fight both the resistance of tight hamstrings and the pull of gravity as well!
Start sitting on the edge of a chair with right knee bent, right foot on the floor, and left leg kicked out straight (or as-straight-as-is-comfortable) with the foot on the floor as well. The left leg will be our working leg
Holding on to the sides of the chair for support, keep your back as upright/straight as you can and lift your left leg as high as you can - this should feel like a strong squeeze in your thigh (quads) and hip crease (hip flexors). Be careful not to slouch your back and tilt your pelvis backwards - we want this movement to only come from lifting the thigh, not from tilting the hips backwards as well.
Hold the leg lifted for a moment, then lower back to the floor with control. That’s 1 rep. Repeat for 8-12 reps with the left leg, then switch legs
Note: this can be quite crampy in the quads if you don’t do a lot of shortened-quad strength work - if it feels too intense bend the knee a bit when you lift. As your quads get stronger over time, you can progress to lifting a straighter leg!
General Tips for When Working on Hamstring Flexibility
And some good general reminders for all of these types of drills mentioned above:
For seated forward folds, don't shy away from using props! That could mean using a strap or a band to help pull you forwards, or sitting in a chair to help elevate your hips and make the forward hip tilting action easier
For bands, don't bother spending a lot of money on something fancy, but you'll probably want something thicker/stiffer than a Theraband (ex. this 15-35lb is the orange band I use, avoid lighter resistance (<10lB) bands like these). You can even get creative and use whatever you have on hand, like a sweatshirt or a scarf
Prioritize stretching with a flat back if your goal is to increase your hamstring flexibility. There's nothing wrong with rounding your back from a functional use perspective, but typically if we let our back round when we stretch, we're much more likely to "deepen" the stretch by rounding our back more instead of actually stretching our hamstrings longer
I'm personally a big proponent of doing flexibility training for a specific muscle group only a couple of days a week (with rest days in between) to make sure the muscles trained have time to recover - BUT some people do make progress working on their hamstrings (just a bit) every day. It may take some experimenting to see what feels/works better for you
So if you’re looking to incorporate these drills into a regular training routine, my advice would be to try to do them 2-4 days/week (with rest days in between). If you do other flexibility training or have other active hobbies (ex. weight lifting, running, etc.), check out this blog post for some thoughts on programming.
What About Sitting in Other Positions (Butterfly, Cross Legged, etc.)?
This same general idea applies to sitting in other positions as well, although the muscles stretched are different (you’ll want to focus on strengthening + stretching the “back side” of the hips, as well as strengthening the “front side” in that position). So for things like a butterfly pose or sitting cross legged, that’s going to mean a greater emphasis on stretching the glutes and strengthening your hip external rotators (since the thighs are turned out in those poses). You’ll still need to focus on hip flexor strength through the front of the hip, but want to skew it towards more knee-out-to-the-side and thighs-turned-out drills to make sure we’re strengthening the hip flexors in a position similar to how they are when we’re in our butterfly or sitting cross-legged stretch.
Looking for More Help?
While these drills I’ve mentioned above are a great start, most folks will see more/faster progress with a slightly bigger training volume. If you’re looking for more ideas of how to stretch the hamstrings, check out this blog post. Or you may be interested in this hamstring flexibility workshop that includes a 20-min and 30-min flexibility routine all focused on -you guessed it - hamstring flexibility. The workshop includes detailed how-to videos and progressions/regressions on all the drills, so you can increase the intensity/challenge as you get more flexible.
Watch the YouTube Video Summary
Related Content
Recommended On-Demand Workshops
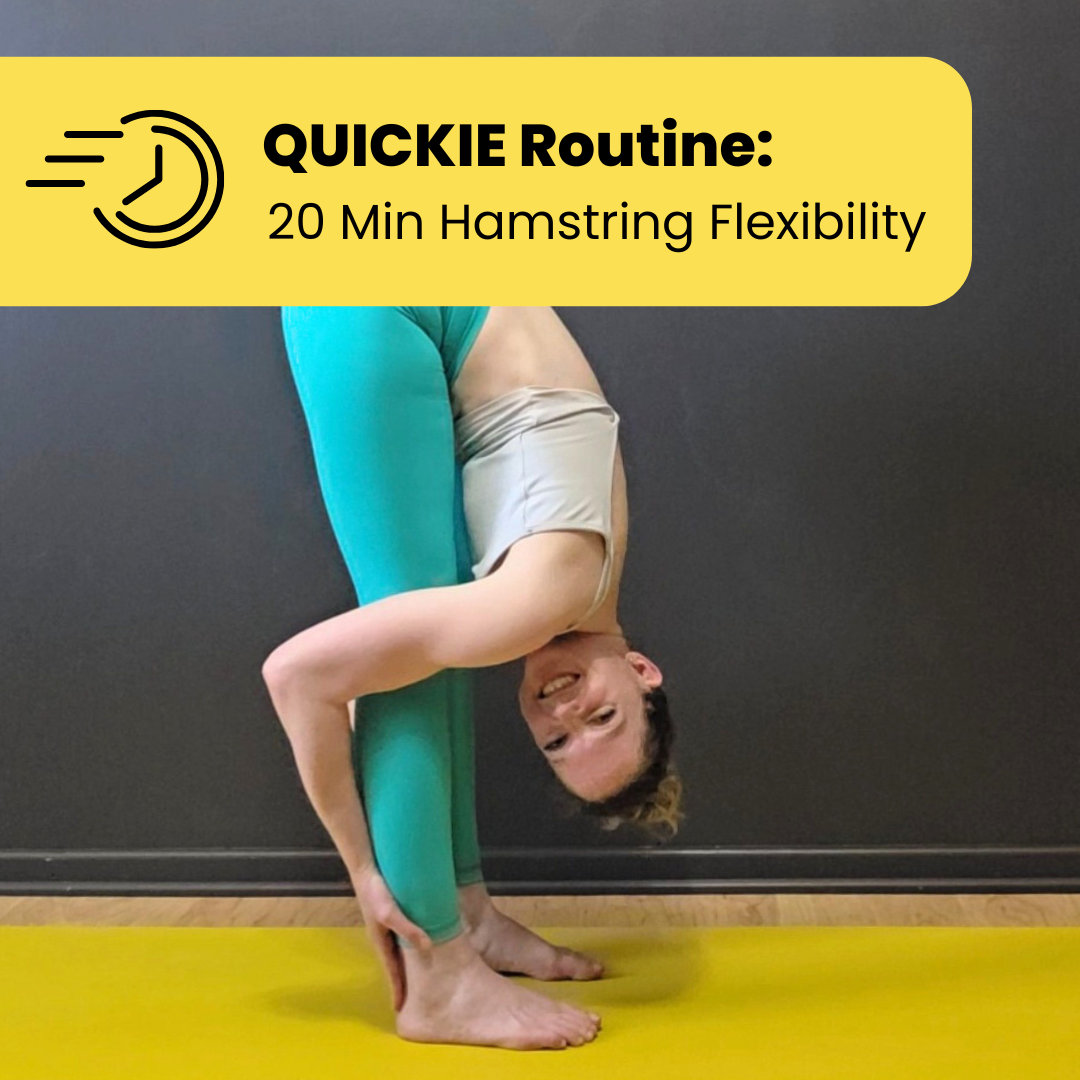
Who this routine is for:
This 20-30 minute training routine is targeted to students who want to work on their hamstring flexibility for deeper forward folds. Modifications of drills are given for all levels - whether you’re someone who’s working to finally be able to touch their toes, or whether you’re a more advanced student trying to get their belly all the way to their thighs in a forward fold, this workshop has drills for you!
What you get:
THIS IS NOT A FOLLOW-ALONG VIDEO like the majority of my other recordings. Instead, this is a written routine that includes detailed how-to videos for each drill, as well as educational content to help you maximize your progress in your hamstring-training journey.
This PDF includes:
Flexibility training best practices
Anatomical considerations for training hamstring flexibility
How to modify the drills to make them easier or harder as your flexibility progresses (spoiler alert: bending your knees is encouraged!)
How to test to see if you have nerve tension that will impact your training (and how to adjust accordingly)
Suggestions for training frequency
A program of drills with how-to videos explaining proper form, what sensations to look for, what muscles to engage (if needed), and how to modify to adjust the difficulty/intensity for each drill. The “default” routine is meant to fit a 20-minute training session
Additional recommended drills (along with how-to videos) for another 10 minutes of training for students who want to extend their practice to a 30-minute session
A printable all-on-one-page list of drills for quick reference
Heads up: Because each of the how-to videos is filmed as an educational video with comments on form, technique, and modifications - and not as a “follow along with me” style video, the videos will likely take longer to watch than to actually execute the exercise. So plan on your first run-through of this routine to take longer than 20 minutes because you’ll likely be watching the videos in their entirety which will take a bit longer (and then just skimming through them for reminders in the future).
Recommended props:
Yoga mat (knee padding is your friend!)
Some kind of long strap - can be stretchy or stiff
2 yoga blocks
A chair or bench (very helpful for folks with tight hips)

Who this workshop recording is for:
This 30-minute workshop is great for beginners or students with tight hips who want to work on their straddle flexibility.
If you struggle in your straddle stretch, meaning:
you feel like your legs don’t straddle out far at all - you’re stuck with a narrow pizza slice
you can’t sit up straight in a straddle on the floor
it feels impossible to lean forwards in your straddle
… then this is a great workshop for you!
If you can already sit in a straddle on the floor and lean forwards a couple of inches while keeping your back flat, I’d suggest trying the 60-minute Straddle Pancake workshop instead.
This 30-min follow-along straddle routine includes:
Passive drills focusing on adductor (inner thigh) flexibility to help widen our straddle
Active flexibility drills to strengthen this deeper range of motion to be able to more easily open our straddles over time
Active & passive drills to help work towards leaning forwards in a seated straddle
Recommended props:
Long stretchy strap (optional, but nice!)
2 yoga blocks
Chair or low table
Wall space you can straddle against
Note: Because of Squarespace’s file size limitations (which is what I use for this wonderful website!), upon purchase you will receive a PDF with a private YouTube link to the recording.