
How’s Your Bridge (Full Wheel Pose)? 7 Most Common Mistakes
How’s Your Bridge (Full Wheel Pose)? 7 Most Common Mistakes
Being able to hold a bridge is a challenging, but rewarding, flexibility goal because it requires flexibility and strength through the entire backbending chain, from our hips, all the way through our entire back, to our shoulders and arms (and even hands!). But specifically because it is requires this coordination, strength, and flexibility through the full body, it can be a real challenge. It’'s easy to push too hard in one area, forget to engage another, or simply not have the prerequisite range of motion to comfortably support the “perfect” pose. At best that might mean your bridge is a less effective stretch than it could be, or at worse it could hurt and lead to potential injury.
So in today’s post we’re going to look at the 8 most common “mistakes” I see students make in bridges, and how to address them.
Note: these are generalizations, there are often many “correct” ways to do a pose, so take these with a grain of salt! For each of these, I will provide more detail about the “why” behind why I think each of these is not ideal, and what we should strive to do differently.
1. It Hurts
I generally try to avoid using black-and-white language labeling certain versions/techniques as “wrong” because there are many possible ways to do a pose. Poses can look different on different bodies because of anatomical variations, differences in flexibility and strength, different body proportions, etc. And different people have different goals when it comes to working on a pose, so sometimes the “generic” best practice advice doesn’t apply.
But when it comes to PAIN in a pose (which is different from discomfort), there really isn’t much room for a grey area interpretation. Flexibility work should never cause sharp pain. Pain is the body’s warning sign that something doesn’t feel safe: we may not have enough strength to support and protect our joints, and our body is trying warn us to avoid injury.
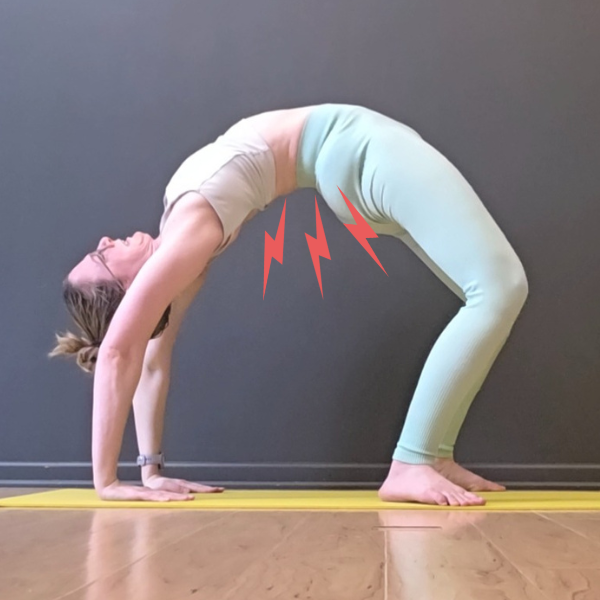
So if your bridge is hurting, whether that’s in your wrists, shoulders, back, or somewhere else (I’ve got tips on all of those below), then you are pushing too hard and likely not engaging the proper support muscles needed to moderate the intensity of the stretch(es) you’re receiving in this pose.
Short Term Fixes

Stop it! (just kidding). But at least stop pushing so hard you’re bending to the point of pain. Try to dial back the intensity. If that’s not enough, opt for a different, less complex pose, like a headstand bridge (less intense on the shoulders & wrists), or a glute bridge (less in tense on the shoulders, wrists, and even back)
Longer Term Fixes
This really depends on where you’re feeling the pain, but typically strengthening the supporting muscles and working on improving the flexibility of the restricting muscles is a common solution. Keep reading for more specific recommendations for different areas that may be causing you trouble.
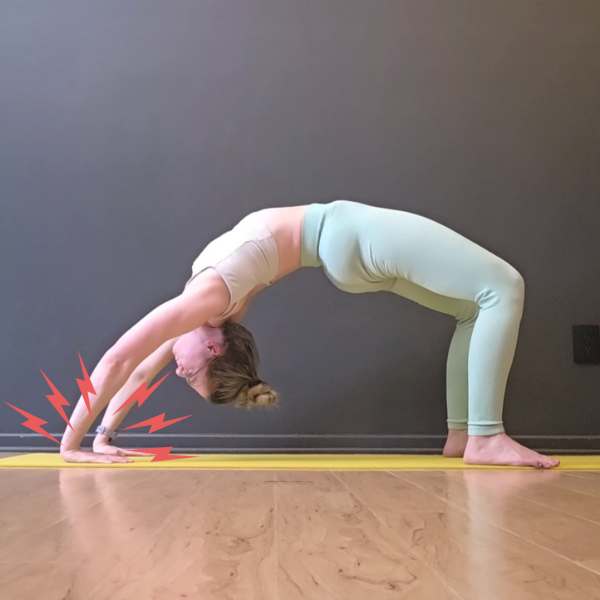
2. Smooshed Wrists :(
An intense bend at the wrist is a common sign of lack of “open shoulder” flexibility (shoulder flexion for you anatomy nerds) we need for a deep bridge. When we don’t have this flexibility, as we start to push into the hands and straighten our arms to lift our torso, the tightness in our shoulders prevents us from being able to open our shoulders to stack them over our hands, and instead all of the pressure goes straight to our wrists in a very intense bent wrist stretch.
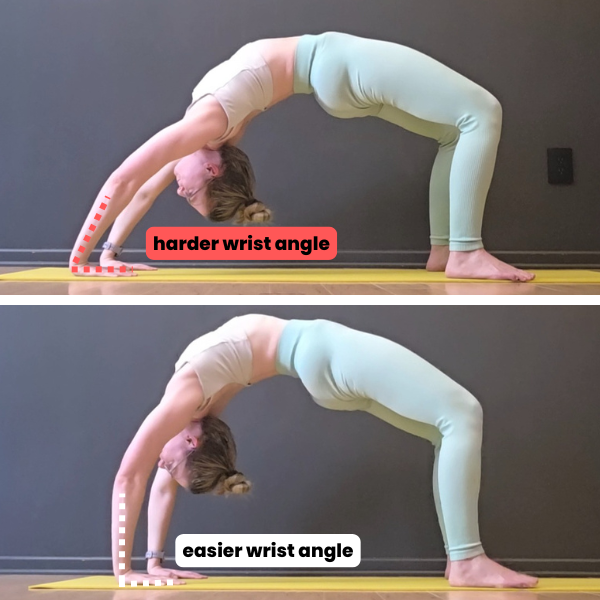
The “catch” is that for most students, being able to shoulders higher over the wrists takes a lot more shoulder and back flexibility, so this is easier said than done!
Short Term Fixes
Warm up your wrists to help them be more comfortable in a bent position. Sometimes the discomfort is due to going from zero wrist warm up to asking your wrists to support almost all of your bodyweight while an intense stretch (so no surprise if they feel cranky!)
Think about pushing into your feet to help press your shoulders forwards to stack over your wrists. Be gentle with this cue! You may be limited by your shoulder/back flexibility here, so keep it an easy foot push, and stop if you’re starting to feel any pain
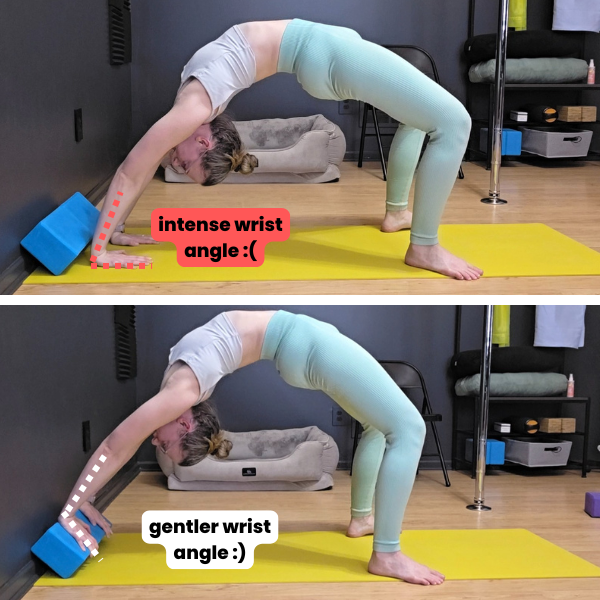
Use wall blocks to adjust the angle of your wrists
Elevate your feet to help achieve a friendlier wrist angle (note: this does require a considerable amount of shoulder strength to support!)
Try a different bridge variation, like a glute bridge, or a headstand bridge
Longer Term Fixes
Work on your overhead shoulder flexibility! Check out this blog post or this flexibility routine for some great ideas for drills to help. A great long-term goal is to build enough shoulder (and back) flexibility to be able to stack the shoulders completely over the wrists
3. Bent Elbows
While there is nothing “wrong” or inherently dangerous about bent elbows in a bridge (unless you are about to drop yourself on your head!), it’s not as effective of a stretch for your shoulders as a straight-arm bridge, so I don’t recommend focusing a ton of time on holding this position. This is absolutely a great milestone along your bridge progression journey worth celebrating, just a not a supper effective “stretch.” Think of it like getting flat un-square splits - open splits typically avoid a deep hip flexor stretch, but getting flat un-square splits is still a great accomplishment all the same.
If you want the best full-body stretch (including helping push a bit more of a stretch into your shoulders), then I’d recommend keep working on building up your shoulder (and arm) strength/flexibility to be able to push all the way up onto straight arms.

“But wait a minute, aren’t your arms still a little bent in that bottom photo?” - I see I can’t trick you with my fancy graphic editing skills! That tiny bend you are seeing is called the “carrying angle,” and is present even when the elbows are “locked out” straight. This is basically a slight sideways bend that naturally occurs based on the alignment between your upper arm bone and your forearms, and is not something you can control like the “forward and backward” bending/straightening of the elbow. This video goes into more detail if you’re interested.
Short Term Fixes
Take your shoulders/arms out of the equation, working on bridge variations like glute bridges, or a headstand bridge
Make the “push up” easier: start with your back supported and torso already partially elevated, like by leaning over a chair or body wheel
Longer Term Fixes
Continue to work on your back and hip flexibility (this blog post has some great drill recommendations)
Keep working on your “open shoulder” flexibility (see recommendations from #2 above)
Focus on building more strength, especially overhead “pushing” strength while the shoulders are in a flexed/stretched position. This blog post and this recorded workshop have great examples of drills that can help
4. Fingers Pointing In (Lack of Shoulder External Rotation)
Similar to bending the elbows, letting the fingers point in is a common symptom of lack of shoulder flexibility, specifically a lack of strength in some of the rotator cuff muscles that help externally rotate (twist to the outside) the upper arm in a bridge against potential tightness in our lats and/or pecs.
I've written a whole blog post on why shoulder “external rotation” is so important in arms-overhead backbends, but the short summary is it’s preferred because:
it reduces the chance of the upper arm bone jamming into the top of the shoulder blade (shoulder “impingement”)
it requires us to engage the rotator cuff, the muscles that help stabilize the ball-and-socket portion of our shoulder to keep it snug and safe (especially in hypermobile bodies!), allowing us to stretch deeper more safely
it helps orient our shoulder blade + upper arm bone to “point backwards” in space as much as possible, and gets the shoulder blades “out of the way” of our upper back when arching
Check out the photos below to see what that means in a bridge. Note: don’t get hung up about the words “internal” and “external” not seeming like they match the direction of the arrows - these are terms from biomechanics/anatomy that make more sense in “anatomical position” (standing right side up with the arms by your sides).
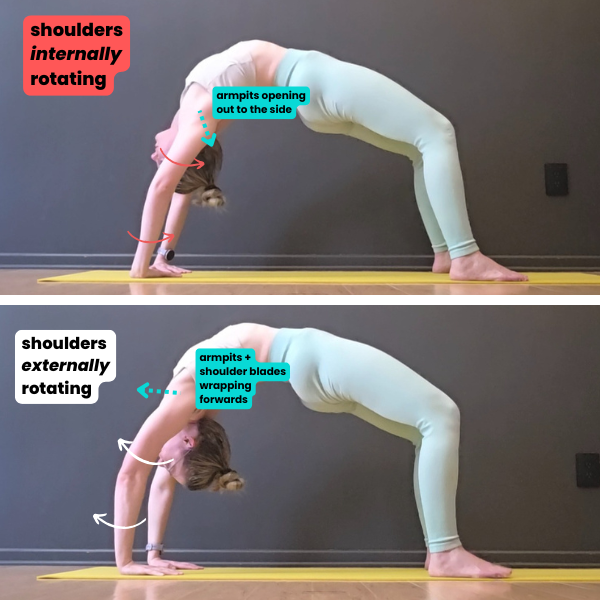
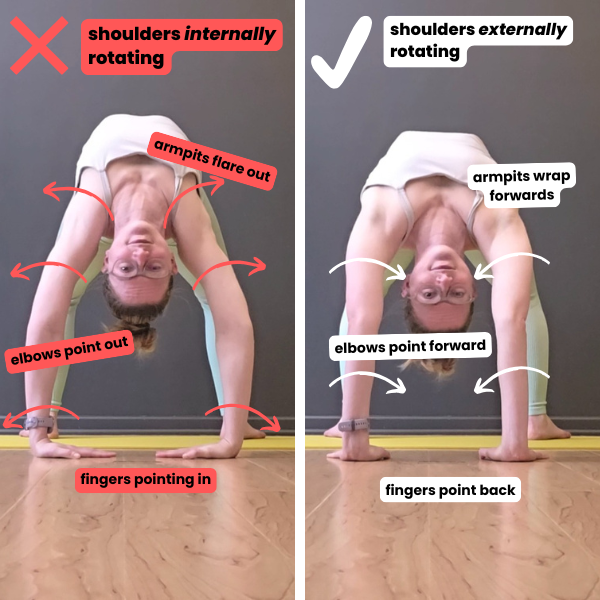
Our pecs and our lats are two of the large muscle groups that insert on the “front” of our upper arm (if we’re thinking of the body in an anatomical position), and get stretched when we reach the arms up and overhead. And they get even more of a stretch when we twist those upper arms to the outside like we do when we add in this shoulder external rotation. So when those muscles are tight, that can limit how much we can rotate the upper arm, leaving our elbows and armpits flaring out to the side in our bridge. If we try to use our feet to keep pushing into a deeper bridge in that more “internally” rotated arm position, we might run into some of the shoulder problems listed above (shoulder impingement, instability, etc.)
Short Term Fixes
Include some rotator cuff engagement drills as part of your warm up. Sometimes the simple act of making those muscles work in an easier position is enough to give them a nudge to work in a more challenging position (like a bridge, where we are smooshing a large portion of our bodyweight into our shoulders and giving them an intense stretch at the same time). Drills with a light resistance band, or bodyweight drills like these can be helpful
Be intentional with your shoulder position as you’re pushing up into your bridge. Think about trying to “wrap” the outsides of your armpits forwards, point the elbow points straight ahead, or point your fingers towards straight back towards your feet (note: because our forearm can move independently of our shoulders, just thinking about the hands alone isn’t always enough to “fix” this issue). This is easier to do before you’ve hit end range and are in your most challenging stretch, so try to find that engagement before you push “all the way” into your deepest bridge
Try the elbow bend test to see if you’re properly rotating your shoulders in your bridge. Don’t sweat if it’s not perfect, but strive to get those elbow points to bend forwards as much as you can (before going back to straightening your arms)
Longer Term Fixes
Strengthen your rotator cuff! Specifically, we want to work on rotator cuff strength in a similar shoulder position to what we do in our bridge, which means biasing in more arms-overhead type drills. This blog post has a good mix of recommended drills
Work on stretching + strengthening (in a stretched position) the lats and/or pecs (this blog post has some good suggested drills). Lessening the tension in those areas can make it easier to find “proper” external rotation in the shoulders when we’re bringing the arms overhead
5. Hinging Just At the Low Back
I was hesitant to add this to the list, because for the majority of students, even those with relatively bendy shoulders, this is what their bridges look like when they start out. Heck, your bridge might look like this for years! As long as it’s pain-free (see #1 above), then this bridge is totally fine. Our lumbar spine (low back) is naturally curved into an arch, and generally has a bigger range of motion of how much additional arch it can accomodate (relative to other areas of our spine).
But for folks seeking to get an even bendier bridge in the long run, eventually you will run into a limit of how much your low back can physically bend, and you’ll need to make sure the rest of your back is starting to join the backbending party. For many, if they don’t learn how to incorporate their mid and upper back in their backbends, they can get “stuck” trying to use their legs to “push” themselves into a deeper bridge, pushing too much pressure into the low back and leading to pain.
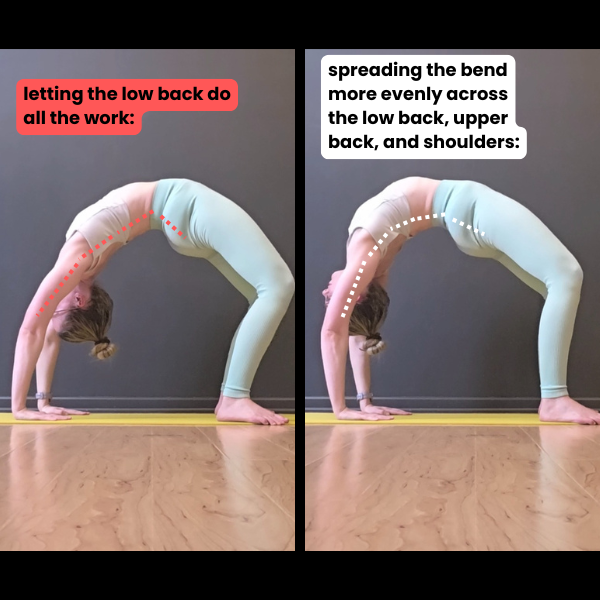
So the earlier we start working on trying to spread out this pressure to our whole back - including trying to spread some of the bend to the pesky upper back - the better.
Short Term Fixes
Add some upper-back-specific drills to your warm up, including drills where you’re encouraging your upper back to bend without also letting your lower back bend and steal the show! Drills like these can be helpful
Experiment with trying to activate some of the upper back pulling muscles by adding a “chest scoop” to your bridge (this Instagram post goes into more detail)
Longer Term Fixes
Keep working on your upper back flexibility and backbending strength. This blog post has some great drills, or you can check out this full 1-hour workshop if you’re looking for a more structured routine: Bridge Clinic: Hello Upper Back!
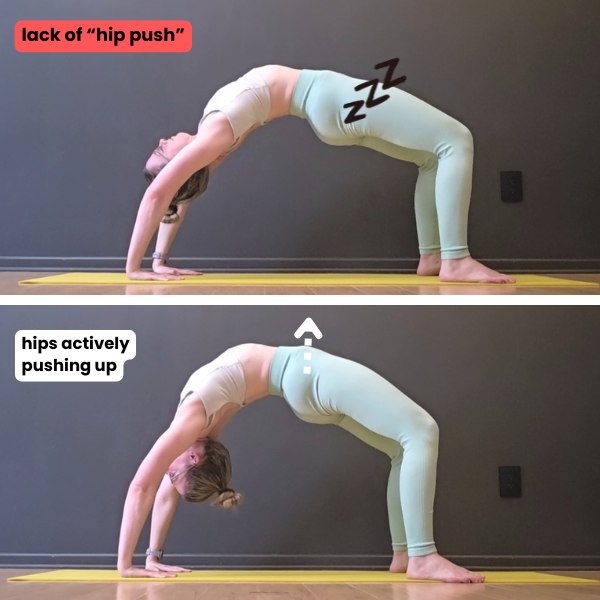
6. Lazy Butt (Relaxed Glutes)
“Should I be squeezing my glutes?” is a question I get asked a lot in classes where we work on bridges. The short, un-nuanced answer is “yes,” because simply from a biomechanics perspective, it’s impossible to press the hips up into a bridge (into hip extension) without using the glutes (or at least I have yet to meet someone who can accomplish this action by only using their hamstrings to assist with this hip extension, and not use their glutes at all).
The longer more-nuanced answer is still yes, but recognize how much you should be squeezing may vary person to person. Two other instructors I love already have amazing blog posts on this topic I’d recommend checking out if you’re a flexibility nerd like me:
Backbends: When and Why to Engage Your Glutes by Jason Crandell
What to do with your glutes (and legs) in backbends by Catie Brier
A short summary is that a certain amount of glute engagement can be helpful, but it’s possible to “overdo it,” (and the glutes aren’t the only muscles we should be using!). Both the glutes and hamstrings should be engaging to help push us into “hip extension” (in a closed chain position like a bridge, this is what helps us both “lift” the hips higher in the air, and tilt them backwards to allow for an easier arch in the lower back). The catch is, it is possible to squeeze the glutes so much that it can feel like it adds more, not less, pressure/force into the low back (which can lead to pain, which we’re trying to avoid!).
Short Term Fixes
Go ahead and let your glutes engage if that feels good in your bridge! Like I mentioned above, how much you should squeeze is more individual specific, so feel free to experiment to see what works best for you. Some students respond best to thinking about a heavy squeeze, pressing their hips as high as they possibly can. Others feel better adding just a mild amount of attention to the hip push, and intentionally dialing it back from the maximum they could be using to push. Others still don’t even feel the need to “overthink” the glutes at all. Try these options in an “easier” pose first (ex. a glute bridge) before trying them in your “full” bridge
Longer Term Fixes
Work on strengthening your glutes (and hamstrings!), as well as your hip flexor flexibility, to allow for more comfortable hip extension in your bridge (check out the drills in this Insta post for some ideas)
7. Inappropriate Entrance Choice
Occasionally in over in r/flexibility (shoutout to the flexibility subreddit, which has a great community of folks sharing advice on flexibility training!), I see people posting videos asking for feedback on their backbend where they try to drop back into a bridge from standing, start to plummet to the ground and barely catch themselves before their head hits the floor, and then don’t have the strength to actually hold themselves in their bridge with straight arms or “proper” shoulder engagement (see #2-4 above). Many people don’t realize that dropping back into a bridge from standing is NOT the “standard” way to enter this type of backbend. Drop backs are actually a pretty darn advanced contortion skill that take an incredible amount of strength and flexibility to execute safely. Until you can at least perform a solid and comfortable straight arm bridge with good technique, they really shouldn’t be attempted in any capacity.
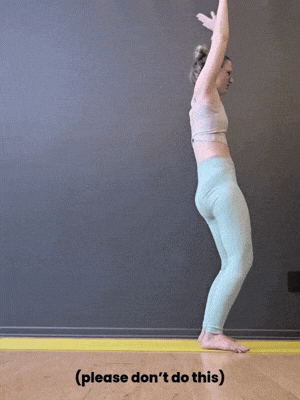
Pushing up from the floor, with your hands by your ears (or on parallettes or blocks), is a much safer and more appropriate choice. It allows for easier “proper” engagement in the hips, core, and shoulders, as well as the safest “bail” (just tuck the chin and lower with control :) ).
Short Term Fixes
Choose a bridge entrance that feels challenging, but still controlled through the entire movement.
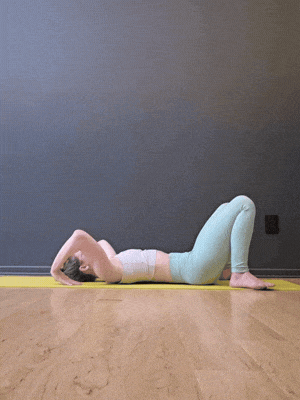
Start from the floor, and start small! If you don’t yet have the strength/flexibility for a “full” bridge push up, work on smaller pieces:
Glute bridges to work on the hip push
Partial bridge push ups - either pressing from the floor to a headstand bridge, or from a back-supported position to a full bridge (see suggestions at the end of this blog post for more ideas)
Do not use “drop backs” as an entrance unless you can do so with control throughout the whole movement (see “longer term fixes” for recommendations of building up the strength for that skill). Letting yourself “fall” through the end of a drop back, or walking your hands down the wall, does not teach us the proper engagement we need for that skill
Longer Term Fixes
Building up the strength and flexibility for bridge skills takes time! This is where working with a coach, or trying a dedicated training plan can be particularly beneficial. Some follow-along workshops I have that cover different bridge entrances are:
Building Up to Your Bridge (Backbending for Beginners) - great for students looking for a more comfortable “push up into bridge” from the floor
Drop Backs, Stand Ups, and Walkover Prep - for students who already can comfortably hold a straight-arm bridge, this workshop covers progressions for training both dropping back into a bridge from standing, and kicking over into a bridge
Continuing Contortion: Narrow Bridges, Teardrops & Ankle Grabs - in addition to working on deepening your bridge to be able to reach your hands to your feet, this workshop does include a couple of other funky shoulder-y bridge entrance variations, like “swooping” into a bridge (my personal fave), and using a “shoulder dislocate” (note: this is not literally a shoulder dislocation!)
The Good News: Your Bridge Doesn’t Have to Be “Perfect!”
So if you’re someone who’s realized that there are not multiple things you “should” be doing differently in your bridge, don’t panic.
The #1 priority is to adjust so that your bridge is pain-free, even if that means you have to do some of these “mistakes” to do so in the short term (ex. keep the elbows a bit bent, relax the butt a bit, etc.). Beyond that, pick just one thing to focus on during your bridge to start with, maybe that’s really working on being mindful of your shoulder external rotation, even if that means you can’t quite get the arms as straight or push as high as before - that’s totally fine. But in the rest of your training, that’s when you can work on building the foundational strength and flexibility to start to address some of these other areas long term (you may have noticed a recurring theme on how more back and shoulder flexibility helps with many of these challenges!). The real progress is made by focusing on the supporting drills, not how perfectly you can do a handful of bridge attempts. Think of your bridge as an opportunity to play with the flexibility gains you have been making in all the rest of your training, and use this guide to help identify what areas might be weaker for you that you can tailor your support training accordingly.
Related Content
Recommended On-Demand Workshops

Who this class recording is for:
This recorded workshop is intended for “beginner” students who want to build their back, shoulder, and hip flexibility (and strength!) to push up into a bridge (aka Full Wheel). You’ll learn how to strengthen and stretch your whole backbending chain - with an extra emphasis on the shoulders.
What this class includes:
A quick full-body warm-up to get you ready to stretch
A full 45-minute follow-along stretching routine you can follow 1-3 days per week to work on your backbending flexibility
An additional 5-20 minutes of bridge-specific skillwork you can add on to that routine to specifically work on your bridge press (so you can tailor your training to fit your own schedule)
Recommended props:
Yoga mat
2 yoga blocks
A strap (which can be stretchy or stiff - a towel or sweatshirt would work as well)
Note: Because of Squarespace’s file size limitations (which is what I use for this wonderful website!), upon purchase you will receive a PDF with a link to the recording. You can then stream the recording online from the private link.

Couldn’t make it to the Feb 6 Bridge Clinic workshop? Lucky you can still get a copy of the recording!
Who this workshop recording is for:
Yogis, pole artists, aerialists, and general flexibility practitioners who have a comfortable bridge, but are struggling to access their shoulders and thoracic spine to help move the bend to their upper back.
Recommended for students who can comfortably hold a bridge with straight arms (legs can still be bent), but feel like all your bend is still coming from your low back.
What you’ll learn:
Proper shoulder and arm position for maximizing shoulder flexibility
What the heck is “external rotation” and why is it such a big deal for upper back and shoulder flexibility
Active flexibility drills for shoulder and back conditioning to help strengthen and increase your range of motion in your “over reach” and upper back
Bridge variations that encourage more upper back engagement
A full 60-minute stretching routine you can follow-along to keep working on your backbending progress
Recommended props:
2 yoga blocks (or something you can use to place your hands on and space your arms for some of the exercises)
Strap (yoga strap, theraband, scarf, or even a pair of leggings can work as a strap - it doesn’t matter if it’s stretchy or stiff)
Some free space by a wall (some of the exercises we’ll be doing involve leaning against the wall)
Note: Because of Squarespace’s file size limitations (which is what I use for this wonderful website!), upon purchase you will receive a PDF with a link to the recording. You can either stream the recording online, or download to your phone or PC for a higher-quality viewing experience.