
10 Min Back Flexibility Routine
10 Min Back Flexibility Routine
By popular demand (at least according to Google…) here’s a quick, basic back flexibility routine you can use when you’re crunched for time, or as a base to build a longer training routine off of. Note: this routine focuses primarily on backbending (arching) flexibility, not literally stretching the back muscles (which would involve rounding, not arching, the back). If you’re looking for a routine that hits other types of back stretches, I’d recommend this post instead.
Backbending Mini Routine
1. Cat-Cow & Disco Cow

Start in a tabletop position (kneeling on all fours)
Round your back by tucking your tailbone, lifting the back of your ribs, and pressing your hands and knees into the floor (this is the “cat” part of “cat-cow”). I like to really focus on pressing my hands down and making space between my shoulder blades (shoulder protraction)
Then arch your back by dropping your belly button, lifting your head and collarbone, and lifting your tailbone. To really engage the back muscles, I like to think of trying to pull the space between my shoulder blades towards my tailbone. This should feel like a squeeze in your back (your back muscles are essentially doing a crunch). (This is the “cow” part of “cat-cow”)
Continue to alternate rounding & arching your spine for 20-30s
Variation: “Disco Cow”

If you want to jazz up your regular ol’ cat-cow, you can add some side bends to get your spine moving in even more ranges of motion!
Start on all fours in a tabletop like for your regular cat-cow
Round your back by tucking your tailbone down and puffing up the back of your ribs towards the ceiling
Then start to circle your chest/ribs by reaching them over to one side, down towards the floor (back into your arched back “cow” position), and over to the other side. I like to think that I’m using my ribs to scrape out the inside of a peanut butter jar. You can keep the arms straight, or if you want a bit more movement in your upper back, you can bend your elbows as you swoop your chest down towards the floor
Do 4-8 circles in one direction, then switch directions
2. Back Extensions
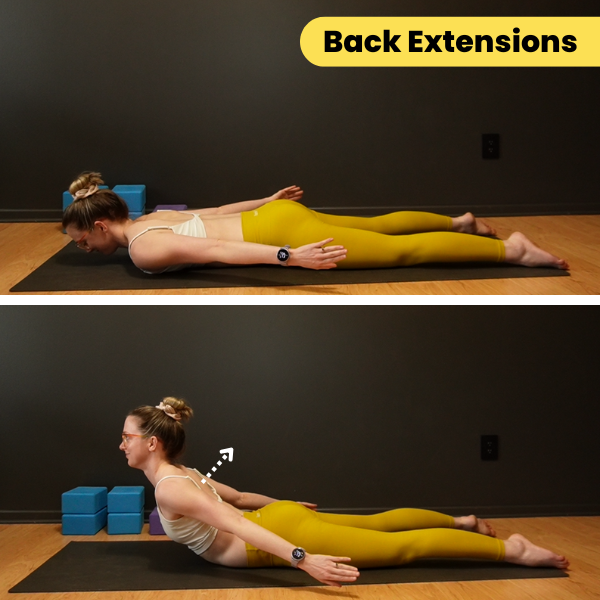
There are a zillion different variations of back extensions as a flexibility exercise (here are some of my favorites), but I consider this one the most basic/foundational of them all.
Start lying on your belly on the floor, feet/legs about hip-width apart (wider is fine if that’s more comfortable), with arms reaching back by your sides
Keeping your legs on the floor (don’t let them lift!), lift your chest and torso as high as you can off the floor - this should feel like a squeeze in your back muscles (because your back muscles are basically doing a sit up) - hold for a moment, then slowly lower back to the floor
That’s one rep. Repeat for 8-12 reps
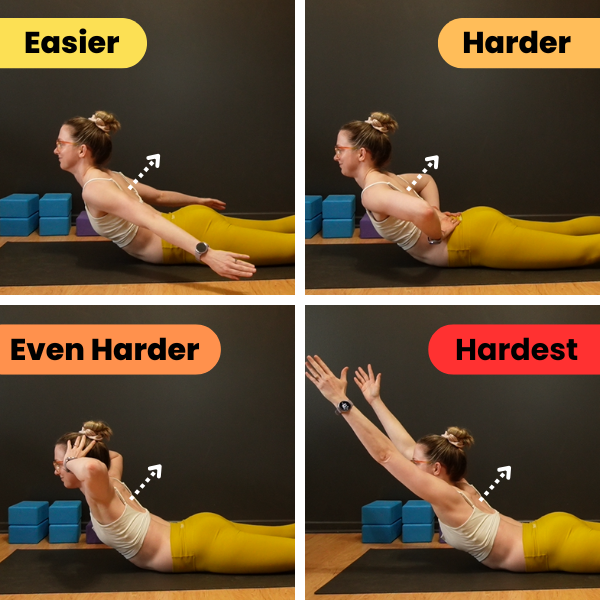
Adjust the Arms to Increase the Challenge: If regular ol’ back extensions aren’t challenging enough (ex. you can lift most of your ribs off of the floor), you can make them more challenging by starting to reach the arms forwards - the farther forwards you reach the arms, the harder your back muscles have to work to lift your torso). Hands behind the head is often a fun challenge, or arms reaching completely overhead (like “superman” arms) is harder still. If you really want to get crazy you can hold a light weight in your hands (you really don’t need to add much to feel it!)
3. Childs Pose Twists

Wait, I thought this routine was just about backbending - why are we doing a twist all of the sudden? Even though our goal is more spinal extension (arching through the back), we can help lubricate our joints by moving them through different ranges of motion, which will then have our back more “warmed up” and ready to move in some of the more challenging ranges of motion. Especially for folks with stubborn upper backs, incorporating some twists and side bends in your training can be super helpful.
Start kneeling with your knees splayed out, but sitting back towards your heels in a Child’s Pose (if you can’t comfortably sit on your heels, feel free to put a yoga block or two between your feet to rest your butt on)
Place your right forearm on the floor with the elbow close to your knees, and take your left hand behind your head
Take a big twist to the left, pressing your right forearm into the floor, and pulling your left elbow up towards the ceiling
Then take a smaller twist back towards the right as you drop your left elbow down towards the floor (it can touch or just float)
That’s one rep - repeat for 8 big twists to the left, then switch sides for 8 big twists to the right
4. Booty Drops


Before going deeper into backbending work for the upper back, which is notoriously stubborn when it comes to backbending, I like to do some “supported” work with props to help give it some help to arch so our body can get used to feeling how much we can safely bend here.
Choose a comfortable upper body support: two yoga blocks stacked flat on top of each other, or a chair or low table (helpful for bendier people). Lean back on your support prop so that the “edge” of the prop is right at the base of your shoulder blades - this is the part of our upper back we’re trying to give a little bit of an extra nudge to help arch! If you are on a chair, you may need to tuck your chin and round your neck to fit.
Cradle the back of your head with your hands (if on blocks), or grab the sides of your chair for support, and point your elbows up towards the ceiling - this will make space between your shoulder blades and help them wrap around the sides of your ribs (often helpful for upper back backbending!)
Keeping the top of your upper back pasted on your support prop (don’t let it lift away!), drop your butt down toward the floor, and pull it backwards towards your blocks, or under your chair/table. Think about using your back muscles to pull your butt down-and-back, as opposed to pushing with your feet
That’s one rep. Repeat for 8-12 reps.
5. Baby Cobra Back Extensions

Here’s a variation of those back extensions from above, but specifically focusing on recruiting more of our upper back muscles. You can even use a strap for a bit of a physical cue to help!
Take a long band (I prefer a medium-high resistance stretchy strap, but you could easily use something stiff like a yoga belt) and stretch it across your upper back right underneath the bottom of your shoulder blades (just like where you had the edge of the yoga blocks or the chair in the drill above). Make sure it’s between your arms and your ribs (if it’s wrapping around the outside of your arms, it not only will smoosh your arms uncomfortably, but you won’t feel it as much on your back)
Lie on your stomach with your feet about hip width apart, using your hands to stretch the band against your upper back. You can rest your hands on the floor for a bit of support, OR (harder version) float them just above the ground.
Keeping everything below your chest (mid ribs, lower ribs, and belly) on the floor, lift your collarbone and chest as high as you can, trying to “hinge” your back around the strap - this will likely feel challenging! Try not to lift anything under your chest off the floor, keep the ribs underneath your chest pressing down into the floor. You should feel your upper back muscles working to try to lift your chest up! Avoid squeezing your shoulder blades together (which can give us the “illusion” of our upper back muscles working, but really that’s just our rhomboids and mid traps, which aren’t going to help our backbending much!)
Lower your chest back down to the floor.
That’s one rep. Repeat for 8-12 reps.
Still having a hard time feeling your upper back muscles work? It can be challenging trying to get our body to isolate lifting (by backbending) just one part of our back, and not using all of the spinal extensors to just lift everything at once. If you’re feeling most of the squeeze still happening in your mid or lower back (and not much in your upper back between your shoulder blades), try tucking your tailbone (aka using some posterior pelvic tilt) throughout this drill. That will flatten out the natural curve we have in our lumbar spine, and this can often help “trick” our body into not using those lower back muscles.
Want to make it harder? Lose the strap! If you can consistently feel your upper back muscles firing with the strap as a prop, even if you aren’t lifting your chest very high, you can make this drill harder by using that (light) physical support. Eventually we want to be able to train our upper back muscles to fire even when we aren’t giving our body a gentle poke on where we want to bend :)
6. Glute Bridge

In addition to being a mild backbend in itself, glute bridges are a great way to work on our hip flexor flexibility (and glute strength!) to support more of an arch coming from the low back / hips in our backbends.
Start lying on your back with knees bent, feet scooted in towards your butt
“Tuck your tailbone” and tilt your hips/pelvis backwards (I like to think about trying to scoop my tailbone to point it up between my knees, and smoosh my low back into the floor) - this will bring us into posterior pelvic tilt (aka a backward hip tilt). If you’re not sure where your tailbone is, imagine you have a tail and are trying to reach it between your legs up towards the ceiling. Keep this engagement throughout this exercise
Keeping your tailbone tucked up towards the ceiling, press your hips as high as you can (without feeling any pain/crunchiness in the low back) by driving your heels down into the floor. You can also press your arms into the floor to help lift your ribs if you’d like to deepen the backbend and/or give the hips a little help. You should feel your glutes squeezing, and you may also feel a stretch across the front of your hip bones (it’s OK if you don’t feel this stretch, sometimes people only feel the butt squeeze). Our eventual goal is to be able to press the hips so high, you can see some “rounding” coming across the front of your hips, and not just having it be a straight line from your chest to your hips to your knees like a plank.
Slowly lower back down to the ground (but don’t “relax” all the way and lose that pelvic tilt engagement!)
That’s one rep. Repeat for 8-12 hip lifts.
Want to make it harder? Try doing it with just one leg! Bend one knee and keep it kicked in towards your chest as you press your hips up into your glute bridges. Keep the backward pelvic tilt throughout. Also be careful to keep both hips level/parallel to the floor - sometimes when we take away the support of one leg, our hips tend to tilt off to that side. You can reposition the “working” leg foot to be more towards your midline if needed.

7. Lunge-y Backbend Crunches

Just like with back extensions, there are many variations of this type of lunge + backbend drill that will look/feel different depending on the goals of the drill. For this particular routine, I recommend this version that emphasizes strengthening the muscles in the front of the core to support deeper backbends as well as stretches the hip flexors.
Start in a kneeling lunge (feel free to adjust to avoid knee pain in that back knee if needed)
Place your hands on the back of your hips for support, and tilt your hips backwards by tucking the tailbone down and lifting the pubic bone up (this is that same posterior pelvic tilt we were just working on in our glute bridges!).
OPTIONAL (but nice): engage your transverse abdominis, the corset muscles that circle your entire abdomen, by lightly sucking in your stomach. While the main focus of this drill is to strengthen our rectus abdominis (the “six pack” muscles in the front of our core which we’ll feel in a moment), this can be a helpful opportunity to work on your TVA engagement as well if you’re choosing to use that in other backbends.
Keeping your hips tilting up-and-back (don’t let them drift forwards!), lift your chest to start your backbend in your upper back. Keep as much weight in your hands on your hips as you’d like. If it still feels good, continue leaning back with the shoulders to deepen the backbend
Lift back up to start, focusing on feeling the muscles in the front of your core (mainly your rectus abdominis), I like to think of lifting by trying to pull my lower ribs back to the top of my hip bones
Don’t relax at the top! Now that we’ve found those rectus abdominis muscles to help us do our crunch, keep them engaged as you start to lift your chest and lean back for rep #2 - this means we’re working to contract these muscles eccentrically, aka contracting even while they’re lengthening. This is one of the best ways to train our abs to help support the weight of our upper (or lower) body in our backbends to help prevent us from accidentally going into too deep of a bend before we’re strong enough to support that position
Repeat for 8-12 lean backs once you’ve got the rectus abdominis engagement “turned on”
Want to make it harder? Remove the hand support. Instead of keeping your hands on the hips (which is subsidizing supporting some of the weight of your torso in your backbend), cross your arms in front of your chest so just your abs are doing the support work, or - even harder - reach those arms overhead!
Remember, only lean back as far as you can without pain, can still breathe comfortably, and still have the strength to pull yourself back up out of your backbend.

8. Belly-Down Leg Lifts

This is a variation of a drill I first learned from Amy Goh many years ago, I like it more than hips-on-the-floor leg lifts because it also helps strengthen our lower back muscles to pull us into a deeper backbend (from the hips!). Especially for those of you who struggle with low back flexibility, this is a great drill.
Start lying on your belly with your hips propped up - that could be laying your hips across two (flat) yoga blocks side-by-side, or laying your hips on a foam roller. Your chest should be relaxed on the floor (you can relax your head on your hands, or lift it slightly if you prefer
Keeping your chest on the floor, lift your legs towards the ceiling. To start, you’ll feel your glutes and hamstrings working to lift the legs in the air, but as you continue to lift, you should feel your low back muscles kick in to try to lift the legs higher by tilting your pelvis forwards. If you don’t feel the low back squeeze, you can think about trying to lift your tailbone towards the ceiling along with your legs
Lower the legs back down to the floor
That’s one rep. Repeat for 8-12 leg lifts
Want to make it harder? Add some upper back engagement by trying to lift your collar bone or chest off the floor. The catch for this variation is you still need to keep some rib contact with the floor (otherwise you are just lifting your whole torso instead of bending your back more). So make sure you can still feel the floor touching you somewhere on the ribs. I call this pose (chest up and butt up) “booty cobra,” and it can be a fun challenge to use more of your upper back!

9. Supermans

Time to bring it all together! Upper back, lower back, hips, and even shoulders! All in one super active backbend :)
Start lying on your belly on the floor
OPTIONAL (but encouraged!): externally rotate your shoulders by wrapping your shoulder blades towards the floor and rotating your upper arm so you try to point your biceps towards the ceiling
Lift your arms, chest and legs off the floor in one controlled motion - that means no “heaving” and no “bouncing” at the top of the movement. Lift and hold for a brief moment
Then lower back down to the floor (also with control! Don’t just relax into a puddle)
That’s one rep. Repeat for 8-12 lifts
Want to make it harder? Hold for a second in the lifted position before lowering, or do the full lift-and-lower even slower.
10. Cobra Roll-Ups (and/or Sinking Ships)

Instead of just pushing up into a cobra pose willy-nilly, I like this drill to help recruit our upper back muscles first, then layer on the engagement and arching in our mid and lower back.
Start belly-down on the floor with your hands planted by the sides of your chest (slightly higher up or farther down is totally fine)
Start to lift your chest (you can press your hands into the floor to help if needed) to find your “baby cobra” position - that’s your cobra with your chest lifting, but everything underneath your chest still touching the floor. See if you can find that same upper back engagement from when you were working on your baby cobra back extensions (drill #5) above
Once you’ve gotten as much of a baby cobra arch as you can (which might be super small, maybe even mostly flat, that’s ok!), keep lifting your chest towards your low cobra - that’s where you can feel the very bottom ribs and your belly on the floor, but everything above those lower ribs is trying to lift. This typically involves arching more through the mid back (where the thoracic spine meets the lumbar spine)
Once you feel like you’ve gotten your bendiest low cobra, then you can continue to lift to your high (or as-high-as-is-comfortable) cobra - eventually that will be belly lifting on the floor. Your arms may or may not be straight depending on flexibility and body proportions.
Hold for a moment, then slowly lower back down, trying to just lower one vertebrae at a time, back onto your belly. The goal is to lower back through your low, then baby cobra positions, not just disengage and flop back to the floor. The controlled lower is part of the drill!
Repeat for 4-6 slow roll ups/downs
Make it harder: For a “fun” challenge, see how much of the roll up you can do without pushing into your hands - that means using just your back muscles to do the chest/torso lifting! Once you’ve gone as high as you can without the hands, then you can start pressing into the hands to help the rest of the way.
Variation: Sinking Ships

This is similar to the “no hands” variation above. This is one of the conditioning drills we all loved to hate back when I took contortion classes with Tracy at Esh Circus Arts in Boston (shoutout to Esh, one of the most magical circus studios!)
Start doing a (controlled!) cobra roll up to press up to your high (or “high as is comfortable”) cobra
Now the mean part: as you lower down, you’re going to try to use as little hand support as possible. I like to come up onto my fingertips to try to avoid pressing my hands into the ground, and as I slowly lower, as soon as you can float your hands away from the floor, remove those hands and continue to lower (SLOW!). Depending on your back strength, you may be able to take your hands away sooner (ex. in your low cobra), or only for the last tiny little bit of the lowering (ex. after your baby cobra).
Repeat for 4-6 slow roll ups and “sinks” down
Don’t worry if you still need your hands for a good portion of the drill, the goal is to just try to keep less weight in them to use your back muscles more. As you get stronger, you’ll be able to take your hands away for a longer portion of the lowering action!
Don’t Be Afraid to Modify This Routine!
This is a great generic base routine to get you started on your back flexibility journey. But everybody’s body is unique, so tailoring your routine to better fit your goals is the best way to make it more effective for you! Maybe you need to spend some more time on your upper back. Or maybe you want to throw in some shoulder drills to help work on your arms-overhead backbends (like bridges!). Feel free to customize and make it your own. If you’re not sure what you should be doing to customize this, that would be a great topic for a 30-min flexibility private!
Is This Routine “Enough?”
It depends on your goals. Doing 10 minutes of back flexibility work a couple of days a week is absolutely better than nothing, but will you achieve contortion-level flexibility? Probably not. I like to compare it to other types of fitness goals: 10 min of walking or jogging a day is a great base to start from, but if you want to significantly improve your cardiovascular fitness long term, that’s likely going to require a higher volume of training (ex. 20-30 minutes a couple of days a week).
Don’t let that discourage you from starting with “just” this routine if that’s all you have time for! Especially if you’re someone who’s working on “full body” flexibility and is trying to work on other goals like hip flexibility, shoulder flexibility, etc, realistically you may only have 10 minutes a couple of days a week to sneak these drills in. That’s OK!
But if backbending flexibility is a priority for you, my recommendation would be to work up to training 20-60 minutes 2-4 days a week to progress faster. (Note: hitting the maximum volume isn’t automatically better, it really depends on what other activities you are doing and how much rest time your body needs).
If you’re looking for a routine with a bit more volume of back (and/or shoulder) flexibility training, these recorded workshops may be a good fit:
QUICKIE Back Flexibility Routine (20-30 Min): a 20-30 min routine for all levels with more drills like the ones in this blog post to help deepen your backbends. Variations of drills are offered for all levels, from stiff-as-a-plank bodies all the way to folks who train contortion - so think of this as a routine that can scale with you as you get flexier!
Building Up to Your Bridge (Backbending for Beginners): a 45-min follow-along routine aimed at beginners working on their back and shoulder flexibility (and strength!) interested in being able to do a bridge (aka “full wheel” in yoga)
Full Spinal Flexibility Recorded Workshop: a 45-mi follow-along routine for all levels that includes not just backbending, but also drills for frontbending, twisting, and sidebending. Consider this a thorough stretching routine that hits your back in all the ranges of motion it was designed to move :)
Beginning Contortion Bridges: a 60+ min follow-along workshop for bendier folks who already have a solid amount of back/shoulder flexibility (ex. can hold a regular bridge with straight arms), who are interested in going even deeper and diving into the world of contortion training
Related Content
Related On-Demand Workshops

Who this routine is for:
By popular demand - this is a short shoulder training routine great for students who don’t have a whole hour to dedicate to stretching.
Progressions of drills in this routine are offered for all levels, so whether you are someone just getting started with backbends, or you’ve been training back flexibility for ages and are more on the contortion-level bendy side of the spectrum - there are versions of drills that can challenge you at your level (and beyond, as you progress!)
This routine includes drills to help strengthen and deepen our spinal extension, aka backbending flexibility, with drills focusing on the upper back, lower back, hips, and core.
Note 1: shoulders are not a focus of this training routine. If you’re looking for a training routine to help with arms-overhead shoulder flexibility, check out the QUICKIE Overhead Shoulder Flexibility Routine (20-30 Min).
Note 2: This routine is not meant to diagnose or treat any pre-existing back issues such as back pain, scoliosis, sciatic, or issues arising from herniated discs. If you have a pre-existing condition, talk to your doctor before doing this routine!
What you get:
THIS IS NOT A FOLLOW-ALONG VIDEO like many of my other recordings. Instead, this is a written routine that includes detailed how-to videos for each drill, as well as educational content to help you maximize your progress in your shoulder training journey.
This PDF includes:
Flexibility training best practices
Special considerations for training backbending flexibility
Suggestions for training frequency
A program of drills with how-to videos explaining proper form (here’s an example of one of the videos), what sensations to look for, what muscles to engage (if needed), and how to modify to adjust the difficulty/intensity for each drill. The “default” routine is meant to fit a 20-minute training session
Additional recommended drills (along with how-to videos) for another 10 minutes of training for students who want to extend their practice to a 30-minute session
A printable all-on-one-page list of drills for quick reference
Heads up: Because each of the how-to videos is filmed as an educational video with comments on form, technique, and modifications - and not as a “follow along with me” style video, the videos will likely take longer to watch than to actually execute the exercise. So plan on your first run-through of this routine to take longer than 20 minutes because you’ll likely be watching the videos in their entirety which will take a bit longer (and then just skimming through them for reminders in the future).
Recommended props:
Yoga mat
2 yoga blocks
[OPTIONAL] A low resistance, stretchy resistance band (ex. TheraBand)
[OPTIONAL] A chair or low bench

Who this class recording is for:
This recorded workshop is intended for “beginner” students who want to build their back, shoulder, and hip flexibility (and strength!) to push up into a bridge (aka Full Wheel). You’ll learn how to strengthen and stretch your whole backbending chain - with an extra emphasis on the shoulders.
What this class includes:
A quick full-body warm-up to get you ready to stretch
A full 45-minute follow-along stretching routine you can follow 1-3 days per week to work on your backbending flexibility
An additional 5-20 minutes of bridge-specific skillwork you can add on to that routine to specifically work on your bridge press (so you can tailor your training to fit your own schedule)
Recommended props:
Yoga mat
2 yoga blocks
A strap (which can be stretchy or stiff - a towel or sweatshirt would work as well)
Note: Because of Squarespace’s file size limitations (which is what I use for this wonderful website!), upon purchase you will receive a PDF with a link to the recording. You can then stream the recording online from the private link.