How to Sit in Full Lotus Pose
How to Sit in Full Lotus Pose
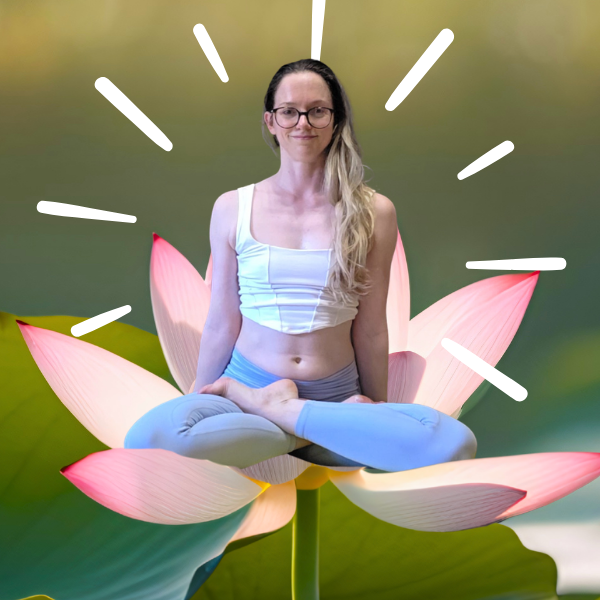
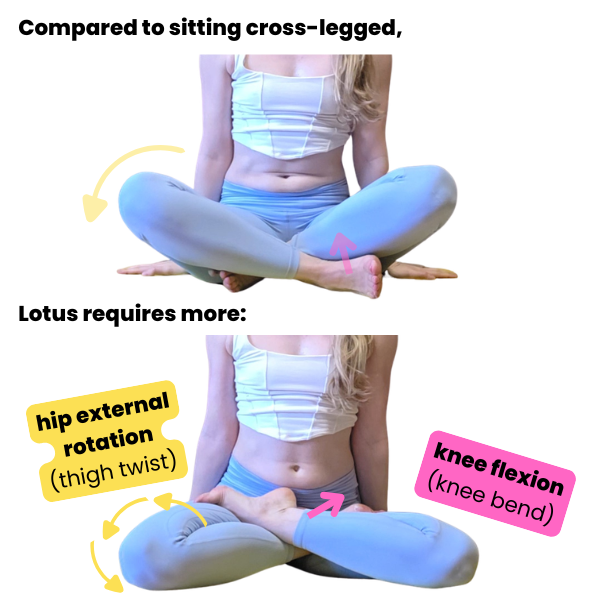
Earlier this week I wrote about working on hip flexibility for sitting cross-legged more comfortably, so it seemed only fitting to continue this topic further to the next goal some folks sometimes to aspire to: being able to sit in a “full lotus” pose. Both poses are actually quite similar in the ranges of motion required in the hips, but lotus just requires more flexibility in these areas.
Anatomy Overview: Full Lotus
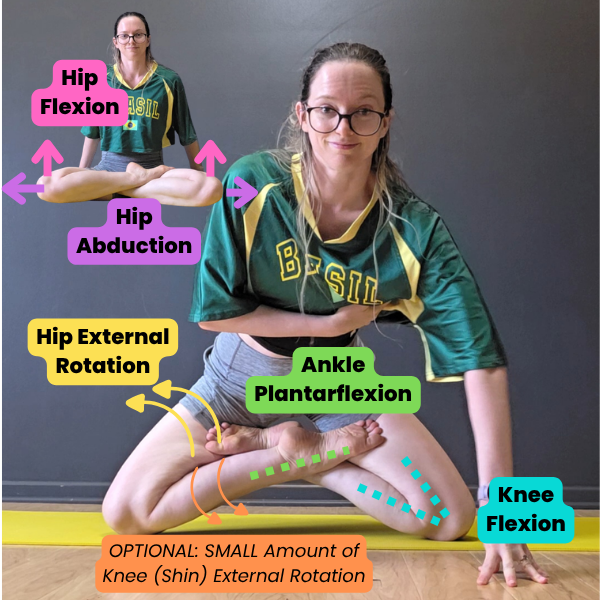
In lotus pose, the ranges of motion we are typically using are:
Hips: flexion (knees towards the chest), abduction (legs opening out to the sides), external rotation (rotating the thighs to the outside)
Knees: flexion (knee bend) and potentially a SMALL amount external rotation (shin twisting to the outside)
Ankles: plantarflexion (toes pointed), and potentially a SMALL amount of inversion (turning the sole inwards/upwards)
(You can also do lotus pose with the feet flexed, but this is more challenging because it “shortens” the length of your limb, requiring even more turnout in the hips to be able to nestle the heel in the hip crease. But some people prefer a foot-flexed position as it engages some more of the ankle muscles, which can feel better for some bodies. So feel free to try it both ways and pick the one that feels better to you)
If you can already sit cross-legged on the floor comfortably, the two main areas you need more flexibility in to be able to get your feet into your hip crease are:
more quad flexibility (to be able to bend the knee enough to bring the foot in to your hip)
more side glute & deep hip rotator flexibility (to be able to rotate your thighs down towards the floor to lift the foot up off the ground without shearing the knee)
Prerequisites
Some good general prerecs to be work towards before working on lotus pose are:
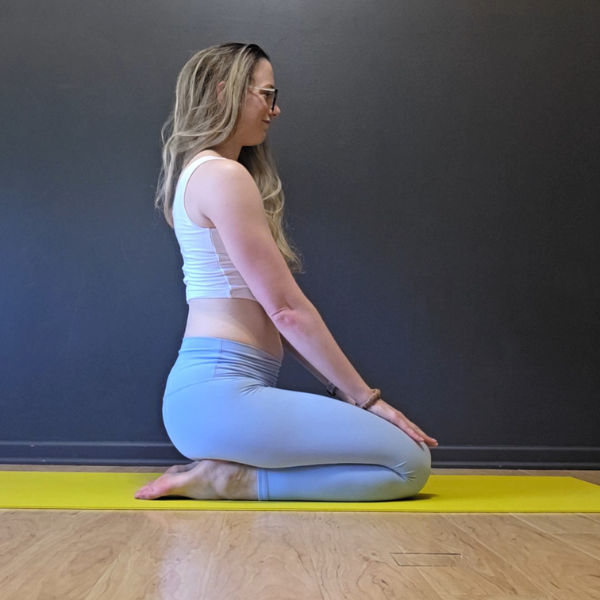
Full comfortably sit on ankles when kneeling (quad + ankle plantarflexion flexibility)
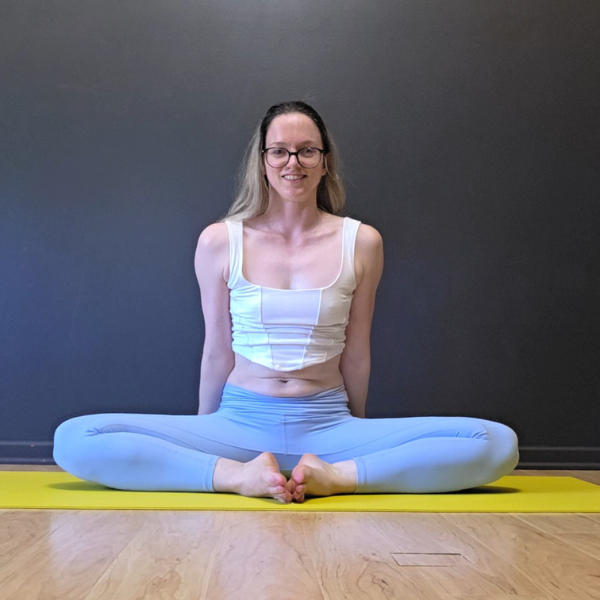
Can comfortably get both knees/shins to the floor in butterfly pose (hip abduction + external rotation flexibility)
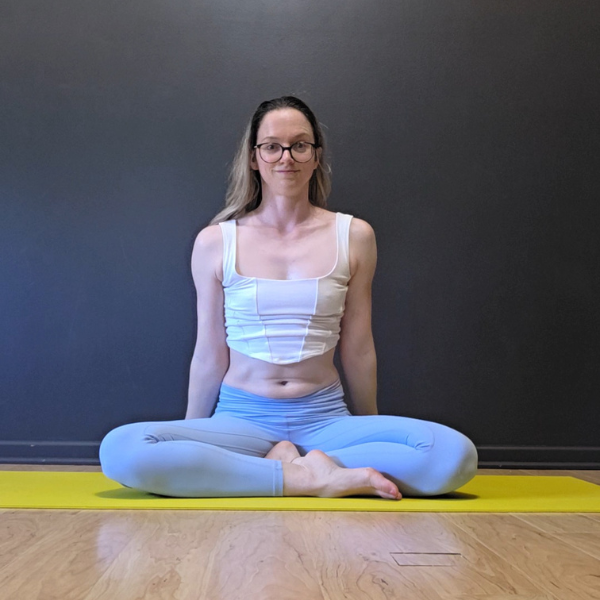
Can comfortably get both knees/shins to the floor when sitting cross-legged (hip abduction + external rotation flexibility)
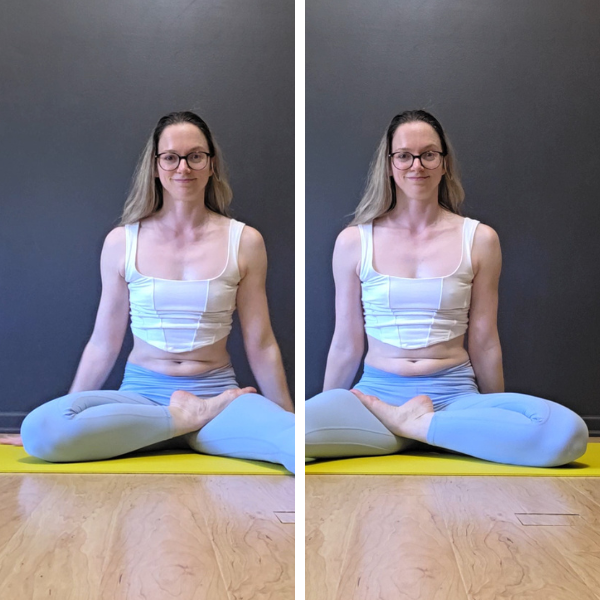
Can comfortably do “half” lotus on each side (“all of the above” flexibility)
If you can’t yet do those poses comfortably, I don’t recommend trying to yank your feet into a full lotus. Trying to use your hands to pull your feet in this position before you have the prerequisite hip flexibility (especially the hip “external rotation” or turnout) can put too much shearing force on your knees, which could lead to injury. Our knees can bend, straighten, and even rotate our shin a bit, but they are not designed to bend sideways. So to avoid putting undo stress on our knee ligaments that help keep our knee tracking in those “safe” ranges of motion, we don’t want to yoink on the foot to pull it out to the side if the thigh isn’t rotating to assist.
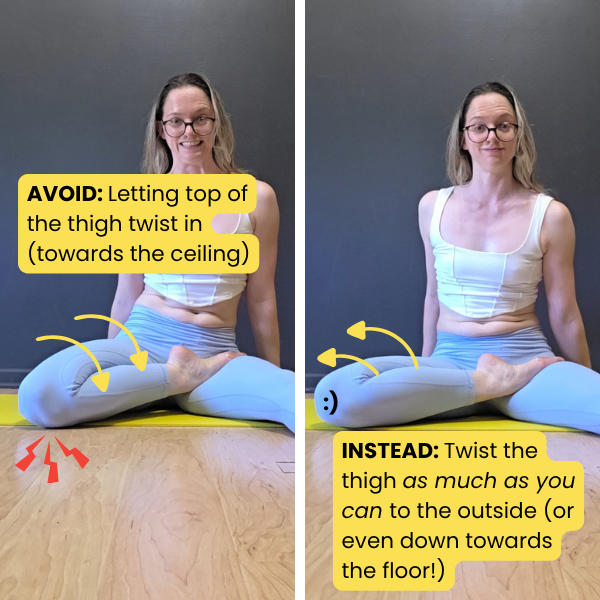
We want to keep the shin in the same movement plane as the thigh, which means we need to physically rotate the thigh if we want the knee bend to “point” our shin and foot “up” towards our hip.
Recommended Drills
Below are a handful of great drills to work on that hip external rotation flexibility needed for full lotus. I’ve also included some links to other resources at the end of this post for folks looking for more ideas/help with this pose.
Note 1: These are not “beginner friendly” drills - these drills assume you already have a decent amount of hip flexibility to begin with (can very comfortably sit cross legged, can comfortably forward fold in butterfly pose, can comfortably sit in a pigeon pose) - if you’re not quite there yet, I’d recommend working on the drills in this post instead.
Note 2: Remember, these are all essentially thigh rotation drills, so really try to visualize and assist your thigh twisting in space, as opposed to focusing just on where the knee or the foot (which may not quite recruit the rotator muscles we’re looking for). Some of these drills will also include a gentle hand “assist.” Some folks can feel a fine rotation in their thigh with the hands pressing on the knee, others may like to try to use their hands on the thigh to try to twist the thigh instead. Experiment with what feels better for you!
Drill #1: Figure-4 Squats
I love this is a slightly-more-challenging-than-regular-squats warm up move for the hips, and since we’ll be drilling a lot of hip “external rotation” for lotus pose, this is a great choice! I do find these quite awkward to balance, so would recommend doing them near a wall/chair/table (or something you can have your hand on for balance)
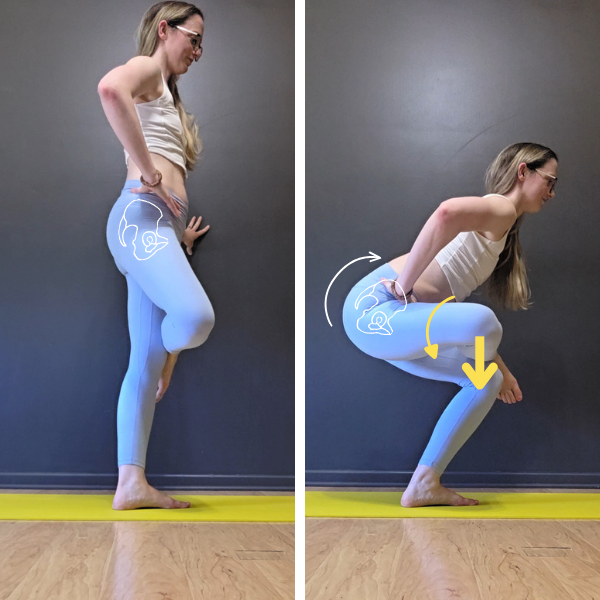
From standing, cross your right ankle over your left knee, pointing your right knee out to the side (making a “number 4” shape with your legs)
Squat down by bending your left knee (this is essentially a single-legged squat) and tilting your hips forwards (forward folding will help keep your center of gravity of er the left foot). Only go as low as you still have the strength to press back up to standing! This does not need to be an ass-to-the-grass pistol squat - if you’re looking for a more intense stretch, you can actively press your right knee towards the floor (twisting your thigh to the outside), as you squat down, or add more of a forward fold as you squat
Repeat for 10 squats with the right leg on top, then switch legs
Want to make it harder? Add a “burner” superset of knee presses on the last squat: hold your low squat position and slowly pulse the “free” knee down to the floor (you should feel a squeeze in your butt / outer hip), then relax, repeating for 10 slow/controlled pulses while in your figure-4 stretch
Drill #2: Wall Hip External Rotation
Now we’ll take away the “support” of the bottom leg helping hold us in deep hip external rotation, and work on our hip rotator strength to pull our thigh into that turned-out position instead.
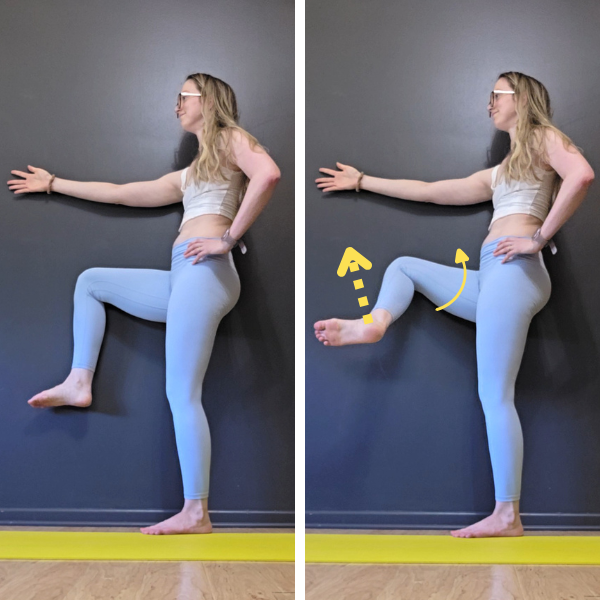
Start standing next to a wall, with your right knee bent 90* and lifted to hip height. Make sure your right knee, ankle and hip are all touching the wall, with hips facing forwards (right knee in line with the right hip bone)
Without letting your knee come off the wall, rotate the top of your thigh towards the wall to lift your foot away from the wall. Try to avoid bending or straightening the knee, or letting the pelvis twist away from the wall, the only thing we’re trying to do is rotate the thigh bone. This may feel like a bit of a squeeze in the inner thigh and/or in the deep butt. Thinking more about the thigh rotation and less about “pulling the foot off the wall” will likely help!
Hold for a moment, then relax the foot back towards the wall. That’s one rep. Repeat for 8-10 thigh rotations, then switch sides.
Want more of a challenge? Loop a stretchy resistance band around the right foot, and plant the “tails” of the band under the left foot. Only use as much resistance where you can still go through the same range of motion without the band (don’t choose a stronger band if it means you can’t pull the foot as far from the wall) - that might mean using a very light band to start.
Drill #3: Butterfly Flutters (Optional: Elevate the Feet)
A sneaky way to make butterfly pose more challenging for flexier folks is to start working on elevating the feet - this gives you space to reach your knees past where the floor “would” be if you can normally already comfortably press your knees to the floor in a seated butterfly stretch.
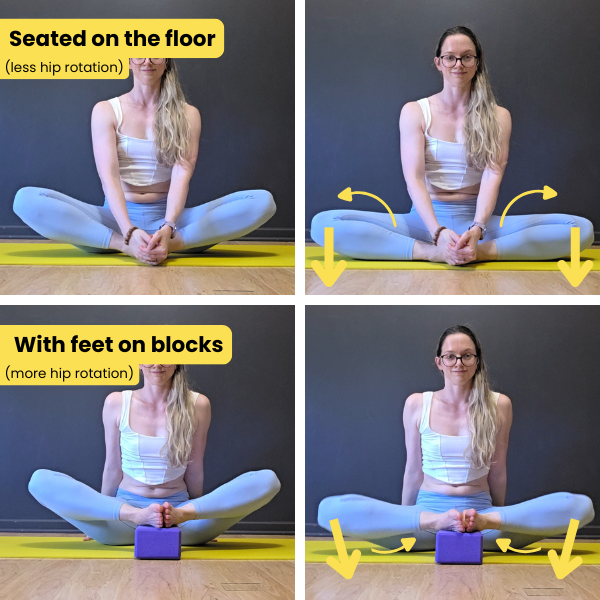
Start in a butterfly stretch: sitting on the floor, brings the soles of your feet together and pull them in towards your groin. If you can comfortably touch your knees on the floor during this drill, you’ll want to add a yoga block under your feet to lift your feet a little higher for this drill
From your seated butterfly stretch, without using your hands to press into your knees (no helping!), actively press your knees down towards the floor, rotating the top of your thighs backwards (if your feet are elevated, think about trying to twist the top of your thighs to face the floor). You should feel a squeeze in your butt / the side of your hips. Hold this squeeze for a moment, then relax
Repeat for 10 slow and controlled reps of pressing your knees down to the floor
Want an extra challenge? Add a forward fold. By tilting your hips forwards, you’ll get a bit more of a stretch in your glutes (which normally only get a mild stretch in butterfly pose).
Drill #4a: Figure-4 Contract-Relax (Resist)
In these next two drills we’ll be using our hands to “assist” deepening the thigh rotation for this stretch. Experiment with how it feels to use your hands (or forearm) pressing your knee towards the floor, or using your hands to try to rotate the thigh. For this first drill, we’ll be working on engaging some of the muscles that are in a stretched position in this pose (like some of the anterior/front fibers of the glute min and med, as well as the piriformis.
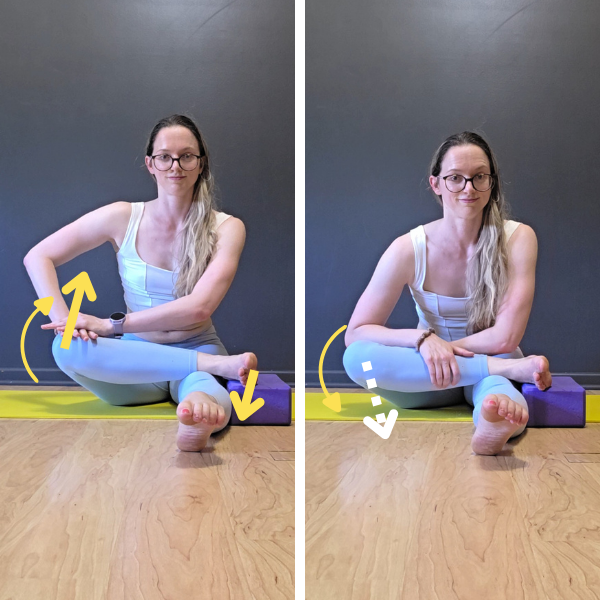
Start sitting on the floor with your left leg extended in front of you and your right leg crossed over the left at knee height. You can rest your right ankle on the left thigh (aim for the thigh, not the kneecap) or - what I prefer - rest the right foot on a block right next to the knee (this avoids the potential discomfort of your ankle digging into your thigh). Keeping the right foot flexed will likely feel more comfortable on your ankle. Bring your hand or forearm to your knee to help gently rotate the top of the right thigh towards the floor, helping lower the right knee towards the ground. You should feel a stretch in the side/back of your hips
Contract: Using your hands to hold your legs in this stretch (don’t let the leg actually move), resist the stretch by trying to rotate your right thigh back up towards the ceiling (you can think about pressing the right knee up into your hands and the right foot down into the blocks to achieve this “internal rotation” activation). Hold this squeeze for 10 seconds.
Relax: Now relax the squeeze, and let your hands gently assist the thigh into a deeper external rotation by pressing the knee back towards the floor, twisting the thigh more towards the outside. Hold the relaxed stretch for 20 seconds.
Staying in the stretch, repeat for 2-3 rounds total (60-90 seconds in the stretch), then switch legs
Need to make it harder? Add a forward fold (make sure you are folding by tilting the hips forwards and not just rounding the back).
Drill #4b: Figure-4 Contract-Relax (Assist)
Now we’ll be using the same stretched position as above, but focusing on engaging and strengthening the rotators that help pull our thigh into a deeper external rotation in this position. Just like with the previous drill, try to focus more on the thigh twisting action, and less on just smooshing the knee towards the floor.
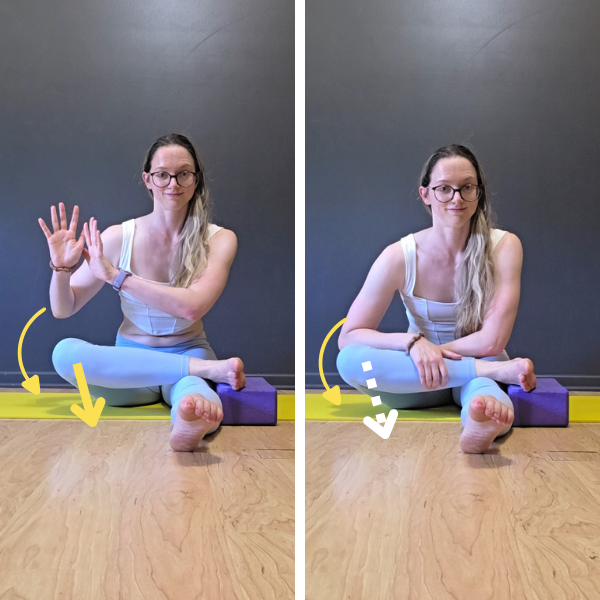
Start in a seated Figure-4 position (see drill above) with the right ankle crossed over the left leg
Contract: Keeping both sits bones on the floor (don’t let the hip bones tilt/lean to the right), take your hands off the right leg and reach your right knee towards the ground, trying to rotate the top of your right thigh towards the floor. You should feel a squeeze in the side of your butt (and potentially the inner thighs). Hold for 10 seconds
Relax: Then bring your hands or forearm to your knee or your thigh and gently press the knee towards the floor, letting that active squeeze go. Remember, the goal here is to assist rotating the thigh (which is what brings the knee closer to the floor), so you can even try to use your hands on the thigh to literally give it a bit of a twist . Hold this relaxed stretch for 20 seconds
Repeat for 2-3 rounds (60-90 seconds total) with the right leg on top, then switch legs
Need to make it harder? Just like with the last variation, you can add a forward fold. OR if you really want to challenge your hip external rotators, you can change the focus of the hip “contraction” portion of this drill: instead of thinking of pressing the knee towards the floor, focus on trying to lift your right foot off of your leg/block (note: it won’t actually move, so this feel more like trying to take 5-10% of the weight out of that foot for a couple of seconds, and then relax). Thinking more about the foot lift component of rotating the thigh helps make sure we’re not over-engaging the hip extensors (like the glute max).
Drill #5: Pigeon Good Mornings
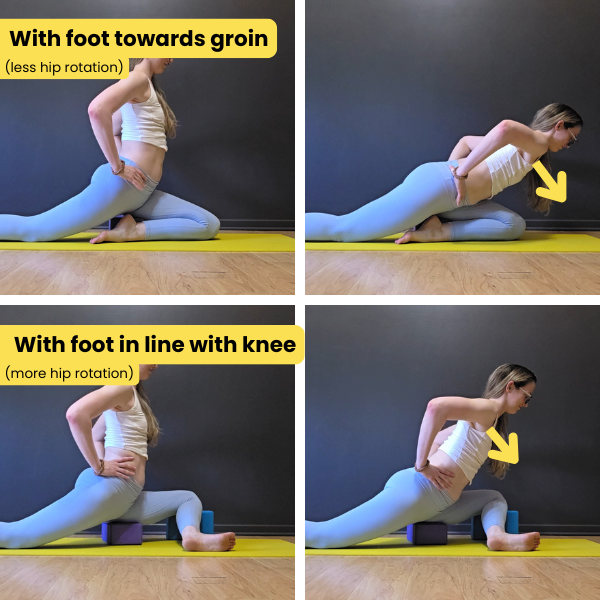
Start in a comfortable pigeon pose (an easy-to-you version of the pose where you aren’t yet feeling an intense stretch): bring your left leg forward and right leg backward, bending the left knee with the foot on the right side of your leg so the right thigh rotates to the outside. The closer you keep the left foot towards the groin, the less-intense stretch you’ll get in your glutes. If you need more intensity, you can start working on pigeon with the foot farther away from your groin (eventually working towards a 90* knee bend, with the front shin parallel to the front edge of your mat). Hips should be “square” (both hip bones level and pointing forwards), not twisting out to the side or tilting to the left. You can put a yoga block (or two!) under the left hip if you need a boost to keep the hips square.
Note: you don’t want the left knee to be “floating” in the air for this drill. So if the knee isn’t already on the floor (which might be the case if you’re working the foot farther away from your midline), place a yoga block or a rolled up towel under the knee so it has something to press into as you deepen this stretch
Without resting your hands on the floor, tilt your hips forwards as you lean forwards to deepen the stretch - you should feel a stretch through the side/back of the left hip. Try to lean straight forwards and don’t let the hips start to lean to the left as you forward fold
Once you’ve forward folded as deep as you can (without your hands supporting your weight), press your left leg firmly into the floor to lift your torso back up to your upright seated pigeon (if you are doing your pigeon with your left foot kicked more out to the side / more of a 90* knee bend, think about pressing the left foot into the ground as you lift)
That’s one rep. Repeat for 10 reps with your left leg forward, then repeat on your right side
What to do with your arms? The purpose of this drill is to make our hips support the weight of our torso as we forward fold, so we don’t want to put the hands on the floor to “help.” Keeping your hands closer to your hips (like bringing them behind your back) can make this slightly easier, whereas taking the hands farther away from your hips (like reaching the arms overhead) can make your upper body feel heavier, making this slightly harder. Choose a position that feels like a fun challenge to you!
Now Let’s Try a Lotus!
So now that we’ve worked a biiiiit more on that extra hip rotation needed to go from half lotus to full lotus, let’s give the full lotus a try! And remember, just like with sitting cross-legged, your precise foot placement, as well as ankle position, might vary depending on what feels the most comfortable to you in your hips!
The most important piece we want to prioritize is rotating the thighs to the outside (aka “hip external rotation”) as much as we can. What we don’t want is to have the thighs slightly twisted towards the ceiling and then yank on the foot to try to lift it away from the floor, which requires us to pull against the knee sideways (spoiler: not a direction it’s designed to move), which can strain the ligaments that try to help our knee resist shearing forces.
On the plus side, you DO have some wiggle room for where you place your feet/knees that can potentially make that hip rotation easier:
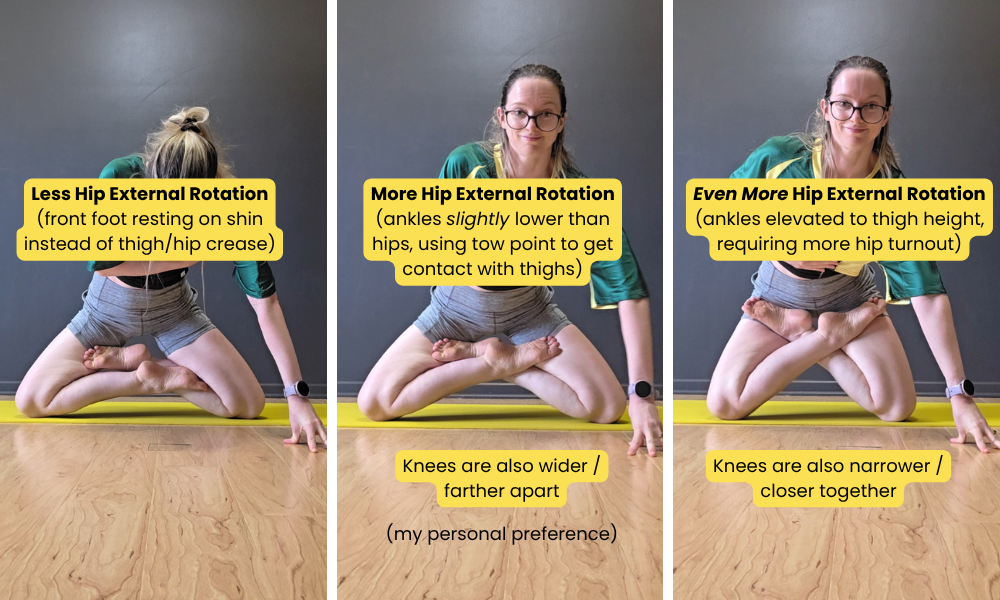
Starting with your ankles closer to the floor (ex. by using your toes to rest against your thigh or shin instead of lifting them all the way to the top of the thigh) requires slightly less hip external rotation, so is an easier version of full lotus to start with. But if you’re looking to go deeper and get the feet into the “proper” position in the hip crease, even then you can play a bit with how far across the hip you bring your heels/ankles.
Personally, I find hip external rotation much easier in a more hips “abducted” (aka knees farther out to the sides, like in butterfly pose) than when the knees are closer to being in front of the hip (like in pigeon pose), so I tend to prefer a knees-as-wide-as-I-can-where-the-toes-are-still-on-the-thighs lotus.
Other people who find it easier to externally rotate the hips when the knees are closer to their midline may prefer a similar hip position in their lotus, bringing their knees farther forwards (and towards each other).
As with all poses, there’s quite the spectrum of what this can look like in different bodies, even in different bodies that are quite bendy! So feel free experimenting with what feels better for you.
Looking for More Help?
If you’re looking for more help working towards your full lotus, you might be interested in this 20-30 min “Quickie” Sitting Cross-Legged and Lotus Pose Routine. This PDF includes a list of drills (some similar to the ones in this blog post) with detailed video how-tos to fit a 20- to 30- minute training routine (you can choose how long). Stretches and drills are offered for a variety of levels, with “easier” variations for folks working on sitting cross-legged more comfortably, and more “advanced” drills for folks who need to be working (strengthening and stretching) in a deeper range of motion to prep them for full lotus.
Related Content
Recommended On-Demand Workshops
Who this routine is for:
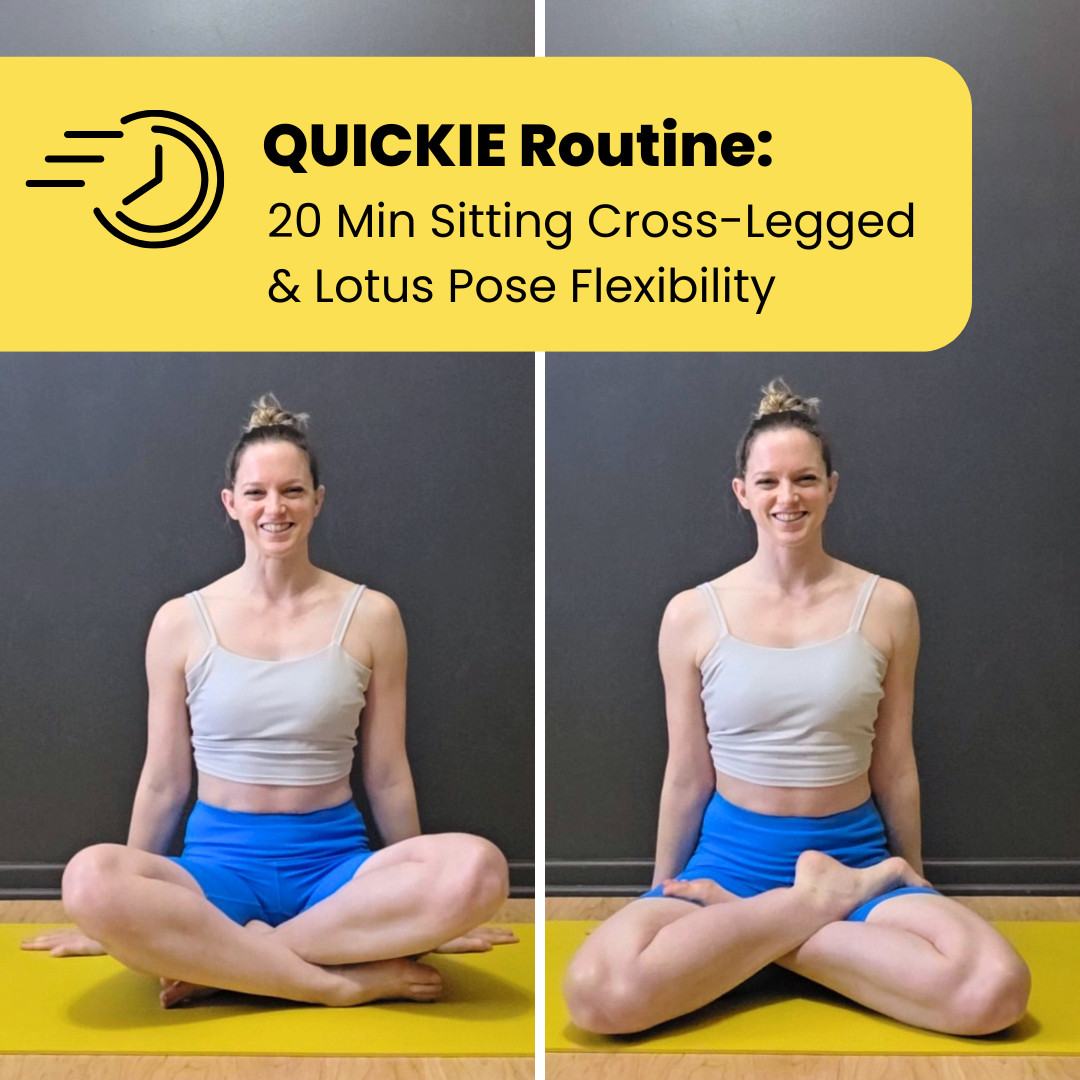
This 20-30 minute training routine is targeted to students who want to work on their hip flexibility to more comfortably sit cross legged on the floor (aka “criss-cross applesauce”), or even take it further and work towards sitting in a full lotus pose.
Drills are offered for a variety of flexibility levels, so whether you’re more of a beginner, or more of a contortionist, you can learn drills to challenge you where you’re at today, AND drills to continue to challenge you as your flexibility progresses!
What you get:
THIS IS NOT A FOLLOW-ALONG VIDEO like the majority of my other recordings. Instead, this is a written routine that includes detailed how-to videos for each drill, as well as educational content to help you maximize your progress in your hip flexibility training journey.
This PDF includes:
Flexibility training best practices
Anatomical considerations for training the hip rotation required for sitting cross-legged (or in lotus pose)
How to modify the drills to make them easier or harder as your flexibility progresses
How to test to adjust the drills (if needed) to keep knees happy and pain-free!
Suggestions for training frequency
A program of drills with how-to videos explaining proper form, what sensations to look for, what muscles to engage (if needed), and how to modify to adjust the difficulty/intensity for each drill. The “default” routine is meant to fit a 20-minute training session
Additional recommended drills (along with how-to videos) for another 10 minutes of training for students who want to extend their practice to a 30-minute session
A printable all-on-one-page list of drills for quick reference
Heads up: Because each of the how-to videos is filmed as an educational video with comments on form, technique, and modifications - and not as a “follow along with me” style video, the videos will likely take longer to watch than to actually execute the exercise. So plan on your first run-through of this routine to take longer than 20 minutes because you’ll likely be watching the videos in their entirety which will take a bit longer (and then just skimming through them for reminders in the future).
Recommended props:
Yoga mat (knee padding is your friend!)
2 yoga blocks
A chair or bench
Some kind of (light resistance) stretchy band that can be made into a small loop (ex. a mini band, or a Theraband you can knot into a smaller band. Long stretchy bands with handles not recommended)