How to Touch Your Toes to Your Head in a Cobra Pose
(AKA How to Touch Your Toes, But a Way Harder Way Than Forward Folding)
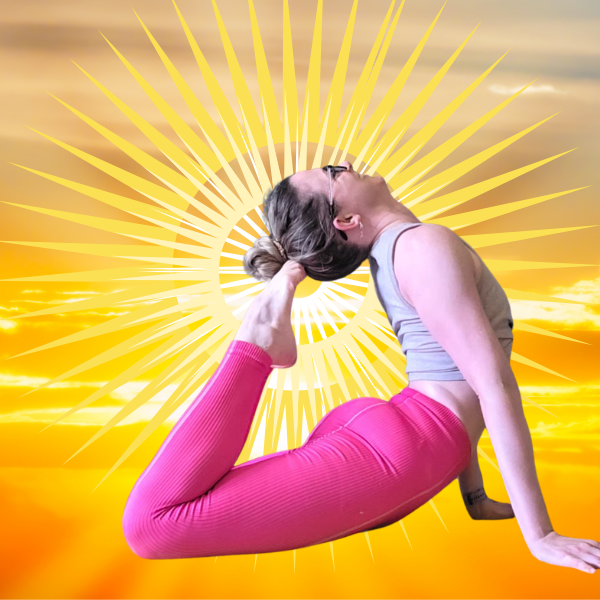
Being able to touch your toes to the back of your head in a backbend (like in King Cobra pose or King Pigeon pose) is a fun flexibility goal to work towards because: a) it looks cool, and b) it encourages you to work on backbending flexibility through the full backbending chain. So you can’t (usually) get away with just having a bendy lower back, you need to work on the whoooooole length of your body to build up the flexibility (and strength!) to be able to pull those feet all the way in to get toes to head.
What it Takes to Tickle Your Head with Your Toes
So if you’ve got aspirations to give the back of your head a little tickle with your toes, it’s going to mean working on stretching the entire front side of your body, and building the strength to support your various joints to go into such a deep backbend.
Let’s take a quick look at the main areas piece by piece:
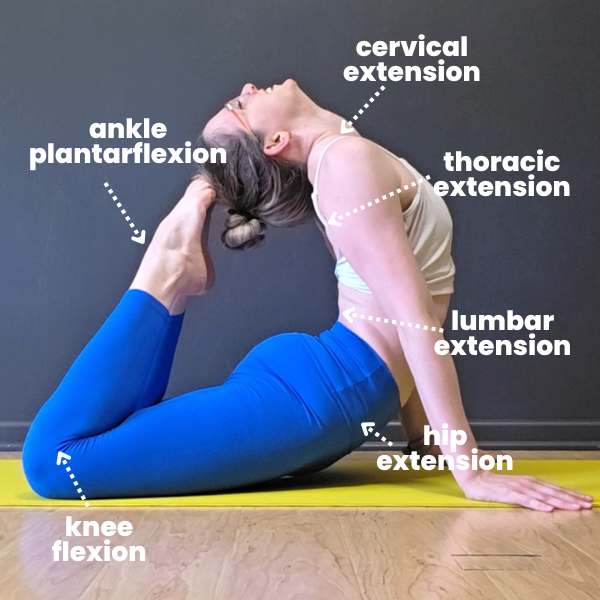
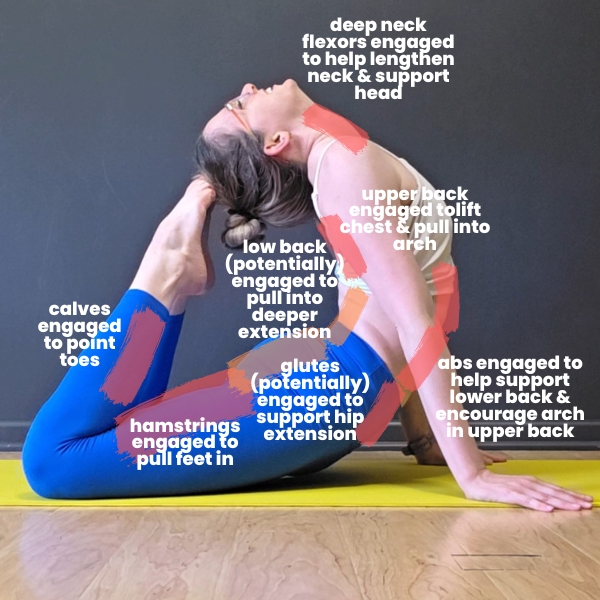
Neck: Cervical Extension & Deep Neck Flexor Engagement (aka “arching the neck with support”)
The farther we can reach the head backwards, the easier it is for our feet to reach. To help support arch - against quite a strong force of gravity weighing down our head - that’s also going to mean strengthening the deep neck flexors in the front of the neck to help hold the weight of the head and not just letting it sploot straight into the neck vertebrae. You can think of these muscle like the “abs” of the neck. (Pssst - this is especially important for folks with hypermobility who are used to just letting the head flop backwards on a relaxed neck!).
Back: Thoracic + Lumbar Spinal Extension & Core Engagement (aka “arching the back with support”)
No surprise here, the more we can arch through the back, the better. But just like with all backbends, it’s helpful to learn to arch - as much as your flexibility will allow - from your whole back. Often our lower back tends to “steal the show” with backbends, because our lumbar spine (lower portion of our spine) is naturally curved into a backbend, and along with our cervical spine has the greateast potential backbending range of motion. So learning to also recruit our upper back (thoracic spine) so it can join the backbending party can both deepen the backbend in general, and also take some of the pressure off of the lower back by potentially redistributing some of the bend.
Working on core control and engagement both through the front of the abdominals (good ol’ rectus abdominis really shines here!), as well as the transverse abdominis (the “meat corset” muscles that wrap around our waist) is also important to help support the weight of our torso as we lean back into a backbend. Especially for folks who have a tendency to “smoosh” or “crunch” their low back in cobra pose, learning how to use these muscles to moderate the bend can not only make it more comfortable, but it is one of the things that can train our nervous system to realize “hey, we’re actually safe here, look at all this muscular support we’ve got going on!” to allow you to bend deeper over time.
Hips: Hip Extension (aka “opening the front of the hips”)
We need enough flexibility in the hip flexors (the muscles that cross the front of the hip joint) to allow our hips to tilt backwards in our cobra pose (aka “posterior pelvic tilt”). The more we can tilt the hips backwards, the more we can help tilt the whole backbend in our spine farther backwards, extending the backbend down into our pelvis. Generally speaking, the more extension we can get out of the hips, the less pressure that will crunch directly into the spot on our spine where our low back meets our hip bones.
Knees: Active Knee Flexion (aka “bending the knees”)
Being able to bend the knees to bring the feet closer to our head in king cobra requires two things:
quad flexibility
hamstring strength to be able to pull the feet towards the head (without the hands helping)
AND because we’re also working in a position of hip extension (see above), this is especially challenging because:
the rectus femoris, the quad muscle that is also a hip flexor, needs enough flexibility to let your knee bend while the hips are tilting backwards - basically it is in a super stretched position compared to your other quad muscles that don’t cross the hip joint
the hamstring muscles are in the shortest position possible since the leg is behind your hips and the knee is bending. Our muscles are (usually) at their weakest when at their most-shortened or most-lengthened positions, so this can be really hard to get the hamstrings to fire to contract to pull the foot in (“active insufficiency” is the fancy term for when the muscles fibers are basically so scrunched up they can’t strongly contract)
So a big portion of working on the knee bend component of a toes-to-head shape is working on strengthening the hamstrings while they’re in this super-shortened state (spoiler alert: it may get a little crampy!)
Ankles: Active Ankle Plantarflexion (aka “pointing the toes”)
Traditionally we reach our feet towards our head by pointing our toes, which makes it easier to reach to our head than when our feet are flexed. Because ankle flexibility is rarely a limiting factor in this skill (you do not need a beautiful ballet-level toe point), I won’t be covering drills for that in this post. But if this is something you are interested in working on, you can check out this blog post instead :)
Recommended Drills
Now that we understand a bit more about what flexibility is required to get our toes closer to our head in a cobra pose, let’s take a look at some drills to get us there! Below is a mix of drills to address the areas mentioned above, including that oh-so-important strength work we need to support deeper flexibility!
Note: this is not intended to be an exhaustive list, and you may need additional drills that target your specific trouble areas in your own training. BUT this should be a great starting point for you to work on building your own training routine.
As always, it’s recommended you do a bit of a warm up first before diving into any intense stretching or flexibility training.
1. Cobra Contract-Relax Quad Stretch
Contract-relax is a great way to help “teach” our nervous system that our muscles are strong and can still do work even while in a stretched position. Often you’ll find that you’re able to get a slightly deeper stretch by the end of your contract-relax rounds than when you started! For this drill, we’ll be working on a hand-assisted quad stretch to help pull our leg into the quad stretched position we use when reaching our toes to our head.
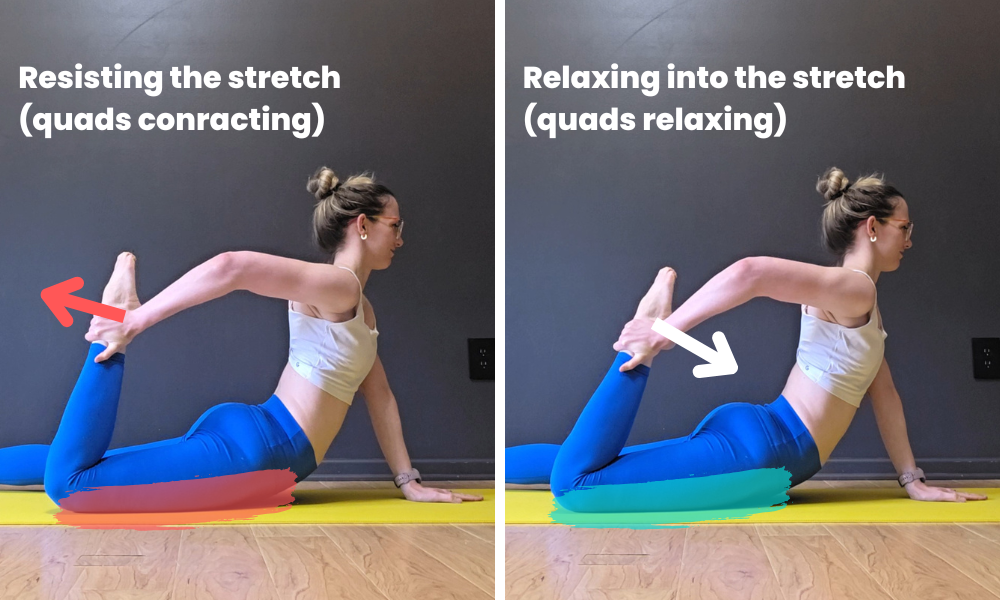
Press up to a as-high-as-feels-good cobra pose - this could be a high cobra for folks who don’t get any crankiness in the low back, or a slightly lower cobra pose to take pressure off the low back if needed. You want to choose a cobra pose you can hold comfortably for about a minute.
Reach back with your right hand to grab your right foot (if you can’t reach, you can loop a strap around your ankle and grab the strap instead), pulling it towards your butt. The goal is to feel a nice stretch in the quads (front of the right thigh)
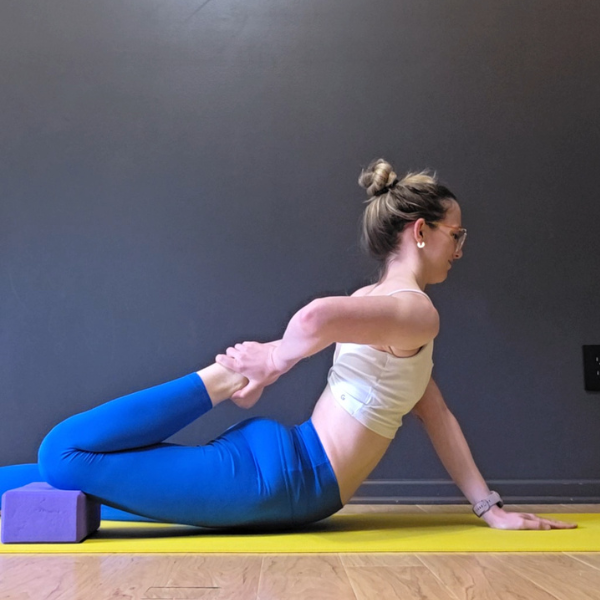
If you aren’t feeling much of a stretch, especially if you find it easy to pull the foot all the way in toward your butt, try to tilt the hips backwards (tuck the tailbone down, lift the front of the hips up and back), or you can elevate the working leg’s knee on a yoga block (just make sure your hips don’t tilt to the side)
Contract (Resist): Now staying in the stretch, keep holding your leg in place (don’t let it actually move), kick the right foot into your hand (or into your strap) to contract the quads, resisting the stretched position. Hold this contraction for 10 seconds
Relax (Passive Stretch): Still staying in the stretch, relax the quads. If it now feels more comfortable, you can even pull the foot in a little closer to your butt. Hold this relaxed stretch for 20 seconds.
Repeat for 2 rounds total with the right leg (60 seconds total), then take a break from your cobra pose (feel free to cat-cow or take a moment in child’s pose to round your back). Come back to your cobra pose and repeat for 2 rounds with the left leg.
Find it super awkward to grab (or hold) your foot? Use a strap! Even if you can physically reach your foot, sometimes the shoulder stretch this puts you in can be uncomfortable after a while, so don’t hesitate to use a strap and try a different arm position you find more comfortable!
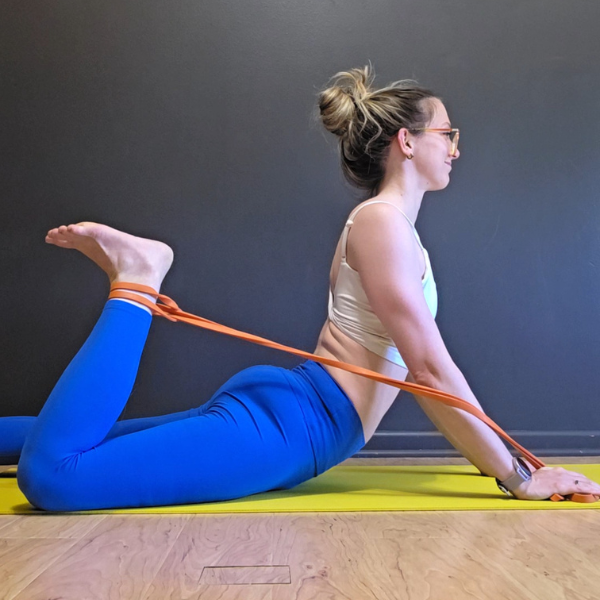
Need more of a challenge? Can you already pull your foot to touch your butt? Start in deeper hip extension, by either actively tilting your hips backward (this will require a bit more ab engagement), or elevating the knee(s) on a yoga block.
2. Cobra Butt Kicks
Now still working in our cobra pose, instead of using our hands to help bring our feet towards our butt, we’ll be working on strengthening our hamstrings to do the pulling. This is super important because we need this strength to pull our feet towards our head without using our hands when working on toes-to-head. If you’re like many students and have a relatively easy time pulling your feet in using your hands (passive range of motion), but can’t get the legs in nearly as far when you don’t get to use the hands to assist (active range of motion), working on the hamstring strength to close the gap between your passive and active ranges will be a big help!
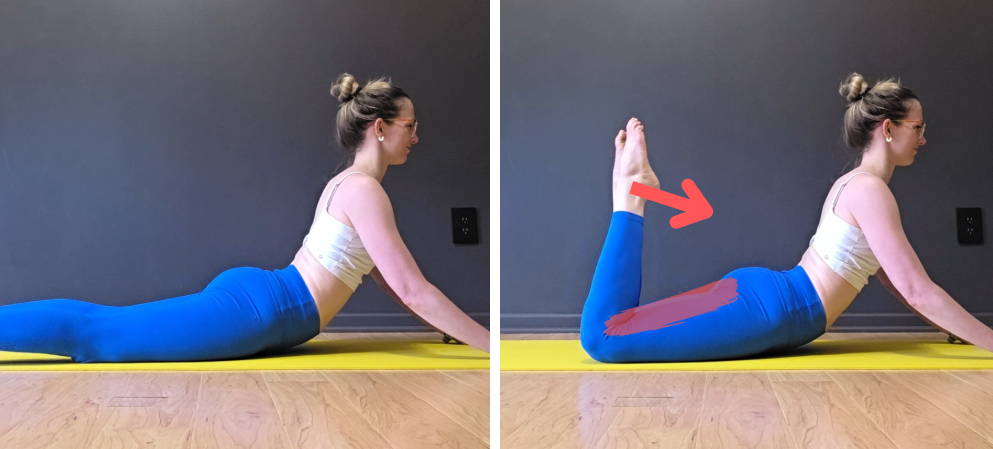
Just like with the previous exercise, start in a “as high as you feel comfortable holding for a little while” cobra pose
Bend your knees and slowly kick your heels towards your butt - you should feel a squeeze in the hamstrings on the back of the thighs
Hold for just a moment (don’t let the legs immediately bounce out of the stretch), then lower back down to the ground
Repeat for 10 butt kicks total
Getting a cramp? If you’re not used to training this “squeezy” range of motion, you might get a bit of a cramp or a Charlie horse in your hamstrings or your calves when doing this drill. Our muscles generally struggle to contract when they’re in a super shortened position (like our hamstrings are in this pose), so it may take some time to build up the strength to do these more comfortably. If you’re getting a cramp in your calves, try flexing your feet (instead of pointing your toes). If you are getting a cramp in your hamstrings, try to make these butt kicks smaller, so you can just squeeze them in as far as you can without cramping, even if that’s not “the deepest” you could kick your feet in. As you get stronger over time, you can work on accessing that full range of motion for a deeper kick.
Want more of a challenge? If you can already get your calves to touch your thighs (feet very close to your butt), you can make these butt kicks harder by adding more hip extension. Keeping your hips on the floor, elevate your knees by putting a folded blanket or blocks under your knees (if using blocks, place them under the tops of the thighs close to the knees, not directly on the kneecaps, which can be uncomfortable) and work on your butt kicks in this position. Note: if this feels like “too much” on your lower back, choose a flatter support for the knees, or keeping working on the knees-on-the-floor version.
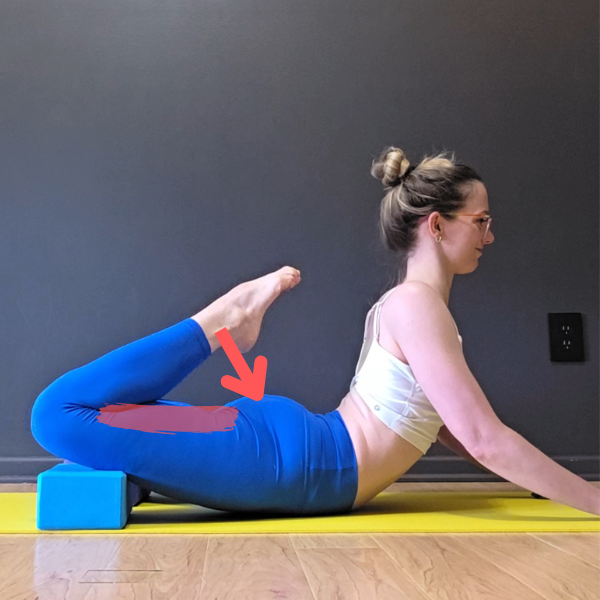
3. Back Extensions
No backbending routine is ever complete without - say it with me now - back extensions! If you are serious about improving your backbending flexibility, back extensions (and variations) should be a regular part of your training. You can think of these as “sit ups” but for your back muscles - they work to strengthen the muscles (like the erectors!) that help pull your back into a deeper arch.
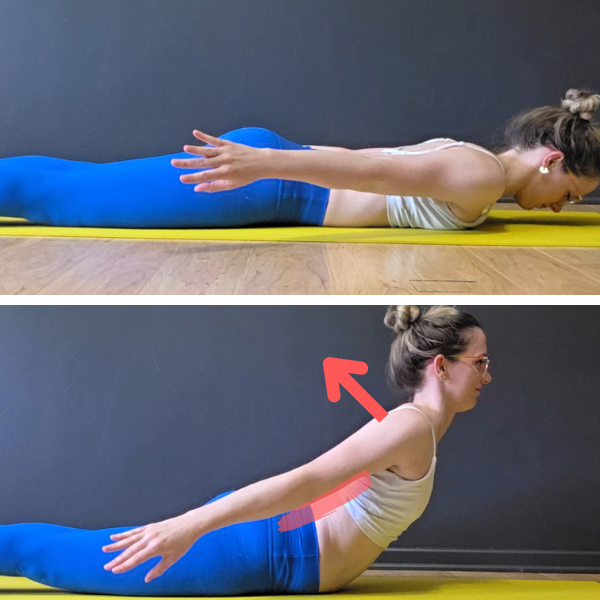
Start lying on your belly with feet about hip-width apart (slightly wider is fine) and arms relaxed by your sides
Keeping your legs on the floor, lift your chest as high as you can off the ground - you should feel a squeeze in the muscles that run up and down each side of your spine. (It’s OK if you can’t lift as high as in the picture above! You may just be able to lift your collarbone off of the ground when you start - as long as you’re feeling a squeeze in your back, that’s what we’re looking for!)
Hold the chest lift for a moment, then lower (with control!) back to the floor
Repeat for 10 chest lifts
Need more of a challenge? If you can lift your chest quite high (ex. can get most of your ribs off the ground), you can add an extra toes-to-head specific challenge by bending your knees. When lying down, bend your knees and squeeze your heels towards your butt. Then lift your knees (keep squeezing the heels in) at the same time you lift your chest so you get an active squeeze along the whole back-body chain.
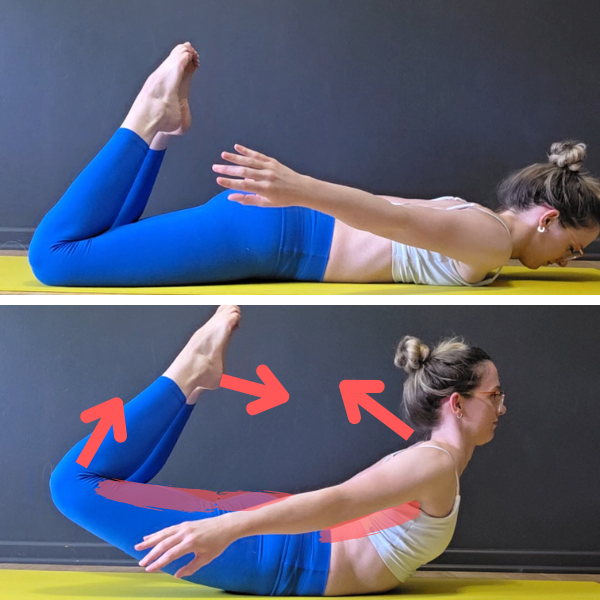
4. Booty Drops
Now we’ll (briefly) forget about our hips and turn our focus towards some upper back work. If you’ve ever taken backbending class with me, you know I love doing supported upper back drills like these booty drops as a way to “remind” our upper back that it can actually arch quite a bit! Using a prop like some yoga blocks or a chair to give you a helpful *poke* in the upper back, and then reinforcing that movement pattern with additional upper back strengthening drills can help us work towards using more upper back flexibility in our full-body backbends.
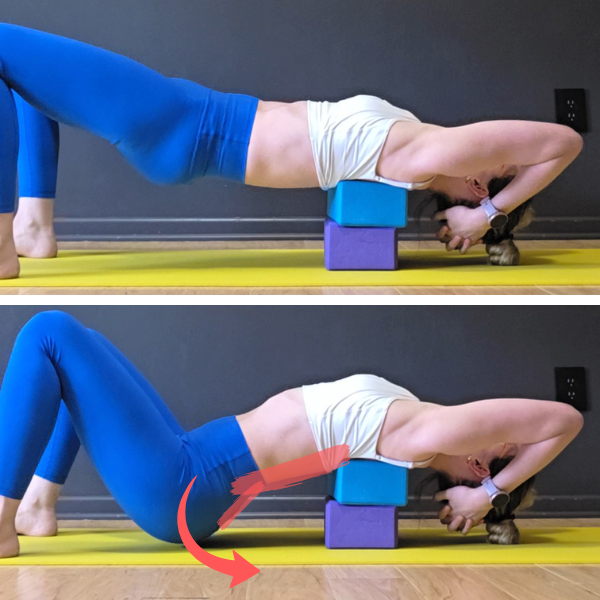
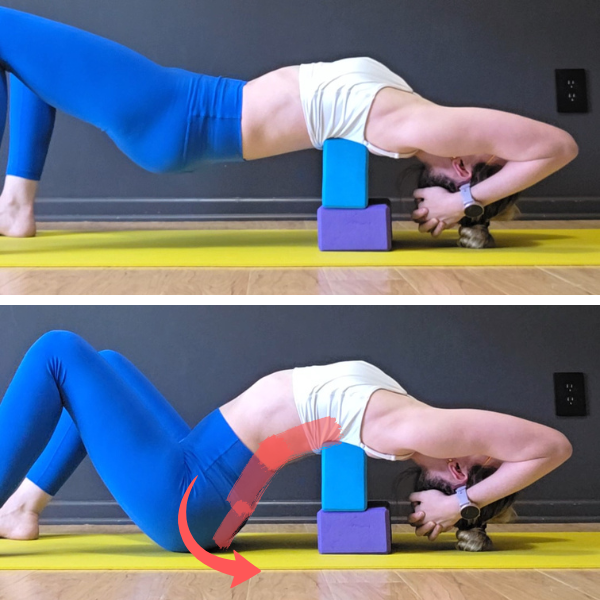
Start leaning backwards over 2 yoga blocks (or on the edge of a chair), with the bottom edge of the top block right at the bottom of your shoulder blades (this is basically the “most rounded” section of your upper back, so this is where we’ll be giving it a helpful assist to bend!). Start with two flat blocks stacked on top of each other, but if you need more of a challenge, you can add a third (flat) block, or rotate the top block to it’s medium height to make your block tower taller. I don’t recommend going taller than 3 blocks (it gets wobbly)
Bend your knees and lift your hips in the air. Bring your hands to the back of your head to support the weight of your head as you let your head fall towards the floor to start with a bit of an arch in the neck (and potentially upper back).
Keeping your head as low as you can (don’t let your upper body teeter-totter upright), pull your butt down towards the floor and backwards as if you were going to try to tap the bottom block of your block tower. The goal is to reach the hips back by pulling with your back muscles, not by pushing with your legs - so this should feel like a squeeze in your low and mid back. Even if you butt hits the floor, keep focusing on the “butt back towards the blocks” pull.
Hold that “booty drop” position for just a moment so you can feel the squeeze, then press the hips back up to start. That’s one rep. Repeat for 10 booty drops
5. Kneeling Back Extensions
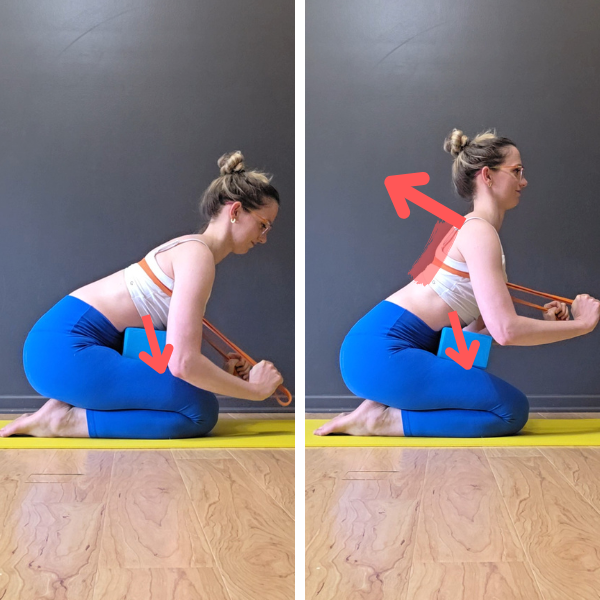
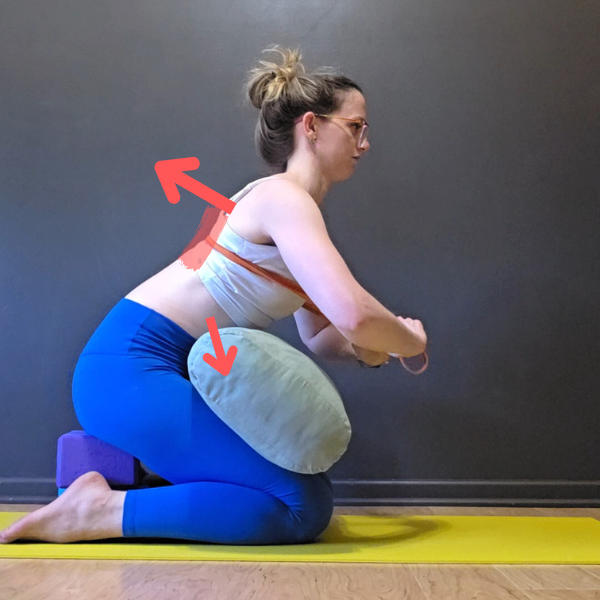
This is a great drill to help start to find your upper back muscles so you can learn how to actually engage them when in a backbend. I’m a big fan of using a strap along our upper back as physical cue we can feel as a reminder to “hey try to bend here.”
The Setup:
Start in a comfortable kneeling position. If you can’t comfortably sit your butt towards your heels, you may prefer to sit on 1-2 yoga blocks to give your hips a little boost
Place a yoga block on your thighs and lean forwards until you can feel your belly or lower ribs touching the block. If you find a block feels too “pokey,” you can try using a bolster or rolled up towel. If you have a bit more of a belly, or your prop just keeps sliding off your legs, you can also just lean forwards without a prop (but the prop is helpful to keep our low back from taking over) - just lean your belly as low as you can towards your thighs
Last piece of the set up: take a long strap and pull it across your upper back, aiming to have it right beneath your shoulder blades, and pull on the ends with your arms so you can feel where the strap is on your back (this does not have to be a crazy arm workout, a little pull is all you need). This strap is going to be our physical reminder giving you a gentle poke to “bend here” - just as if I were in the room with you giving your upper back a poke with my finger!
PHEW. Now that you’ve completed the slightly-more-complicated-than-normal setup, we can work on the actual drill:
Starting in your kneeling forward fold, with your belly smooshing into a block or towards your thighs
Keeping your belly touching your block (don’t let your belly lift), begin to lift your chest up, imagining you are scooping it forwards and up to wrap your upper back around the strap on your upper back. You should feel a squeeze in your upper back. It is OK if your upper back arch is small, or even if it’s just going from “rounded” to “closer to flat” (and not visibly arched) - it can take a while to build up the active flexibility and coordination to turn this into a literal arch!
Hold that upper back squeeze for just a moment, then lower your chest back towards your starting position
That’s one rep, repeat for 10 chest lifts total
6. Little Yeses
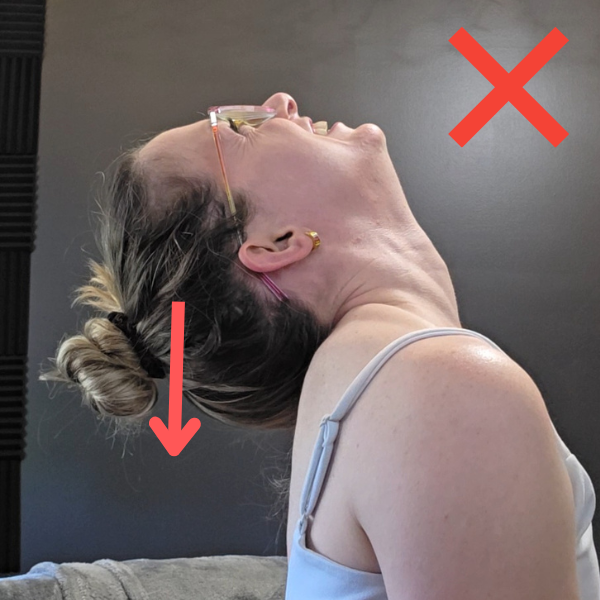
Variations of this “little yes” are something I usually include as part of my neck warm up. This variation in particular is a nice way to start working on the strength and control of the muscles in the front of the neck to help moderate the intensity of how much our neck arches when we start to let the head fall backward. This is especially helpful for hypermobile folks who have a hard time looking up without letting the head “falling” all the way back to rest on the top of their upper back with a passive neck.
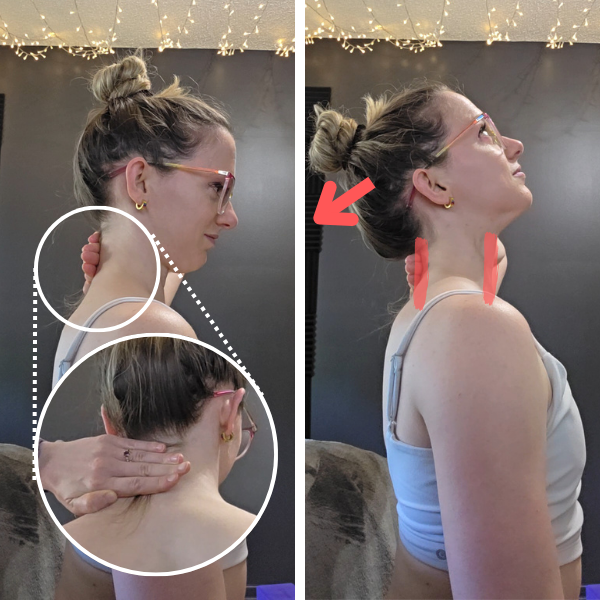
Start in a comfortable seated, kneeling or standing position with your torso upright and spine long. Take 4 fingers pressed together to the back of your neck for support, with your index finger near the base of your neck, and your pinky finger right by the base of your skull
Start to lift your nose, letting your head start to fall back. Only let the head tilt until you feel the back of your head starting to touch your pinky finger - you should feel a bit of engagement through the front of your neck as those muscles work to limit how far your head is falling back
Then nod your head back to the starting position. The full head nod should be like you’re shaking your head “yes,” but just a little bit (hence, the “little yes”)
If that feels good, you can try it again with just 3 fingers of support (a slightly bigger head nod), or remove the hand completely and try to go through that same controlled range of motion, but without the helper hand
Aim for 10 “little yes” nods total
7. Knees-on-Block Hip Drops
Now that we’ve done a bit of lower body and a bit of upper body, let’s start to work on a more engaged variation of toes-to-head. This “hip drop” drill is a useful one to learn to engage the rectus abdominis (the ab muscles that help support our low back in backbends) while in a deepening cobra pose. You can do these just focusing on the front-of-the-abs engagement, or turn it into a more active backbend by layering on other engagements as well.
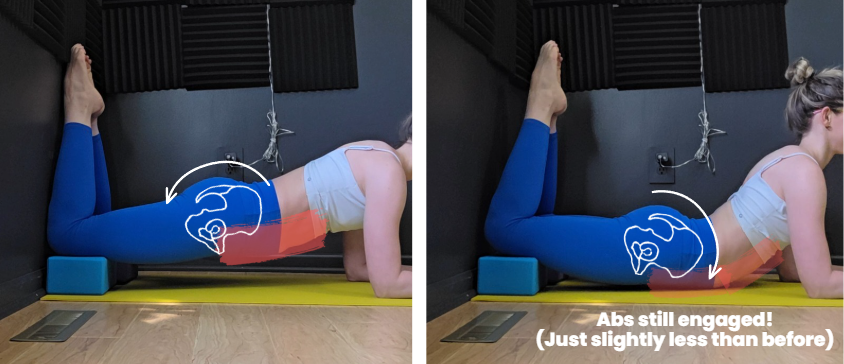
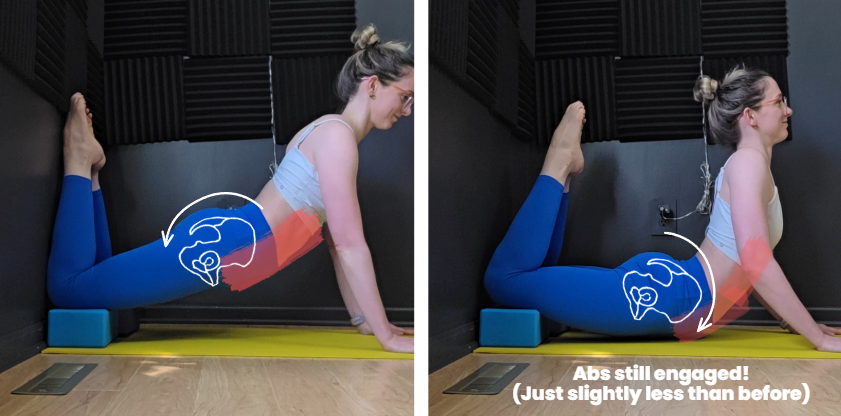
Place two yoga blocks side by side (long-ways, on the flat height) at the edge of the wall
We’re going to start in basically a kneeling plank, with our knees on the blocks, feet pointing up the wall, hips elevated in the air, and torso leaning over our hands (or forearms if you prefer). Starting with straight arms is a bit more intense, starting on your elbows is a bit less intense, so feel free to modify as needed. You should be feeling a pretty strong engagement in the front of your abs
Now keeping your chest lifted, slowly start to relax some (not all!) of that ab engagement, letting your hips start to tilt forwards slightly and sink towards the floor as your lower back starts to arch. See how low you can comfortably drop those hips (you can even bend your arms to drop the hips lower if that feels better for you) - you may even be able to bring them all the way down to tap the floor. Try to maintain some of that front-abs engagement to keep too much weight/pressure from pushing into the low back (which can feel “crunchy” or cause pain - both things we want to avoid!).
Then go back to that “stronger” abdominal engagement to pull you out of that deeper arch, lifting your hips away from the floor back to your starting sort-of-plank position
Repeat for 6-8 hip drops total
Want more of a challenge? If you feel like you’ve mastered the coordination and ab engagement from the “base” drill, and aren’t getting any discomfort in the low back, you can add on some additional engagements to deepen the whole backbend. As you’re dropping the hips down (keep the ab engagement, that’s still priority #1!), layer on:
finding your upper back squeeze (like we did with the kneeling back extensions) to scoop your chest up into a bit of a deeper upper back arch
keep the deep neck flexors engaged as you reach the crown of your head back towards the wall
pull the feet off the wall, squeezing heels towards your butt to bring the feet closer to your head
Then reset back in your sort-of-plank pose and repeat. If this is too much to think about all at once, try just adding one of these engagements at a time, you don’t need to do all at once!
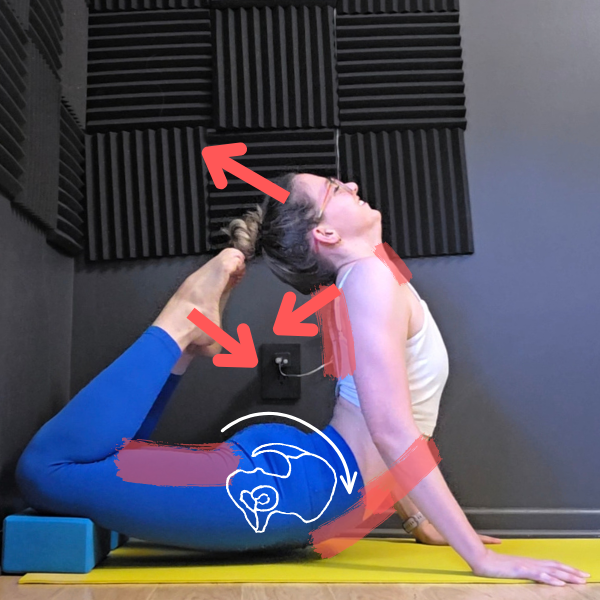
8. Cobra Roll Ups with Wall Support
Now it’s time for the whole shebang, working on actually pulling our feet to our head in cobra. We’ll be using the wall to help support the knee bend to start, and using a slow-and-controlled roll up to help encourage a bit more of an upper back arch so we don’t just let everything “dump” straight into the lower back.
Note: there are different ways engagements can be cued in this roll-up (a great example of how there are multiple “correct” ways to do a thing!), I’m going to use the cuing sequence that leans more towards active back “squeezing” throughout the roll up because I’m personally a big fan of using that for a bit more of an upper back bend.
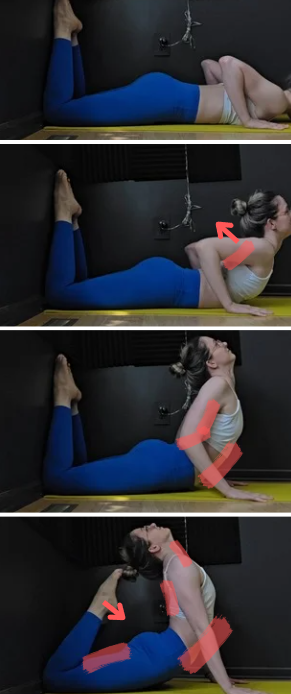
Start lying on your belly with knees bent about hip-width apart, knees touching a wall with feet pointing up the wall. Place your hands on the floor by the sides of your chest (feel free to experiment with the hand placement if you prefer wider, farther forwards/backwards)
Start to slowly curl through your upper back, scooping your collarbone and chest forwards and up (see if you can find that upper back muscle squeeze from earlier when you had the strap!)
Now keep that upper back squeeze (don’t forget about it) as you start to continue to lift higher. See how much higher you can lift without pressing your hands into the floor first (aka using your back muscles to pull your chest higher), and once you can’t lift any more without the hands, press the hands into the floor to continue to lift up to your high cobra
If you are starting to feel “crunchiness” in the low back at any point, lower the torso a little (lessen the backbend) and layer on more of your front-of-abs engagement we used in the last drill
Once you’ve lifted as high as you can, you can let your head start to fall back (keeping some support through the front of the neck, using those “little yes” muscles!), and pull your feet away from the wall
If your head feels to heavy, you can keep your gaze looking forwards and keep the neck arch out of this exercise. As you build up more neck strength/flexibility over time, you can layer back in looking up towards the ceiling in your cobras when it feels better
Hold for a moment, then slowly lower back down to the floor
Repeat for 3 roll-ups total
Looking for More Help?
This should give you a solid start on working towards more of the “active” flexibility required for your toes-to-head King Cobra. If you’re looking for even more ideas for drills that hit these different challenge areas (active knee bend, opening the hips, deepening the back in the lower and upper back, strengthening the neck to arch deeper with control), you should check out this 60-minute Toes to Head Workshop. In this workshop you can do a follow-along-with-me stretching routine where we’ll work on deepening our flexibility in all of those different areas. Variations of drills are included for various levels of flexibility, so you can choose the version that feels like a good challenge for wherever you’re at now, and still have “harder” drills to work on as you get more flexible over time!
Watch the Video How-To For These Drills:
Related Content
Recommended On-Demand Workshops
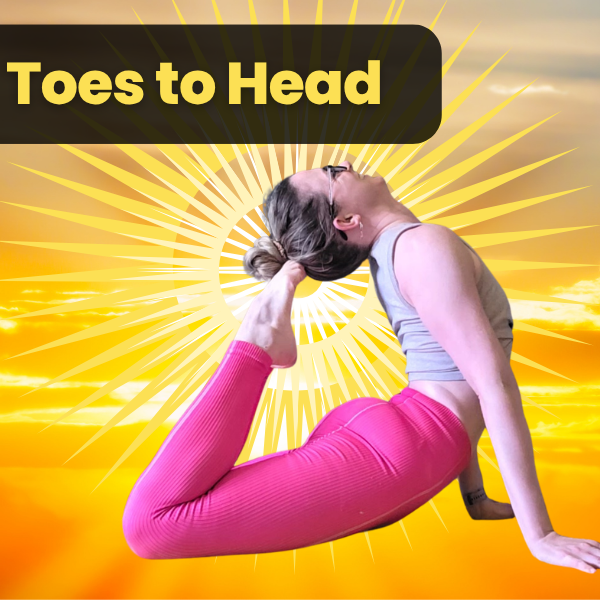
Who this workshop recording is for:
Students working towards touching their toes to the back of their head in a backbend. For this workshop, we’ll specifically be working on toes-to-head in a cobra pose, but the same flexibility applies to other backbends.
This 60-minute follow-along workshop includes:
A brief warm up for the back, legs + hips to get you ready to move
Dedicated drills to strengthen and stretch the main areas needed for bringing your toes closer to your head:
Quads
Hip flexors (spoiler: one of your quads is also a hip flexor, and we’ll be giving that rectus femoris muscle a little extra love!)
Lower back
Upper back
Neck
Various engagement and cue options for working on your toes-to-head cobra so you can see what works best for you!
Required props:
Yoga mat (there are some drills kneeling on the floor, so the padding from a yoga mat can be nice to have)
2+ yoga blocks
Long strap (can be stretchy like a resistance band, or stiff like a yoga strap)
Wall space
OPTIONAL: Mobility peanut (only used in one exercise, and you can just use blocks if you don’t have a peanut)
Upon checkout, you will receive a PDF with a link to the workshop recording (Squarespace limits file upload sizes so I can’t actually upload the whole recording here). The recording is for your personal use only, not to be shared with others - thank you!
Other workshops to consider:
QUICKIE Back Flexibility Routine (20-30 Min) - if you’d prefer a shorter training routine (note: this one is not a “follow-along” style, it instead has individual how-to videos for each of the drills in the routine)
Flip Your Grip Workshop - for students more interested in getting their foot closer to their head to be able to grab their foot and flip their grip, this is a better choice for you. This follow-along workshop includes drills for the hips, back and shoulders (the shoulder focus is the main difference between the “Flip Your Grip” and the “Toes to Head” workshops). But for folks who simply like more variety, many of the back + hip drills in this workshop are a bit different from the Toes-to-Head workshop, so you can have fun doing both if you’re looking for even more drills :)