Stretches for Overhead Shoulder Flexibility (Shoulder “Flexion”)
Stretches for Overhead Shoulder Flexibility (Shoulder “Flexion”)
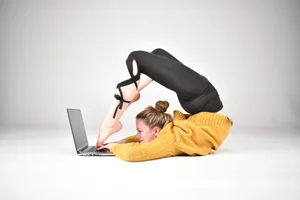
There are lots of reasons you may want to work on your arms-overhead shoulder flexibility. From a practical standpoint, we want healthy shoulders to allow us to reach things overhead without pain. And many hobbies require flexible (and strong!) shoulders for being able to perform skills with “proper” form, like handstands or bridges in yoga, Biellmann spins in figure skating, needle poses in cheerleading, Eagle or other backbend-y foot grabs in pole dancing - the list goes on!
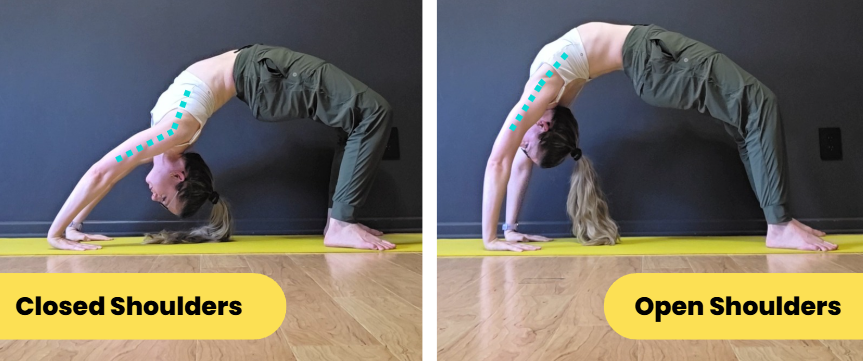
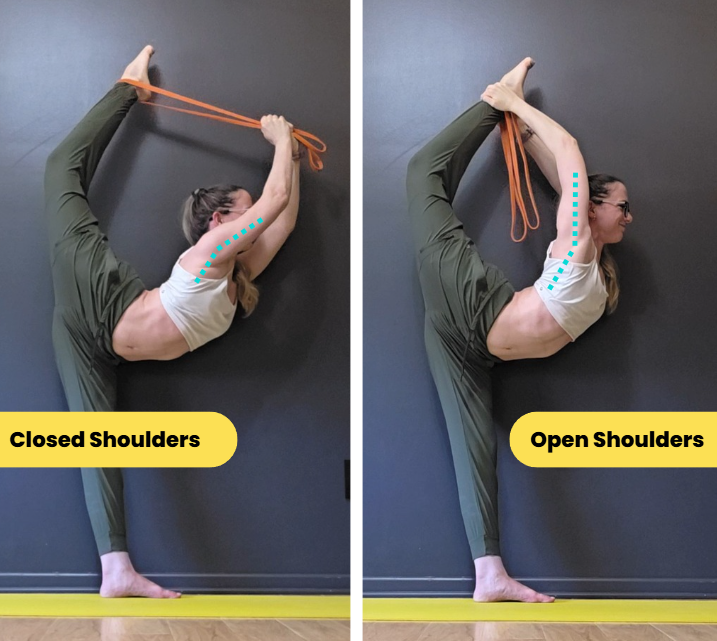
Take the bridge & needle scale photos below - the dramatic difference between each of these two shapes is not more back flexibility, it’s all coming from more flexible shoulders:
So let’s take a look at some of the basic anatomical concepts that are helpful to know when it come to safely and effectively training your overhead shoulder flexibility, and then learn some drills to help work on this range of motion.
Arms-Overhead Shoulder Anatomy 101
The Shoulder Joint(s)
Even though we talk about our “shoulder” as a singular entity, it’s actually composed of 3-4 different joints (depending on how you count them). This shoulder complex is one of the most mobile areas of our body, allowing us to move our arm through all 3 planes of motion.
the glenohumeral joint is what most folks think of when they think of “the shoulder” - this is the ball and socket joint where the “ball” of the upper arm bone sits in the “socket” of the shoulder blade
the acromoioclavicular joint is where the front of the shoulder blade connects to the outside point of our collarbone - this is the only”real” connective point that connects our shoulder blade (and therefore upper arm) to our torso
the sternoclavicular joint connects the inside end of your collarbone to your sternum (chest bone)
the scapulothoracic joint is also sometimes considered a “joint” (although it lacks connective tissue literally connecting bone-to-bone and instead is linked by supporting muscles) that refers to the relationship between the shoulder blade and the backside of the ribs
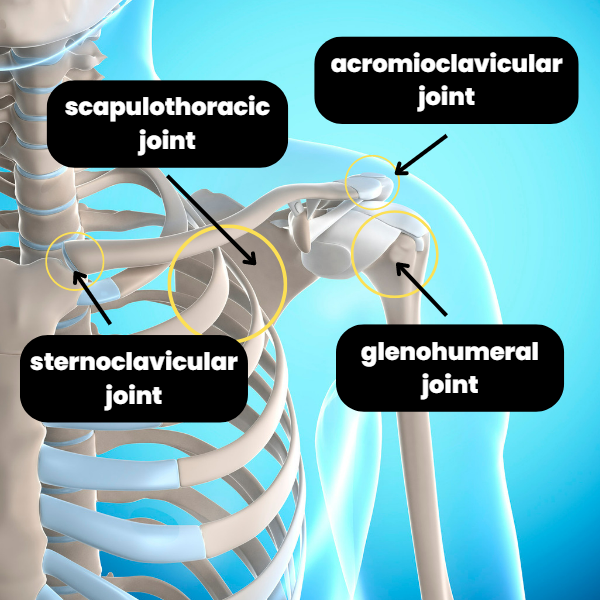
That means your upper arm bone is essentially just dangling off of the side of your shoulder blade, which is dangling off the end of your collarbone, which is then connected to the rest of your torso - wild!
On the plus side, this allows for an incredible amount of freedom with how you can move your upper arm in space.
On the down side, it requires quite a bit of control (and flexibility) in the various shoulder muscles to use this freedom. Even taking an action as “simple” as reaching your arm forward and then up overhead, there are quite a few things that need to happen in coordination. Just looking at the shoulder blade (and ignoring the upper arm bone and collarbone, which are also parts of the shoulder), if we’re trying to reach our arms overhead for something like a handstand or a backbend, we need it to:
protract - wrap forwards towards the sides of our ribs
elevate - slide up our back,
upwardly rotate - rotate to point the “socket” part of the ball-and-socket joint more overhead
tilt posteriorly - tilt backwards just a smidge (this may be less necessary if the shoulder is already protracting, but is more necessary when not protracting the shoulder)
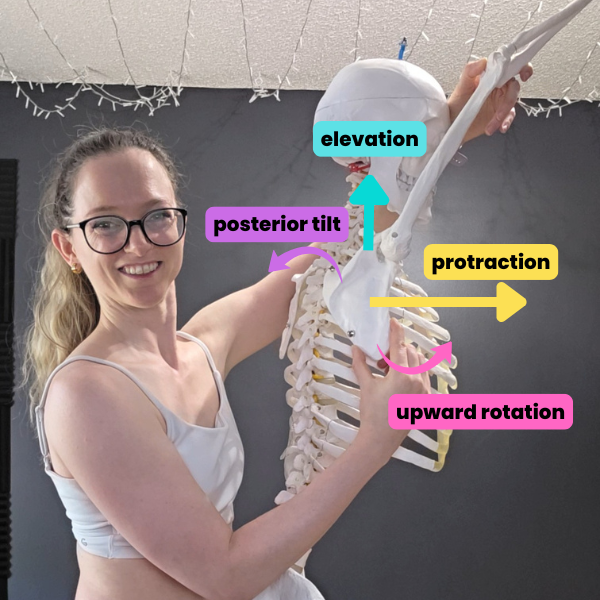
All of these actions together help “point” the “socket” of the shoulder blade farther overhead, so it’s easier to reach the arm backwards in space.
Covering all of the muscle actions required for all of those synchronized movements to happen is outside the scope of this blog post (but I do talk about some of them in my shoulder anatomy workshop!). For practical purposes, the most helpful concept to understand is that we want to be able to help the shoulder blade wrap forwards towards our chest and slide up our back when working on arms-overhead flexibility (this is why the cue “pull your shoulders down and back” is typically counterproductive for arms-overhead shoulder work).
The Importance of Shoulder External Rotation
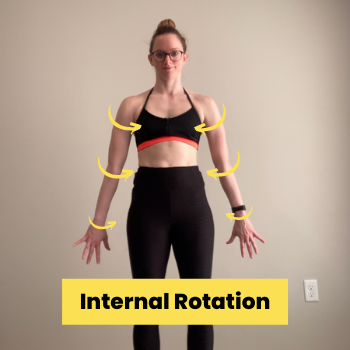
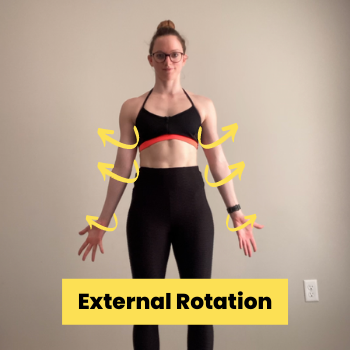
I’ve written before about the importance of shoulder “external rotation” in backbends - so I’ll only briefly touch in it here. We’ve already talked about how the position of our shoulder blades can help make reaching the arms overhead easier (by helping orient the “socket” of the ball-and-socket joint to make it easier to reach the arm back). The other piece of the puzzle is helping orient the “ball” of the ball-and-socket joint be in an orientation that allows for the greatest range of motion, which means being intentional about the positioning of how the upper arm is twisted.
When lifting the arm overhead, we generally want to “externally rotate” the upper arm, meaning twisting the upper arm so the bicep-side of our arm is twisting towards the outside. If your elbow is bent, this would be like trying to point the elbow “point” forwards and the elbow “crease” backwards. We generally want to avoid “internally rotating” the upper arm (rotating the upper arm towards the inside, as if the elbow points are pointing “outside”) because this has the potential to smush part of the upper arm bone unfomcortably towards the boney protrusion that hangs over the top of the shoulder blade (the acromion is the boney part that sticks out of the top of our shoulder blade that hangs over the top of the “socket” of this joint)":
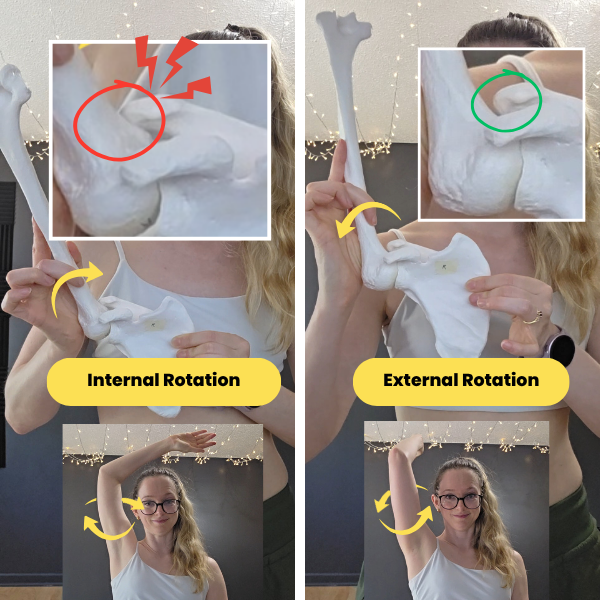
While this may not literally end up with bone-on-bone contact (because there is connective tissue in the way), this does uncomfortably pinch the connective tissue, tendons, and/or nerves that run through this area This can feel like an intense “pinching” sensation or sharp pain right in the top of the shoulder, that worsens the more you push into the shoulders.
For most people, the more you can “externally rotate” the shoulder, twisting the upper arm more to the outside, helps reorient the upper arm bone to give a little more space between it and the “socket” of the shoulder blade without running into that pinchy sensation.
Additionally, actively externally rotating the upper arm is also a way to engage the “rotator cuff” muscles of the shoulder, which are responsible for both:
controlling the rotation or twist of the upper arm (hence the name!)
helping “stabilize” the shoulder by keeping the “ball” of the upper arm bone “snug” in the “socket” of the shoulder blade
Without this activation, there is a chance the upper arm bone may slide too much within the “socket” of the shoulder (especially in hypermobile bodies!), which can limit how far we can safely stretch.
Commonly Tight Muscles That Limit Opening the Shoulders
While we have lots of muscles that can impact shoulder flexibility, for the purposes of this blog post I’ll just briefly cover the two most common muscle groups that can limit our overhead reach: the lats and the pecs.
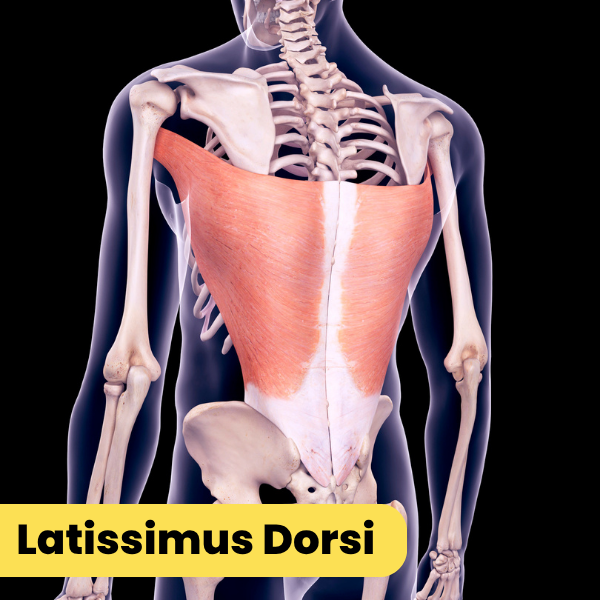
Our lats (latissimus dorsi) connect the inside of our upper arm to our spine at the mid and lower back. We often think of these as the “pull up muscles” that help pull our torso up towards our arms. They get the deepest stretch when the arms are reaching overhead and externally rotating - that little extra “external rotation” twist of helps pull the top of the lats to stretch even farther as they have to “spiral” around the upper arm as it rotates. So when these muscles are tight, they resist letting the arms lift super high overhead (and/or resist that extra upper arm rotation).
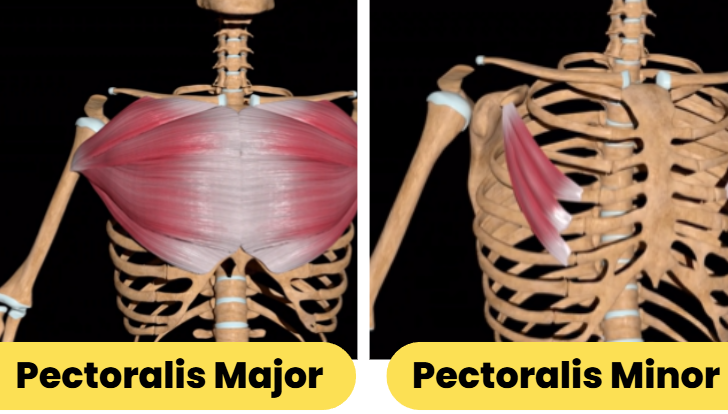
The second most common muscle group that can cause some challenges with our overhead mobility are the pecs (both the pectoralis major, which run from the front of our sternum to the front of our upper arm bone, as well as the pectoralis minor, which run from some of our ribs to attach to the top of our shoulder blade). The pec major typically serves to help pull the upper arm closer towards our midline, and the lower fibers of this muscle group get a bit of a stretch when the arms are reaching overhead (especially when the upper arm is twisted externally). While the pec minor muscles don’t attach to the upper arm, they can still limit overhead shoulder flexibility by tugging on the top of the shoulder blade, making it harder for the shoulder blade to elevate and upwardly rotate (part of the movement pattern than helps us raise our arms overhead).
A Brief Note About Nerve Tension
The last piece of the puzzle worth mentioning is the potential role nerve tension can have in impacting shoulder flexibility, particularly in arms-out-to-the-side and arms-overhead stretches. I already have a whole blog post on this topic (Is Nerve Tension Limiting Your Shoulder Range of Motion?), so I won’t go into a ton of detail here. What’s helpful to be aware of is:
we have quite a few nerves that travel through our shoulder
if one of these nerves gets pinched or pulled into tension and is unable to slide like they’re supposed to, this can make it harder to reach the arms overhead
symptoms of nerve tension in one of these nerves include: tightness in the wrist, forearm, front of the shoulder, or chest, or tingling in the fingers (if you’re someone who gets finger tingles in deep shoulder or chest stretches, this is usually a sign something funky is going on with one of your nerves!
you can test to see if you have nerve tension in some of the more commonly problematic nerves (this blog post has two easy tests to try)
if you have nerve tension and nerve glides may help reduce some of those symptoms of tingling or tightness, and you should consider including a set of gentle nerve glides as a part of your warm up before doing deeper shoulder stretches (2 example nerve glides are also mentioned in that blog post above)
if you don’t test positive for nerve tension, you nerve glides likely won’t make any difference in your flexibility
Recommended Shoulder Stretches & Drills
Now that we better understand some of the underlying anatomy of our shoulder joint(s), let’s review some different drills that help strengthen + stretch those “big mover” muscles of our shoulder, as well as strengthen the smaller stabilizing/supporting muscles that help optimize the position of the various bones in our shoulder for overhead shoulder flexibility.
As always, it’s helpful to do a bit of a warm up before doing deeper / more serious flexibility work. For an easy shoulder-specific mobility warm up, check out this blog post.
(P.S. if you’d like to watch a video tutorial for these drills, scroll down to the YouTube video at the very end of this blog post)
Stabilizer Strengtheners:
These drills are aimed to strengthen the smaller muscles like parts of the rotator cuff and the serratus anterior that help support and stabilize the shoulder to keep “proper” form when working on the deeper end-range muscle stretches.
1. Wall Open Sesames
This is a great drill to work on shoulder external rotation strength in the rotator cuff muscles. By starting to raise the elbow higher up the wall we can really challenge those muscles in a more arms-overhead position, more similar to how we use them in deeper stretches.
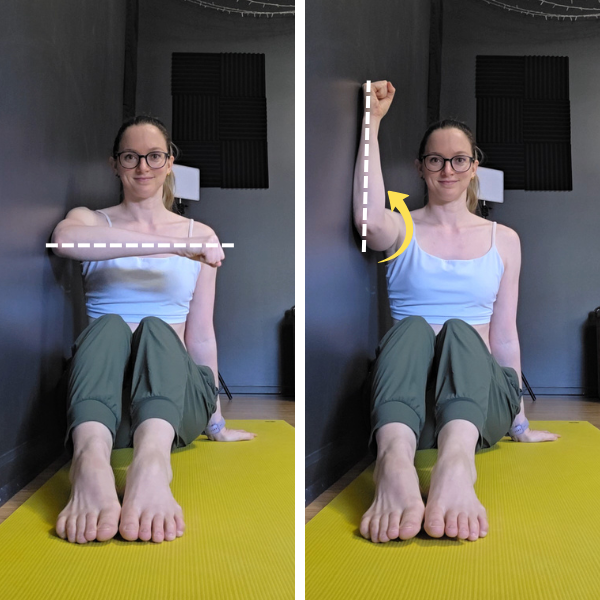
Start standing or sitting next to a wall, with the right side of your body touching the wall. Bend your elbow 90*, lifting your elbow to about chest height with your upper arm touching the wall, and forearm parallel to the floor (I like to think of my forearm as a “trap door” that we’re going to open)
Keeping your elbow & shoulder touching the wall, and keeping your elbow bent 90*, start to rotate your upper arm to bring your right forearm and hand to reach towards the wall. Make sure this movement is coming from rotating/twisting the upper arm and not bending/straightening the elbow, or flexing the wrist to reach with the fingers. You should feel a bit of a squeeze around the back of your shoulder blade.
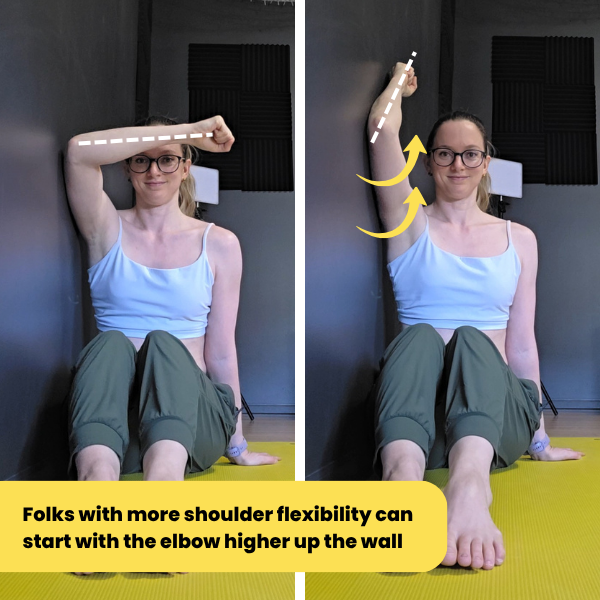
If you can easily touch the wall with the back of your right hand, you can challenge yourself more by starting with the elbow higher up the wall. Keep sliding the elbow up the wall until you find a height where it feels quite challenging to bring the back of your hand to just barely touch the wall
Then bring the forearm back down to its starting position, parallel to the floor
Repeat for 10 rotations on each arm
Make it harder: As mentioned above, you can make this drill harder by keeping the elbow higher up the wall (which is working on that rotation action in a more arms-overhead position, where we often have more muscle tightness to resist against). If you’re looking for a different type of challenge, we can take away some of the “support” the wall provides to stabilize this movement by not leaning into the wall. Instead of physically touching the wall, start with your arm in the same position, but just a half-inch away from the wall. Try that same upper arm twisting action, keeping your elbow and upper arm close to - but not touching - the wall.
2. Scapular Push Ups
Unlike traditional push ups where we move by bending and straightening our elbows, scapular push ups are done with straight arms, and the movement comes from our scapula (shoulder blades). These are a great strengthener for the serratus anterior, one of the main muscles that helps assist that shoulder blade “wrapping” towards the sides of the chest we use in many arms-overhead stretches.
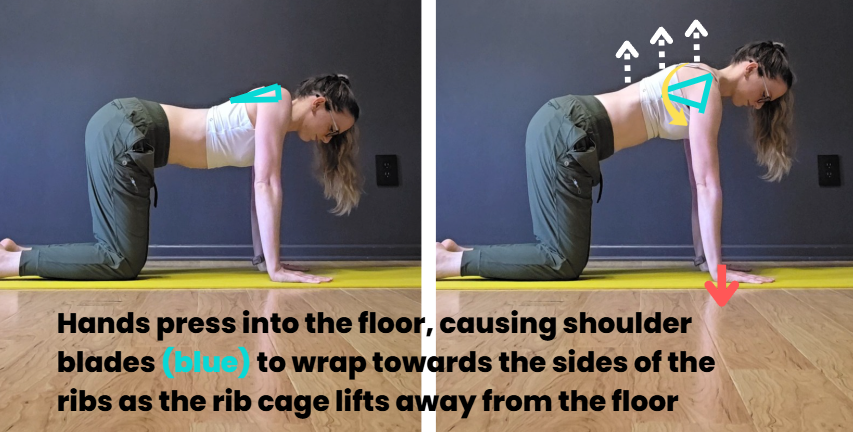
Start in a tabletop position, kneeling with your hands on the floor under your shoulders, arms straight
Press your hands into the floor to lift the back of your ribs towards the ceiling, sliding your shoulder blades towards the sides of your ribs as the rib cage lifts (note: this may be a small movement, it’s probably not going to feel huge!). This should feel like a bit of a squeeze in your lower armpit and/or sides of your chest
Still keeping your arms straight, relax that squeeze and let your ribs fall back down towards the floor, letting your shoulder blades slide together towards your spine
Repeat for 10 straight-arm push ups
Make it harder: Add more load to the shoulders by adjusting your leg position. In increasing level of difficulty, you can do these in a:
kneeling plank
full plank
feet-elevated plank
Pec Stretches:
3. Doorway Stretch Contract-Relax
By doing this variation of the classic “doorway stretch” with the arms higher than shoulder height, we can get a deeper stretch in the pec muscle fibers (like the pec minor) that can limit overhead shoulder flexibility.
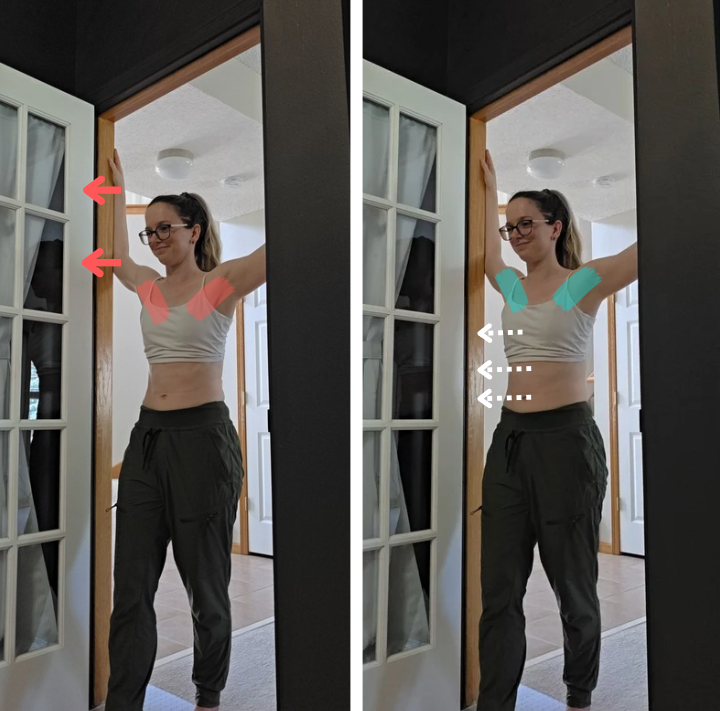
Start standing in a doorway. Bend your elbows and place your forearms on the sides of the door frame, with elbows a bit higher than shoulder height (aiming for ~120* angle, vs the 90* angle we have when elbows are at shoulder height)
Step forwards to bring your ribs forwards until you start to feel a stretch in the front of your chest (you might feel this more towards the front of the shoulder). We’re looking for just a gentle amount of pressure/lean here, not a huge pushing force. Folks with tighter chest/shoulders will likely still have the ribs/torso a little farther back, folks with more flexibility might have their torso leaning forwards through the doorway
Contract: Once you’ve found a comfortable stretch, without letting your torso move, press your forearms into the door frame - you should feel more tension in the front of the chest/shoulders as the pecs start to contract while they’re in a stretched position. Hold this squeeze for 10 seconds
“Relax:” Then start to relax that squeeze and see if you can lean into a slightly deeper stretch. Instead of relaxing into a 100% passive/relaxed stretch, keep a small (like 1/10 on the intensity scale) amount of forearm push into the door frame. This extra little bit of engagement in the “relaxed” portion of the stretch can help avoid putting too much pressure on the connective tissue in the front of the shoulder (this is especially helpful for folks who have some hypermobility in their shoulders!). Hold this mostly-relaxed-but-still-has-a-small-push stretch for 20 seconds
Repeat for 2 rounds total (60 seconds total in the chest stretch)
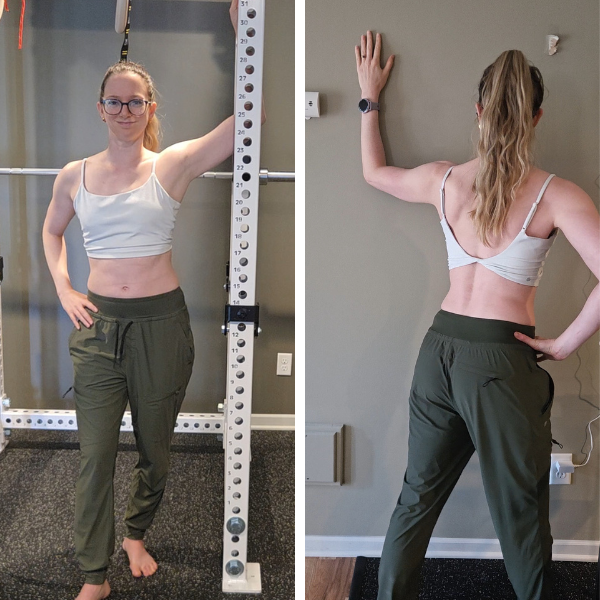
Don’t have a doorway you can use? You can also do this same contract-relax combo with one arm at a time, bracing your forearm against a wall or another vertical surface (pole, squat rack, etc) instead of a doorframe
Lat Stretches:
4. Bent Elbow Puppy Pose / Butcher Block Stretch
This stretch is a classic with good reason - it’s a great stretch for the lats, and by holding a prop (like a yoga block) between our hands, helps us stretch them while we’re in a shoulder externally rotated position, which gives them even more of a challenge.
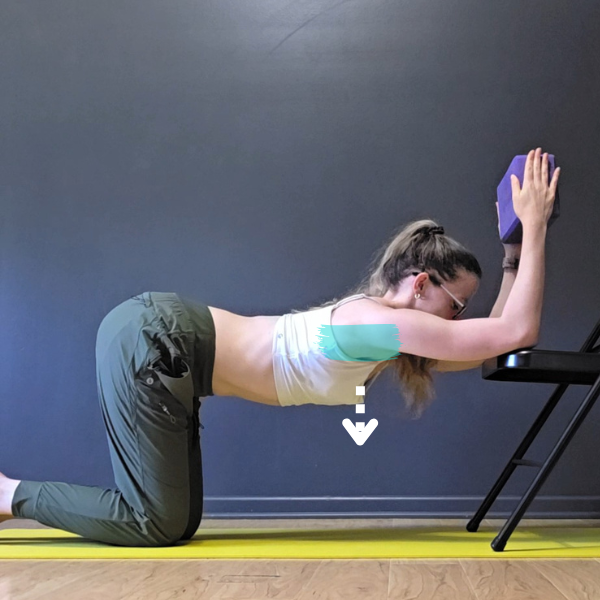
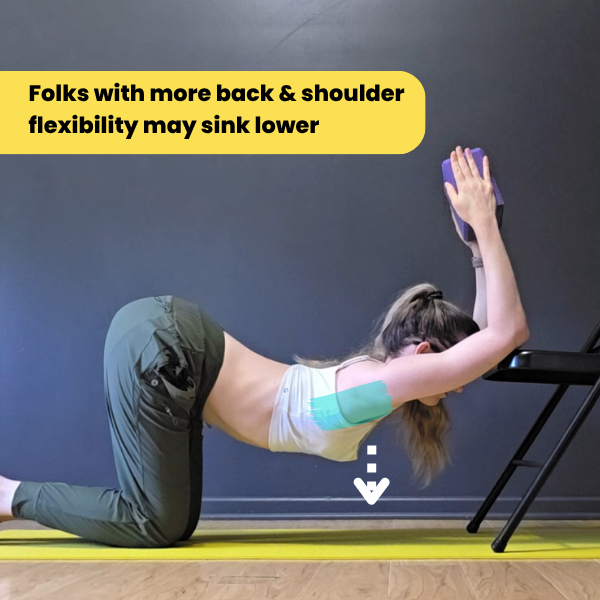
Start kneeling, holding on to a prop (like a yoga block, light dumbell, or dowel) - something to help keep your hands about shoulder-width apart (does not have to be exact).
Bend your elbows and place them shoulder-width apart on the edge of a chair or bench, and walk your knees backwards as you drop your chest towards the floor until you start to feel a stretch. Your ending position should have your hands pointing towards the ceiling (holding on to a block or your prop of choice), elbows bent about 90*, leaning your chest towards the floor, with hips stacked over your knees (thighs vertical, avoid sitting your butt back towards your heels). Depending on flexibility, your back might be slightly rounded, closer to flat, or have a backbend - all are OK. This should feel like a stretch in the outside of your armpits (that would be your lats!), but you might also feel a stretch between your shoulder blades, in the front of your chest, or even some tension/engagement in the tops of your shoulders
If you are feeling a pinching sensation or pain in the top of the shoulders, don’t push through it. Dial back the intensity of the stretch and only go as far as you can without getting that pinch-y feeling (even if it doesn’t feel like as much of a stretch)
Don’t have a prop handy? You can still do this stretch with your hands pressed together - this uses slightly less shoulder external rotation, but can still be a great stretch.
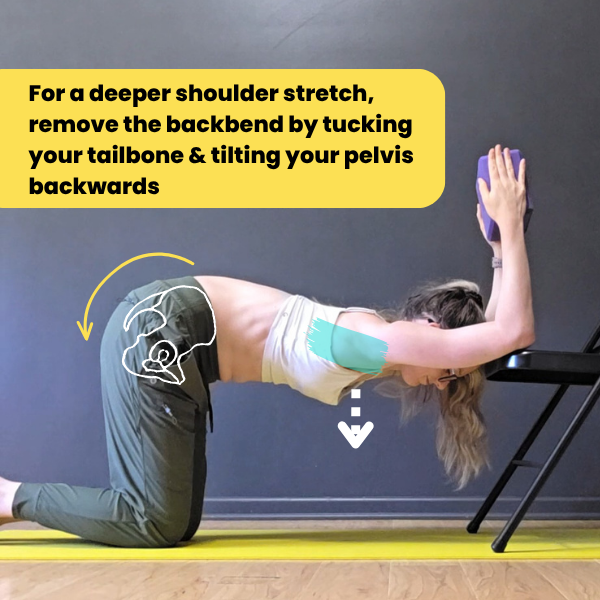
Make it harder: Personally, I actually like using this as a “multitasking” stretch for the shoulders + backbend, BUT if you want to make the shoulder component more challenging, you can remove any backbend that might be “assisting” lowering your chest by tilting your pelvis backwards (rounding your lower back) as you lean into your chest.
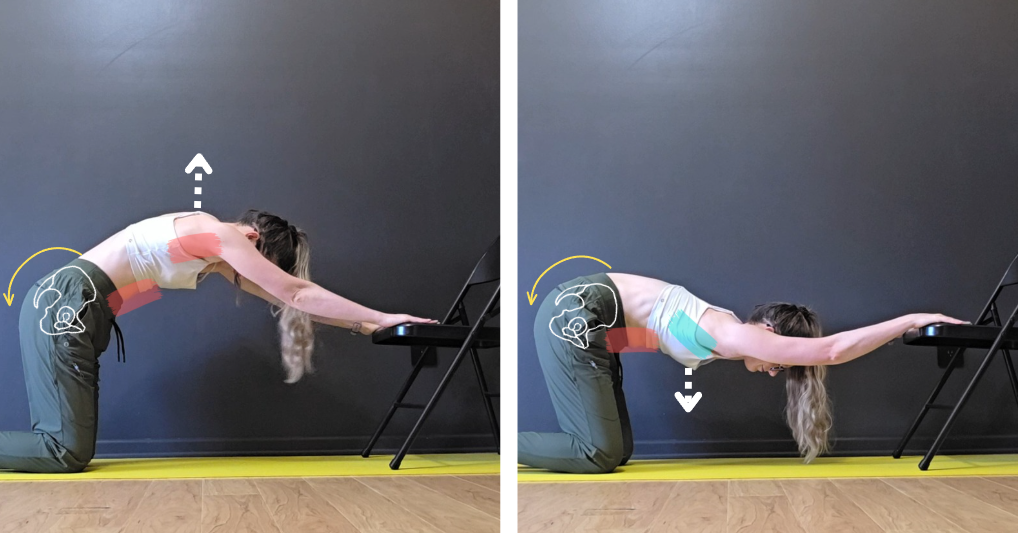
5. Hands-Elevated Puppy Pose Cat-Cow
Now let’s add some strength work to that hands-elevated stretch above. I really like this “cat-cow” type flow for two reasons:
it’s a nice way to start building some strength in our lats while they’re in a stretched position
you can easily add some breathwork cues to really help your body “relax” into a deeper stretch
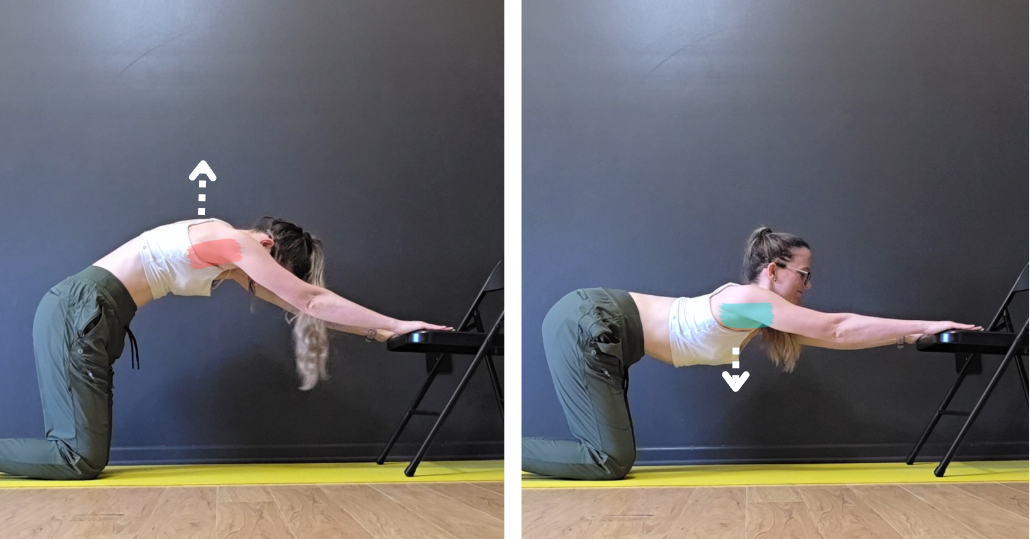
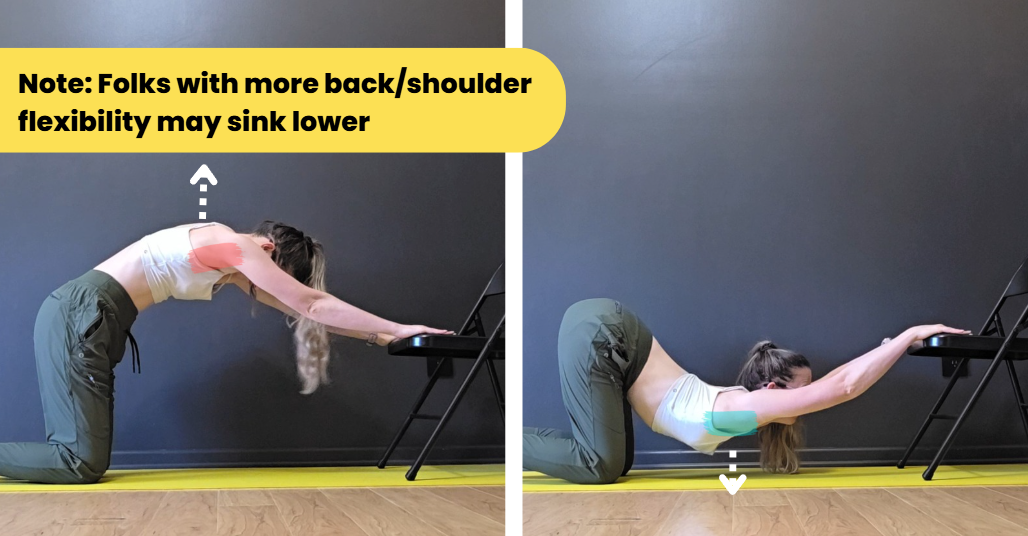
Start in a hands-elevated puppy pose: From kneeling, place your hands shoulder-width apart on the edge of a chair or bench, and walk your knees backwards until you can reach your arms and straight out in front of you with your torso mostly parallel to the floor. Instead of completely relaxing your shoulders and leaning into your chest, wrap your outer armpits down towards the floor (this is that shoulder “protraction” action we mentioned earlier) and twist your upper arms to try to rotate your elbow crease to face the ceiling (this is the shoulder “external rotation” we also mentioned). Keeping those two engagements, lean into your chest, as if you were trying to reach your outer armpits down towards the floor. This should feel like a bit of an outer armpit or chest stretch
Depending on shoulder/back flexibility, this will look very different in different bodies. Folks with tighter shoulders and less back flexibility will have their torso a bit more lifted or parallel to the floor. Folks with more shoulder/back flexibility will be able to drop the chest lower. Don’t worry so much about how low you can go, instead focus on that “wrapping” and “spiraling” action of the upper arms, and trying to find that outer-armpit stretching sensation
“Cat” your back: On an inhale, start pressing your hands into your chair/bench to engage your shoulders further (this will engage your lats while they’re in that stretched position). Keep pressing into the hands as your lift your chest, rounding your back. You should feel some tension in the armpits as you hold this press
“Cow” your back: Then on an exhale, let that resistance go and relax back into your armpits-towards-the-floor stretch - you might find that you can already lean a little bit further!
Repeat for ~10 reps or 30 seconds
Make it harder: Just like with the last exercise, we can make this more intense on the shoulders by isolating the lifting/lowering action to just the shoulders, instead of letting the spine “help” by backbending. Tuck the tailbone to tilt the pelvis backwards (this will require a bit of a squeeze in your abs), and keep that backward-pelvic-tilt position as you lift and lower your chest/armpits. This will make the “lowering” portion of the movement smaller - that’s OK!
6. Hands-Elevated Puppy Pose Arm Lifts
When strengthening muscles to support a deeper stretch, we don’t want to just focus on the muscles “being stretched” - we also want to make sure we work on the strength of the “helper” muscles that pull us into that stretched position. So for this type of arms-overhead mobility, that generally means working on the strength of our delts to help pull the arm farther overhead (while still maintaining all that great rotator cuff engagement we’ve already talked about).
This exercise is a fun challenge that helps us strengthen those shoulder pulling muscles, as well as helps us identify any big gaps between our “passive” (gravity-assisted) shoulder flexibility and our “active” (no gravity/chair helping) overhead shoulder flexibility. If you notice a big gap in how much you can actively open your shoulders vs. passively lean into a shoulder stretch, working more on this type of strength will likely help you be able to “access” that deeper range of motion more safely/comfortably over time.
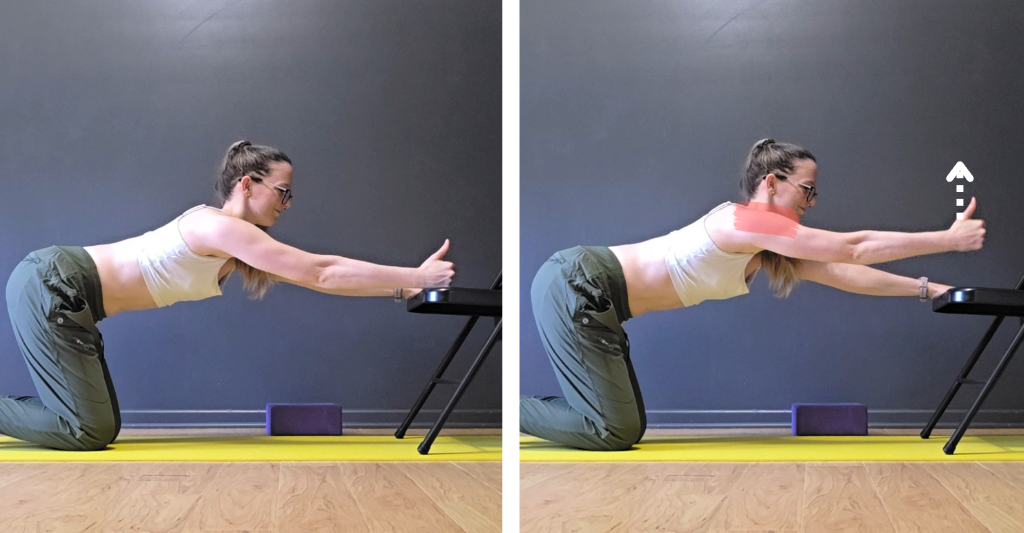
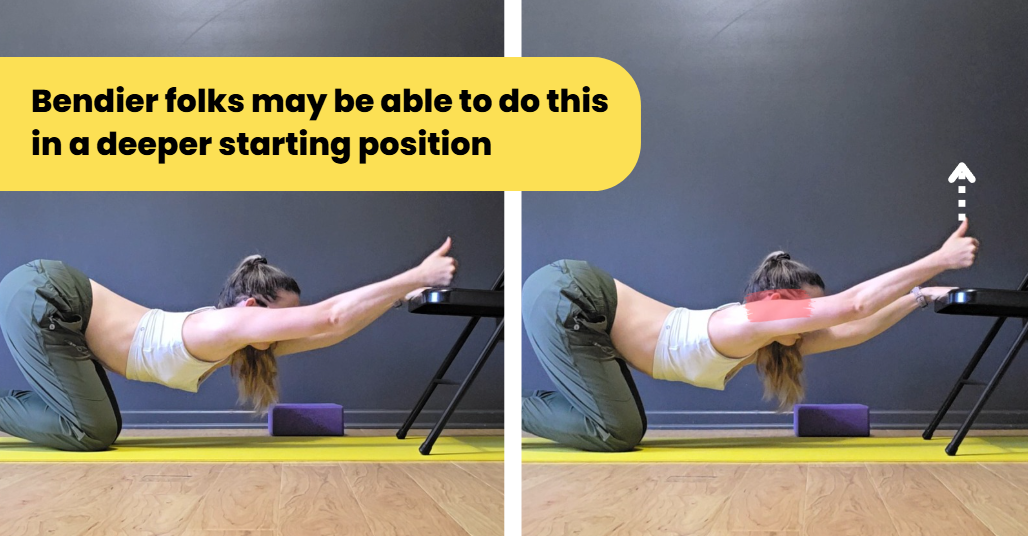
Start in a hands-elevated puppy pose (see Drill #5 above): Instead of sinking your chest as low as you can into a deep stretch, start with your chest halfway lifted (you can always drop it deeper if you need more of a challenge). Make a thumbs-up sign with your right hand, thumb pointing to the ceiling
Keeping your shoulders “externally rotated” (upper arm twisting to the outside, keeping your thumb pointing up), lift the right arm as high as you can - you should feel a squeeze in the top/back of the shoulder (you may not feel any “stretch,” just a squeeze - that’s ok)
If you can lift the hand more than a couple of inches, sink your chest a little lower - the goal is to work on the “end range” strength of your shoulder stretch
Hold the arm up for just a moment, then let it drop back down onto the chair. Repeat for 10 arm lifts on the right arm, then switch sides
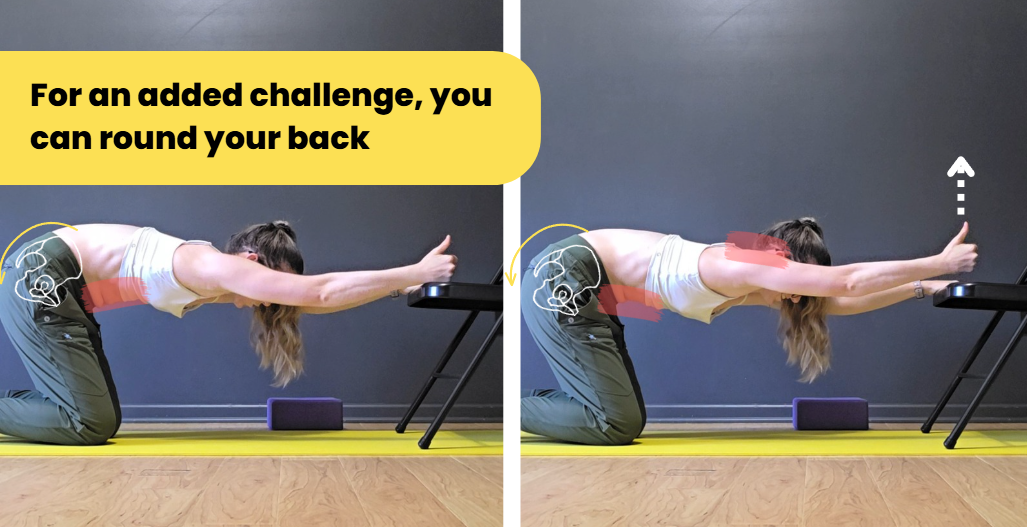
Make it harder: You may have guessed by now - but we can make this more challenging by removing the backbend (for folks who are bendy enough to have a visible backbend in this pose to start with). Tuck the tailbone to tilt your hips backwards and round through the lower back. Keep the armpits reaching towards the floor as you do the arm lifts.
Now Put It All Together!
So now that we’ve done a bunch of drills that work on the various pieces/aspects of our arms-overhead shoulder flexibility, let’s try 2 final drills that are both great stretches in their own right, but also can be useful for tracking your flexibility progress over time if you want to use these for regular progress photos.
7. Puppy Pose
If you liked the setup for the hands-elevated puppy pose on the chair from drills #5 and #6, you could absolutely do an elevated version of puppy pose. But if you want to add a slight level of challenge, working on puppy pose with our hands on the floor pushes a bit more weight into the shoulders, which can help start training them to keep the “external rotation” engagement even while being smooshed with more force (which is more like what it will feel like in more “challenging” poses like handstands or bridges, if you’re working towards different skills where you’ll have more weight in your hands/shoulders).
Even though the shoulders aren’t literally relaxed in this stretch (we are intentionally engaging those “external rotator” muscles), we generally call puppy pose a “passive” stretch since gravity is helping assist/push our shoulders into a more open position. So this is a good pose to help track your “passive” overhead shoulder flexibility progress.
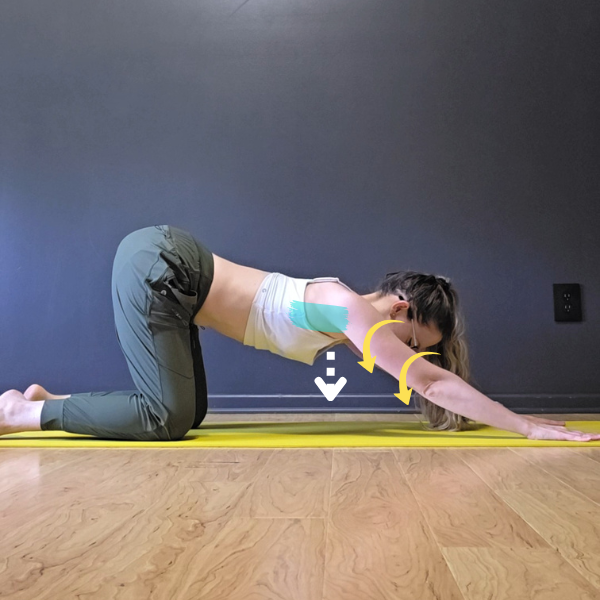
From kneeling in a tabletop position, keeping your hips stacked over your knees, walk your hands forwards as far as you can to straighten the arms
Wrap the outer armpits towards the floor (wrapping your shoulder blades towards the sides of your ribs) and twist your upper arms to the outside (“externally rotating” the shoulder) - imagine you’re trying to get your elbow crease to point up towards the ceiling
Keeping this “wrapping” or “spiraling” engagement through your upper arm and shoulder, start to drop your chest towards the floor until you feel a shoulder stretch - you may feel this in the outer armpit (lats), chest (pecs), or even a bit of tension/squeezing in the tops of your shoulders. Do not push deeper if you are getting a pinching sensation in the tops of your shoulder
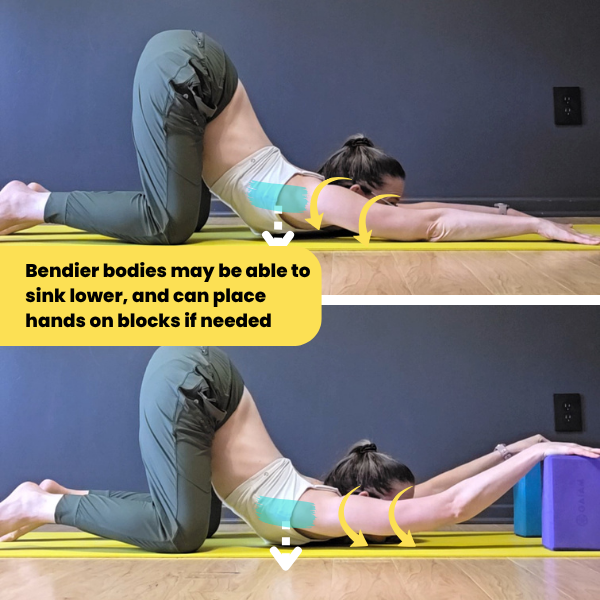
Just like on the chair, your version of puppy pose may look different depending on your current level of flexibility. Folks with tighter shoulders will have their chest farther from the ground, while bendier students may be able to get the chest lower to even touch the ground
If this is uncomfortable on your neck or feels like the floor gets in the way of your head, you can put your hands on blocks
If you are super bendy and can touch your chest to the floor with hips over your knees, and not feel a deep shoulder stretch, you can also put blocks under your hands
Hold for 20-30 seconds
Make it harder: Say it with me now - we can make this drill more challenging by “removing” the backbend (at least in the lower back). By tucking the tailbone and tilting the pelvis backwards, we take the (usually small) arch out of the lower and mid back, leaving the rest of the stretch in the shoulders (and potentially a bit of backbend coming from the upper back).
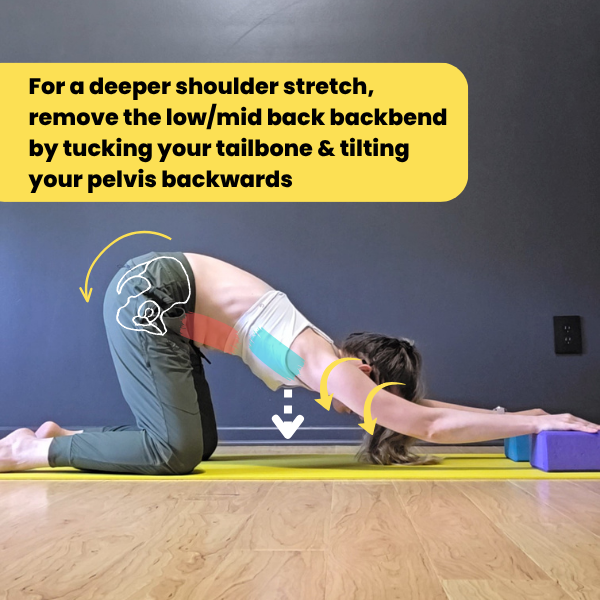
8. Hitchhikers
Now we’ll take the “support” of the floor away, and see how much strength we have in those pulling muscles in the back of our shoulder to help “open” the shoulders against the resistance of potential tightness in our lats or chest. This is a good drill to help track your “active” overhead shoulder flexibility.
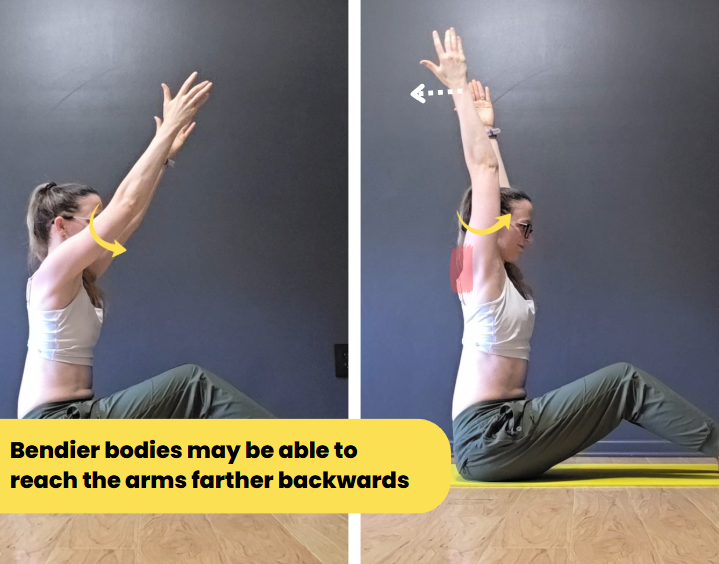
Start in a comfortable sitting, kneeling, or standing position with a neutral spine. Start to reach the arms overhead, with hands about shoulder-width apart
Before lifting all the way up, make sure you’re externally rotating the upper arm, twisting your biceps to face backwards as much as you can (it can be helpful to think of rotating your palms in to face each other, but think about this rotation coming “from the shoulder” instead of rotating “from the elbow/forearm)
Keeping that outward twist of the upper arm, reach the arms as far back/overhead as you can - this should feel like a squeeze in the backside of your shoulder. Folks with tighter shoulders may be trying to bring their arms closer to their ears. Folks with more open shoulders may be able to get them completely overhead. Even bendier folks will be able to reach the arms behind their ears. Just go as far as you can without arching your back to “help”
Hold that squeeze for a moment, then relax the arms back farther forwards
Continue these slow-and-controlled pulses for 10 reps
Don’t Forget About the Upper Back!
As a final note, a “complimentary” area to consider focusing on that will help with your arms-overhead flexibility is working on your upper back.
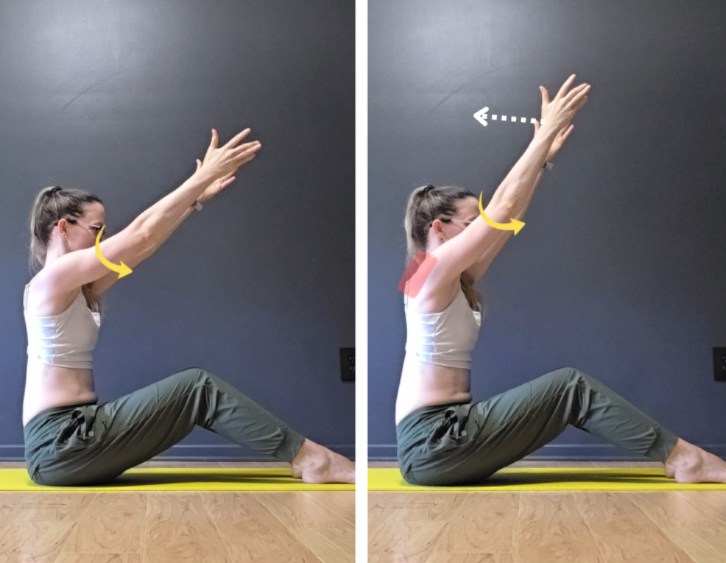
Since our shoulder blades rest on our upper back, the more we can work on thoracic extension, aka un-rounding (or arching) our upper back, the easier we can “point” the top of the shoulder blades and upper arms overhead without actually changing the angle between the shoulder blade and upper arm bone. That means being able to reach the arms farther overhead with the same shoulder flexibility, because the “reach” is coming from starting to arch through the upper back!
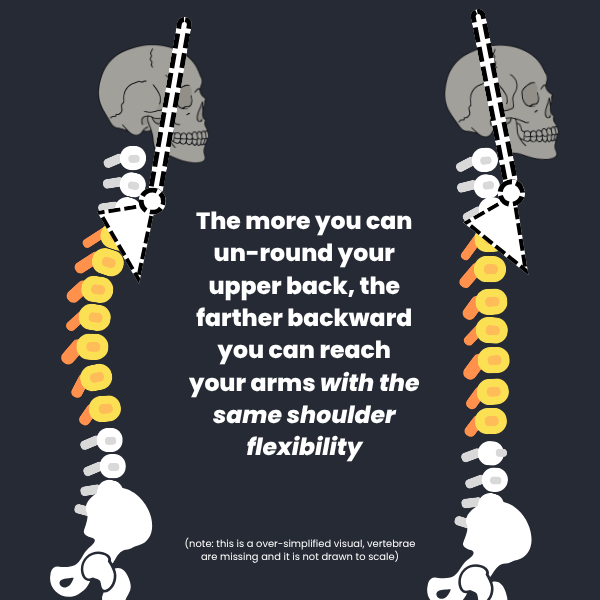
Here’s what that looks like in a real body:
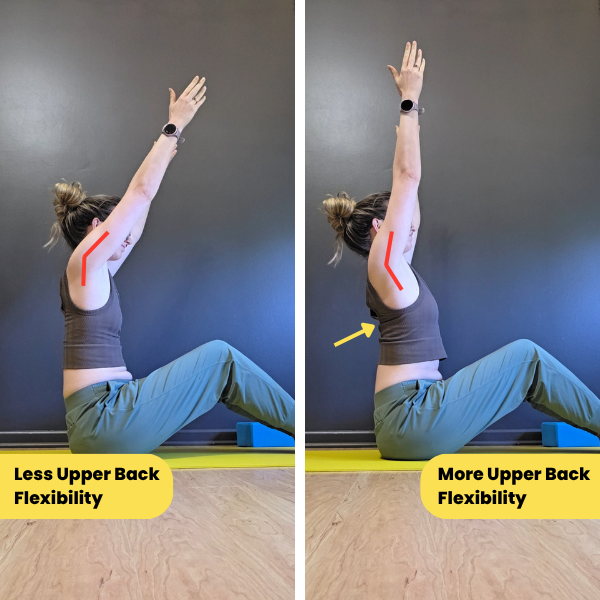
Even though my shoulders are in the same “position” in both images (notice how the angle in red doesn’t change, it just rotates), by using my upper back flexibility, I’m able to reach my arms farther overhead without needing more shoulder flexibility.
This has two implications:
The more we can arch through our upper back, the easier it is to bring the arms farther overhead (especially helpful for folks with tighter shoulders who need some “help” from other parts of their body to compensate for their lack of shoulder flexibility)
If we let our back arch while doing shoulder stretches/drills, it may be harder to isolate the working action to just the shoulder - this is why many of the “make it harder” modifications for the drills above involve not letting the spine arch
Of course getting your upper back - which is naturally rounded - to get comfortable with arching is easier said than done. Lucky for you I have a whole blog post that talks about upper back flexibility (including recommended drills!) in more detail: : Why Your Upper Back Sucks at Backbending (and How to Make it Suck Less)
Need More Guidance?
PHEW! This was a long post - congrats for making it through all the way to the end. Hopefully you learned more about the underlying mechanics of some of the things that impact our shoulder flexibility, and feel more confidently armed with some drills to use to work towards more “open” shoulders.
If you’re looking for more help with this range of motion, I do have a couple of recorded workshops that might be a good fit:
QUICKIE Overhead Shoulder Flexibility Routine (20-30 Min) - for folks serious about training their shoulders, this is a great “minimalist” flexibility routine (takes about 20-30 min) to continue to deepen that range of motion (beyond what the drills in this blog post can get you)
Bridge Clinic: Hello Upper Back! Workshop - for folks who already have a decent amount of shoulder and back flexibility (can already comfortably push up into a bridge) but want to go deeper, this is the best workshop for focusing specifically on both the shoulders AND upper back to get more “open” shoulders in skills like a bridge
Shoulder Anatomy for Flexibility Training - for those of your who love learning the “why” behind why we do stretches, this is the workshop for you. This 2+ hour workshop is a mix of lecture/slides and practical follow-along drills to better understand the underlying anatomy and mechanics of shoulder flexibility. This is basically all the shoulder knowledge I’ve learned over the last ~10 years that I wish I had been taught earlier in my flexibility training
And THANK YOU to everyone who purchases recorded workshops like these - your support is what allows me to give away more educational content for “free” like this blog post.
Watch the Video How-To For These Drills:
For my visual learner friends, this video shows how-tos for all of the drills mentioned above in this blog post:
Related Content
Recommended On-Demand Workshops

Heads up, this routine is also part of a 2-routine bundle if you’re looking for even more shoulder stretchy fabulousness!
Who this routine is for:
By popular demand - this is a short shoulder training routine great for students who don’t have a whole hour to dedicate to stretching.
Progressions of drills in this routine are offered for all levels, so whether you are more of a beginner and just working towards being able to reach your arms 180* overhead, or you already have a solid amount of overhead shoulder flexibility and are looking to go deeper for skills like bridges, foot grabs, etc - there are versions of drills that can challenge you at your level (and beyond, as you progress!)
What you get:
THIS IS NOT A FOLLOW-ALONG VIDEO like many of my other recordings. Instead, this is a written routine that includes detailed how-to videos for each drill, as well as educational content to help you maximize your progress in your shoulder training journey.
This PDF includes:
Flexibility training best practices
Anatomical considerations for training your shoulder flexibility
How to test to see if you have nerve tension that will impact your training (and how to adjust accordingly)
Suggestions for training frequency
A program of drills with how-to videos explaining proper form (here’s an example of one of the videos), what sensations to look for, what muscles to engage (if needed), and how to modify to adjust the difficulty/intensity for each drill. The “default” routine is meant to fit a 20-minute training session
Additional recommended drills (along with how-to videos) for another 10 minutes of training for students who want to extend their practice to a 30-minute session
A printable all-on-one-page list of drills for quick reference
Heads up: Because each of the how-to videos is filmed as an educational video with comments on form, technique, and modifications - and not as a “follow along with me” style video, the videos will likely take longer to watch than to actually execute the exercise. So plan on your first run-through of this routine to take longer than 20 minutes because you’ll likely be watching the videos in their entirety which will take a bit longer (and then just skimming through them for reminders in the future).
Recommended props:
Yoga mat
Some kind of long strap - can be stretchy or stiff
2 yoga blocks
A chair or low bench
Some wall space

This 2-hour workshop is a deep dive into the anatomy & kinesiology of the shoulder in the context of flexibility training (various ranges of motion, with an emphasis on overhead shoulder flexibility). Half of the session will be "lecture" style with slides and visuals to learn more about the bones, ligaments, muscles and nerves of the shoulder (and their important implications for training!), and half will be practical exercises/drills to apply this knowledge to our own bodies and training!
Who this workshop recording is for:
Pole dancers, aerialists, handbalancers, contortionists, or movers of all types who want to understand how to more effectively train their shoulder flexibility
Instructors who want a deeper understanding of the “why” behind shoulder stretches to more effectively program for and cue their students
Workshop overview:
This 2+ hour workshop covers:
Shoulder ROM (Range of Motion) Overview
Bones of the Shoulder (& Implications for Training)
Joints of the Shoulder (& Implications for Training)
Deep dive into overhead shoulder reach flexibility
Ligaments of the Shoulder
Muscles of the Shoulder (& Implications for Training)
Drills!
Nerves of the Shoulder (& Implications for Training)
Drills!
Pose Breakdowns (aka “WTF are my shoulders supposed to be doing in…. a bridge, king pigeon, bird of paradise, etc.)
No prerequisites.
Optional props:
Yoga mat
Yoga blocks
stretchy resistance band
a chair or low table
wall space
***********************
Note: Because of Squarespace’s file size limitations (which is what I use for this wonderful website!), upon purchase you will receive a PDF with a private YouTube link to the recording, as well as a PDF of the workshop slides.
Related Blog Posts
The Importance of “External Shoulder Rotation” in a Backbend
Why Your Upper Back Sucks at Backbending (and How to Make it Suck Less)