How to Sit Cross-Legged More Comfortably
How to Sit Cross-Legged More Comfortably
Being able to comfortably sit cross-legged on the floor (aka “criss cross applesauce” as I’m told the cool kids call it these days) can be a frustrating challenge for bodies with tight hips - especially as we get older. Gone are the days of our youth, happily sitting on the floor during story time. Instead, trying to sit on the floor for any extended period of time may now result in a butt cramp, twinge-y knee, or a cranky low back.
As someone on the bendier end of the spectrum who has admittedly never struggled with this, I was initially surprised how freaking common it was for students to complain about this. But I quickly learned that this is a very real struggle for people with tight hips. When asking about a student’s goals, I’d often hear variations of “I want to be able to sit on the floor and play with my kid without pain” or “I want to be able to sit to meditate without being distracted by my knees hurting.”
On the plus side, being able to sit on the floor without a) looking like a hunched over gremlin and b) not incurring nagging pain is a very achievable goal!
So let’s take a look at why you might be struggling to sit in this position and discuss some helpful drills to help work on the hip flexibility needed to sit more comfortably.
Anatomy Overview: Sitting Cross-Legged
The main ranges of motion we need in the hip to sit cross-legged comfortably are:
hip flexion (tilting the hips forwards relative to the thighs / bringing the knees toward your chest)
hip external rotation (rotating the thighs to the outside)
and a bit of hip adduction (opening the knees out to the sides)
The main piece students tend to struggle with is the “external rotation” action of letting the thighs twist to the outside (which is what helps the knees drop more relaxed towards the floor, instead of keeping them floating up by your armpits). Tightness in some of the deep hip rotators (such as the piriformis), or tightness in the glute medius & minimus (side butt muscles) are the usual culprits here.
I tried to film some clever graphics with my skeleton model, but failed rather royally. It’s really hard to show the butt view with all the muscles overlapping! So instead I’ll rely on the wonderful Muscle & Motion to showcase how these muscle groups get pulled into a stretch when one leg is in a cross-legged position:
When these muscles are tight, it can limit how low your knees can drop to the ground, or cause your pelvis to tilt backwards, rounding your back (potentially making some of your back muscles uncomfortable over time).
Other muscle groups that get a stretch when sitting cross-legged (albeit to slightly lesser degrees), include the gluteus maximus, quadriceps, some of the adductor (inner thigh) muscles, and - depending on your ankle position - the peroneal (outer ankle) muscles.
Short-Term Solution: Elevate Your Hips!
One of the easiest things you can do in the short-term to make sitting cross-legged feel less uncomfortable is to elevate your hips by sitting on a block (or any type of low support, like a rolled up blanket, bolster, or a pillow or two). Lifting up your hips higher than your feet requires less hip external rotation, which means the knees can drop a little lower without putting the same strain on those deep hip rotators, and/or make it easier to tilt the pelvis forwards to help you sit with a more “neutral” spine (as opposed to the tighter hip muscles pulling your pelvis backwards, causing you to slouch).
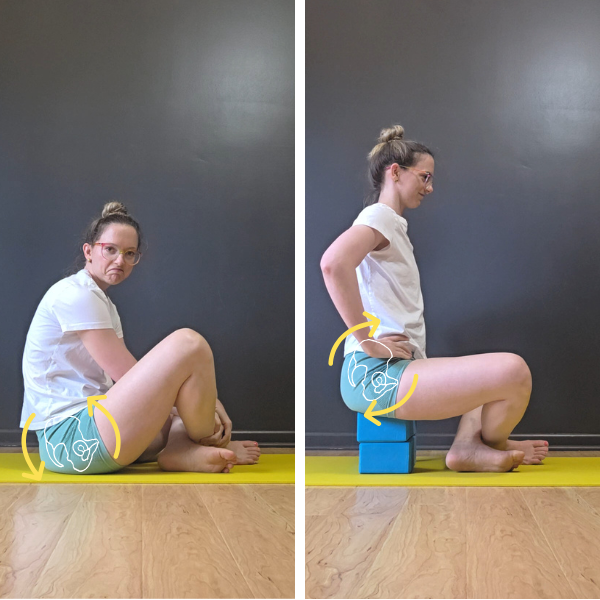
Another adjustment worth experimenting with is playing with the positioning of your feet (and knees and thighs). I don’t have a blanket recommendation here because what feels best can depend on your unique hip anatomy and which hip muscles tend to be tighter (or more flexible) for your body. But recognize that putting your feet in a different position (relative to where your hips are) can slightly change the stretches in this pose. Some people feel more comfortable with their feet closer to their midline, with knees flopping farther apart to the sides (more similar to a “butterfly” stretch) - this can be less intense on some of those hip rotators, but requires more flexibility of the adductors (inner thighs). Other people prefer crossing their legs further, bringing each feet past each other so they’re closer to the opposite hip (maybe even tucking the ankle underneath the opposite foot’s shin) - this requires a bit more hip external rotation, but is less intense on the inner thighs. Some people like the feet scooted close in towards the groin, other people prefer having the feet slightly farther away from their crotch.
For a real-world comparison, check out how differently me and my husband prefer to sit cross-legged:
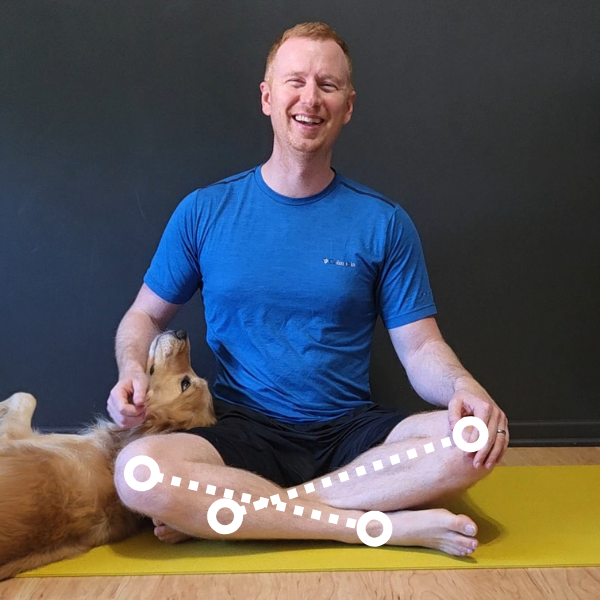
Nate has quite a bit more hip external rotation (thigh turn out) in sitting positions than I do, he’s always felt comfortable in things like the “fire log” stretch or pigeon poses. So Nate tends to sit with his knees closer to the front of his hips, feet across his body clsoe to the opposite knee, allowing him to use more of this turnout.
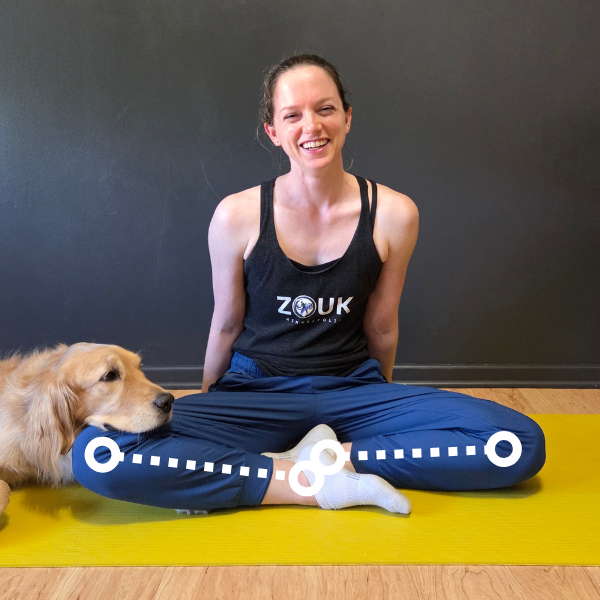
I have less hip external rotation in this position than Nate does (being a contortionist doesn’t mean I’m automatically bendy everywhere!), but I do have much more inner thigh flexibility. So my “comfortable” seated position takes me knees farther apart (more inner thigh stretch), and is less intense on the hip rotators.
You can see this even more dramatically if we compare what it looks like if I try to replicate the same foot position Nate uses in his fire log pose and when sitting cross-legged. Because I don’t have as much hip external rotation flexibility compared to Nate in these positions, my thighs stay a bit more twisted up towards the ceiling, pulling my knees farther away from the floor:
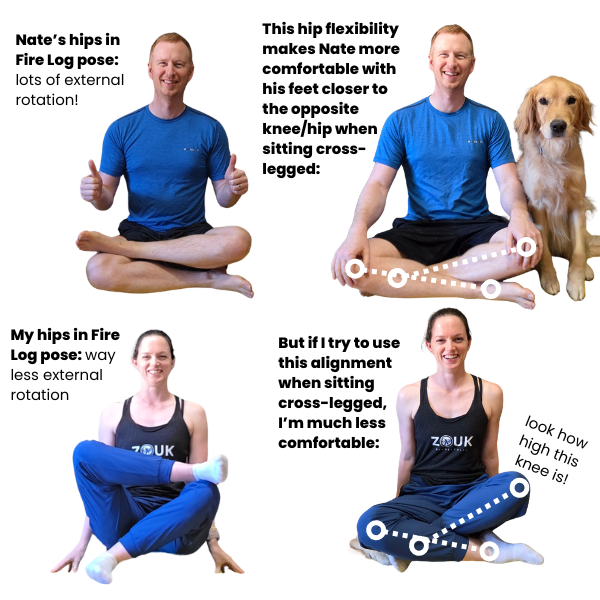
But if I adjust my form to slide my knees farther apart, I could sit cross-legged in that position comfortably all day.
All that to say: one size does not fit all, feel free to experiment with what alignment feels better for you!
Long-Term Solution: Work on Your Hip Flexibility (Recommended Drills)
Unsurprisingly, the long-term solution to make sitting cross-legged more comfortable is working on your hip flexibility (and strength!) to make that hip range more accessible. Below is a good mix of drills that emphasize the hip external rotation (thigh twist / knee drop), flexion (forward tilting of the hips), and adduction (opening wider of the knees) - all of the ranges of motion we want to be more comfortable for sitting cross-legged!
Drill #1: Chair Figure-4 Stretch
The “figure-4” stretch is a classic stretch for the glutes and some of the deeper hip rotators that we need to be flexible when sitting cross legged. While there are a bunch of different variations of this stretch, I like this one sitting in a chair because it’s easier to control the intensity by choosing how much of a forward fold you want to add.
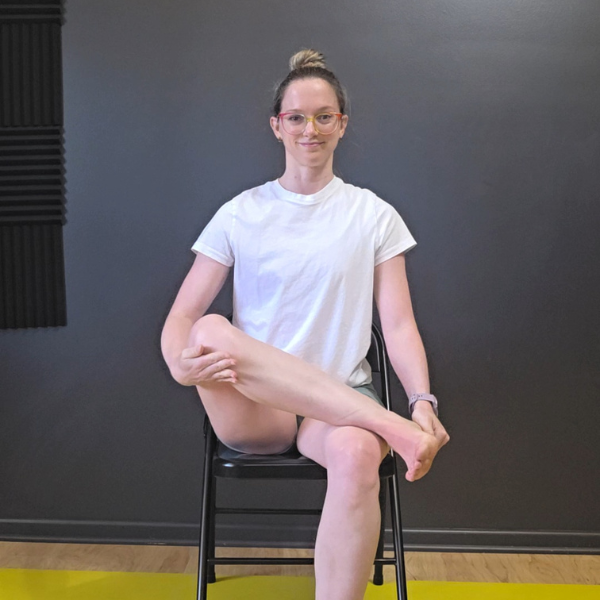
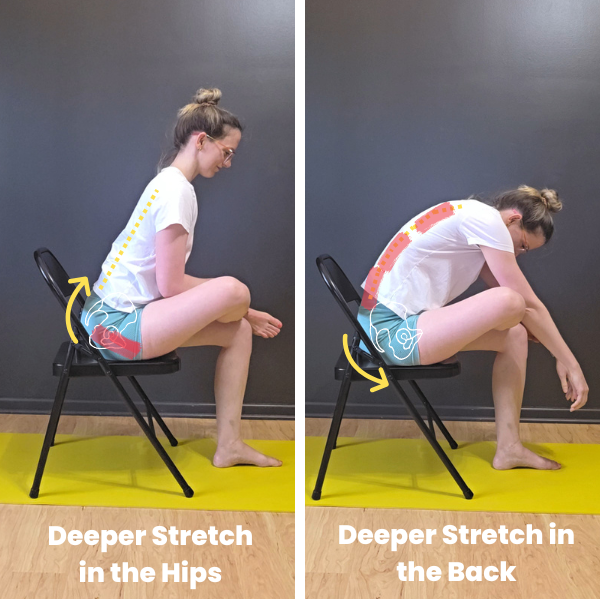
Ideally we want this to feel like a stretch in the back/side of the hips, not the back muscles
Start sitting in a chair. Cross your right ankle over your left knee so that your right knee splays out to the side
If you’re already feeling a stretch in the back/side of the right hip, great! If you aren’t feeling much of a stretch yet, you can make this more intense by either:
Gently pressing down on the right thigh to lower the knee toward the floor
and/or tilting your hips forward to try to forward fold (think more about leaning with your belly button, as opposed to reaching with your arms/chest to help ensure this forward fold comes from the hips, and not just by rounding your back)
Hold for 20-30 seconds, then switch sides
Variation: change the lean! If you have the flexibility to add a bit of a forward fold in this stretch, you can experiment with leaning more towards the left or the right in your forward fold and notice how that changes the hip stretch (and you may even get a bit of a lower back stretch as well!). You can either slowly sway/reach side to side, or just pick a different angle and hold.
Drill #2: Chair Band-Resisted Hip External Rotation
Now that we’ve stretched our hips a bit in that externally rotated position, let’s reinforce that with some strengthening. You’ll want a light mini loop resistance band for this exercise. How light of a band? Ideally, you’ll want a weight where you can still rotate your thigh to the same range of motion without the band, but we’re just adding the band challenge the hip rotators even more. You can use a “mini loop” style resistance band, or tie a small loop in a longer band
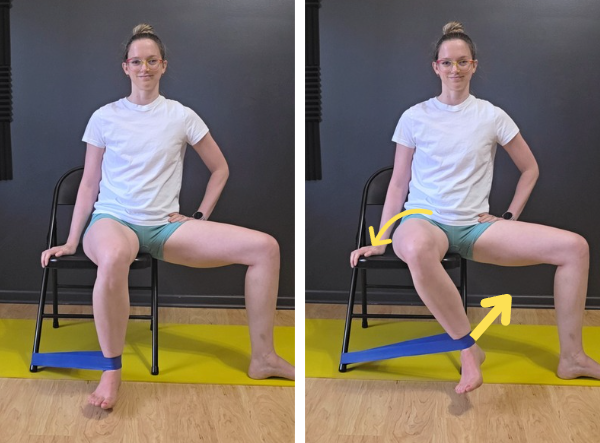
Start sitting in a chair with both knees bent. Take a light mini loop band and loop one end around the right front leg of your chair, then stick your right foot in the loop as well. Scoot your body slightly over to the left side of the chair so that you can start with the band in a slightly stretched position against the inside of your right ankle (as opposed to it being loose and dangling off your foot). It should feel like the band is pulling your foot over to the right
Keeping your right thigh on the chair (don’t net the knee lift or drift to the side), and keeping the knee bent 90 degrees, press the inside of your right ankle into the band, rotating the top of your right thigh to the right/outside (you may need to move your left leg off to the side if it feels “in the way”). This should feel like a bit of a squeeze in your inner thigh and a bit in the back of the hip - it’s OK if it does not feel like a stretch. Once you can’t lift the foot / rotate the thigh any more, slowly let the band pull your foot back towards the floor
That’s one rep. Repeat for 10 reps, then switch legs
No band? You can still do this as a bodyweight exercise without the resistance band. To keep this challenging, make sure you are lifting the foot (and rotating the thigh) slowly, and try to hold the foot lift at the top for a second before relaxing it back to the floor
Drill #3: Butterfly Cat-Cow + Forward Fold
“Butterfly” stretch variations are also nice compliments for folks working to get more comfortable sitting cross-legged. While they’re not as intense a glute stretch as figure-4 type stretches, they hit the adductors (inner thighs) more intensely, and also are a nice way to stretch the hips while they’re in an “externally rotated” (thighs twisting to the outside) position like they are when sitting cross-legged.
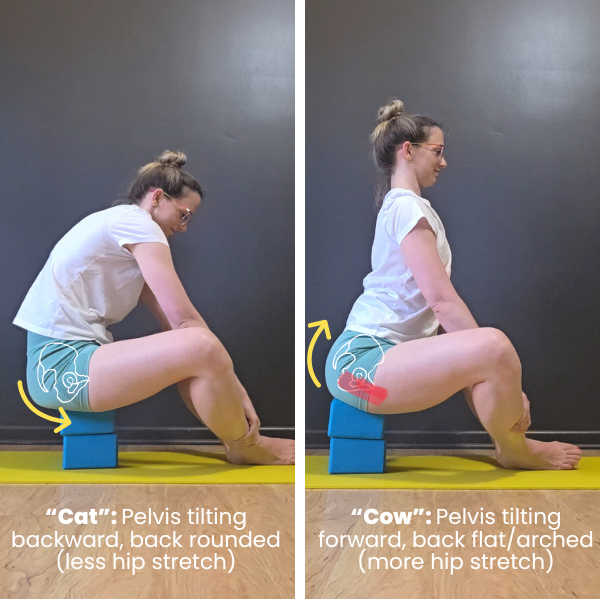
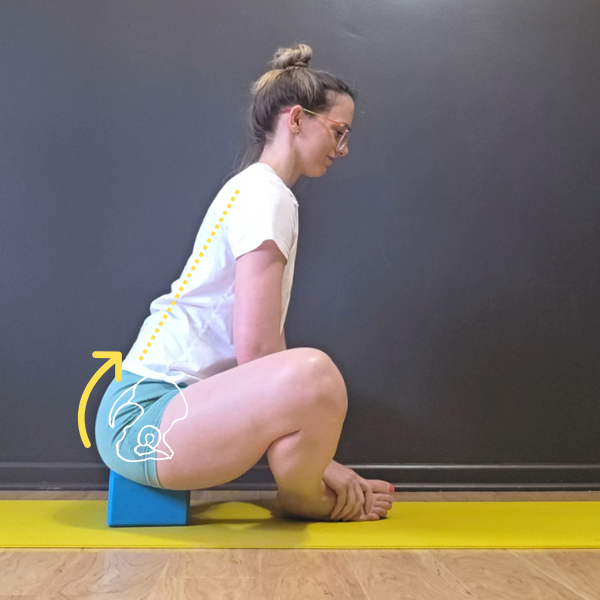
Start in a comfortably butterfly stretch: sit with your butt on the floor (or on some yoga blocks or a pillow or two), bend your knees out to the side and try to bring the soles of your feet to touch (your feet should still be on the floor). Pull your feet in towards your groin. We want this starting pose to be one where we can sit up straight relatively comfortably - so if you are rounding your back, or it feels like an intense stretch in your inner thighs or hips already, try sitting on a slightly taller support (so hips are higher than your feet). Don’t worry if your knees aren’t close to the ground.
If you can reach your ankles, go ahead and grab them for support (otherwise hands can rest wherever feels comfortable).
First we’ll start with the “easier” hip position: tuck your tailbone towards the floor, tilting your hips backward and rounding your back (similar to the “cat” of cat-cow) - this may not feel like a hip stretch at all, that’s ok
Now we’ll make this more challenging on the hips: arch your back and tilt your hips forwards, dropping your lower belly towards your feet as if you were going to forawrd fold, and lifting your tailbone up and away from the floor (or blocks). This should feel a bit more intense in the inner thighs (and/or outer hips, depending on which area is tighter for you). This is similar to the “cow” portion of cat-cow
Keep alternating between arching and rounding your back, tilting the hips forwards and backwards (just like “cat-cow” on the floor) for 4-10 reps
Then holding the forward hip tilt and try to forward fold as deep as flexibility will allow while keeping your back flat (it’s ok if this is a very small lean!). If you’re not feeling much of a stretch (in either the inner thighs or outer hips), you can use your hands to gently press your thighs down towards the floor. Hold for 30 seconds
Drill #4: Butterfly Flutters
Here’s a slightly more “active” version of a butterfly stretch that works on (lightly) strengthening the hips while in this stretch.
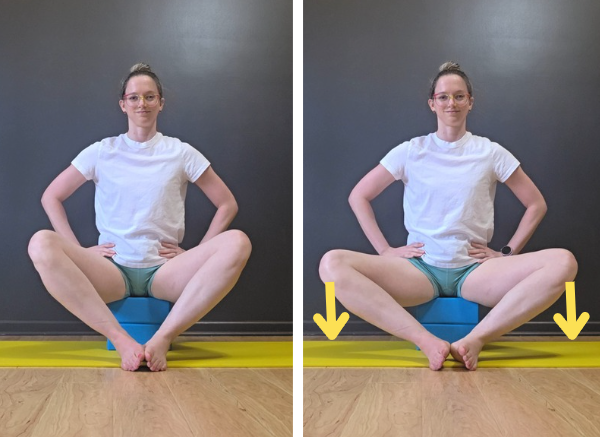
Start in a comfortable butterfly stretch (see above), sitting on the floor, or with your hips elevated on blocks or a pillow if needed
Keeping your torso lifted and back nice and straight (avoid letting it slouch/round), without using your hands press the outsides of your knees down towards the floor - you should feel a squeeze in the sides of your butt (it’s OK if you just feel a squeeze and don’t feel much of a stretch). Hold for a second, then relax and let the knees float back up.
Repeat for 10 slow knee presses
Need to make it more challenging? Add a forward fold (just make sure this forward fold is coming from tilting your hips forwards, not just rounding your back) and do your knee presses while in a forward fold
Drill #5: Cross-Legged Good Mornings
Now it’s time to see how sitting cross-legged is feeling! But instead of just chilling in this position, we’ll work on two different active flexibility exercises to build a bit more strength in the hips in that position. For this first drill, we’ll start with the hips slightly elevated so we can get a bit of an" “assist” from gravity on the forward fold.
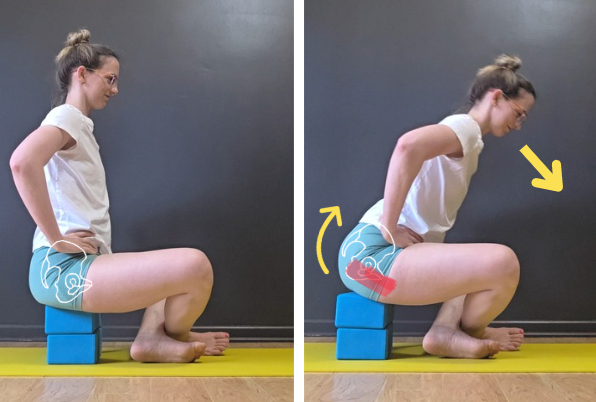
Start sitting cross-legged with your feet on the floor and hips elevated on 1-2 yoga blocks (or pillows). Note: the higher you boost up your hips, the easier it will be to lean forward and get a “gravity assist” to find a deeper stretch, so don’t feel like starting with less blocks is necessarily “better” or harder
Keeping your back as flat as you can, start to forward fold. - you should feel a deep stretch in the back/side of at least one (if not both) hips. You’ll likely feel this more intensely in the hip of the leg that is “in front”
Then press both feet into the floor as you lift your torso back to sitting upright
That’s one rep. Repeat for 10 reps, then switch which leg is “in front” and repeat on the other side
Drill #6: Cross-Legged Contract-Relax (Resist)
While the last exercise emphasizes more engaging the outer hip muscles tin a cross-legged position, for this exercise is focused a bit more on some of the muscles on the inside of the hips
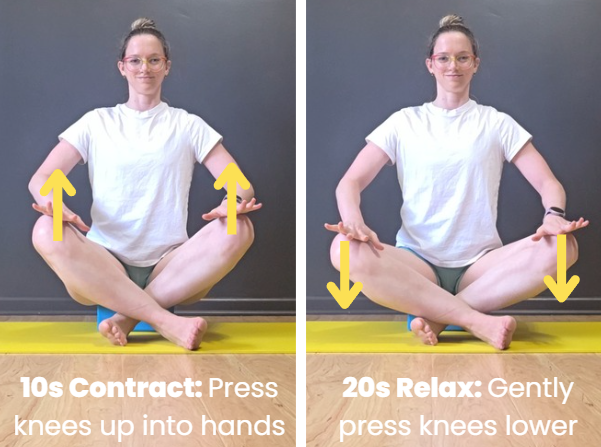
Start sitting cross-legged (hips can be on the floor, or on a support like in the last drill) - we want the starting position to feel like a mild hip stretch that you could tolerate for sitting in for a couple of minutes. You’ll probably have at least one knee floating away from the floor (assuming you’ve got tighter hips!) - that’s ok :)
Place your hands on your knees and gently press them towards the floor to deepen the stretch (if your knees are already touching the floor, you can add a forward fold)
Keeping your hands pressing your knees towards the floor (don’t let them move!), actively press your knees into your hands for 10 seconds
Then - staying in the stretch - relax the legs and continue pressing the knees down with the hands. Hold the relaxed stretch for 20 seconds
Repeat for 2 rounds total (so you’ll be in the stretch for 60s), then switch your legs and repeat for 2 rounds on the other side
A Modification for Folks Who Experience Knee Discomfort (In Any of These Drills)
For some bodies, letting the knees just “float in the air” in these stretches can be a bit too intense and invite an uncomfortable shearing force on the knee (typically this manifests as some sharp pain in the oustide of the knee). If you’re experiencing knee pain during these drills, try to stack something under each knee (could be a yoga block, a pillow, or you can use your hands to help “hold” the undersides of the knees) to give them some gentle support.
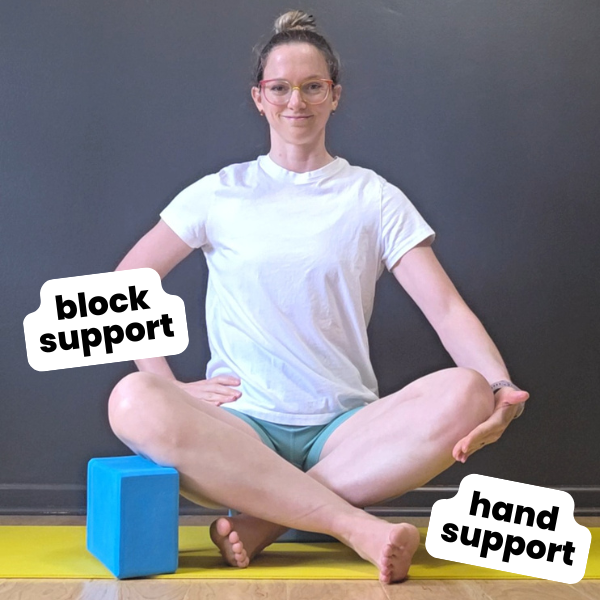
And as mentioned earlier, you can also experiment with changing your foot placement (closer to or farther from your groin, or feet farther apart or closer together) to see if there’s a position that feels better on your ankles/knees/hips.
Looking for More Help?
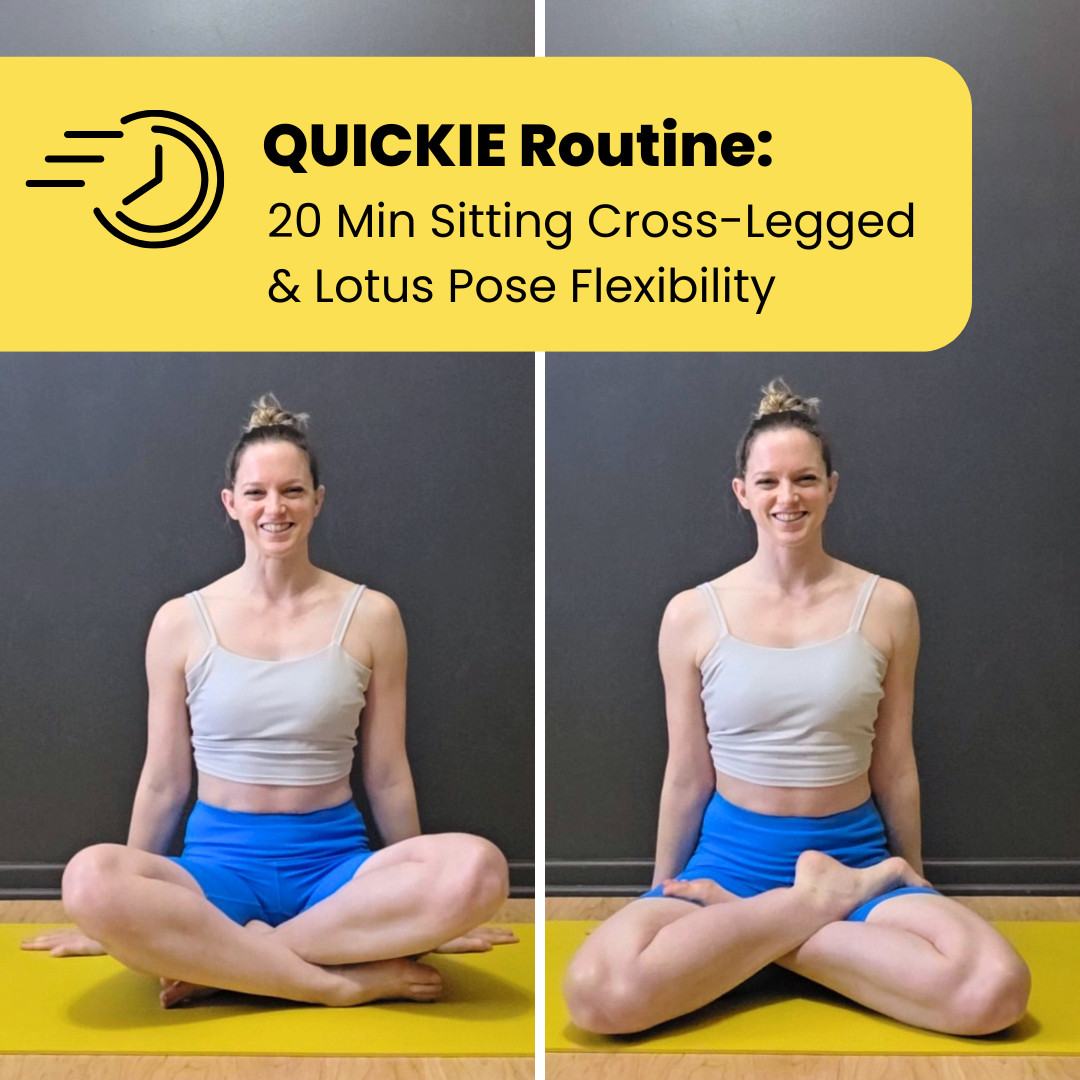
If you’re interested in even MORE drills like this, or if you progress so much you want to do crazier cross-legged things like sit in half or full lotus pose, you should check out the “Quickie” Sitting Cross-Legged and Lotus Pose Routine. This PDF includes a list of drills with detailed video how-tos to fit a 20- to 30- minute training routine (you can choose how long) to work towards either sitting cross-legged on the floor - or for folks doing the more “advanced” variations of drills, working towards a full lotus pose. Stretches and drills are offered for a variety of levels, so you can pick the version to challenge you where you’re at today (and still have “harder” versions to work through as you progress!).
Related Content
Recommended On-Demand Workshops
Who this routine is for:
This 20-30 minute training routine is targeted to students who want to work on their hip flexibility to more comfortably sit cross legged on the floor (aka “criss-cross applesauce”), or even take it further and work towards sitting in a full lotus pose.
Drills are offered for a variety of flexibility levels, so whether you’re more of a beginner, or more of a contortionist, you can learn drills to challenge you where you’re at today, AND drills to continue to challenge you as your flexibility progresses!
What you get:
THIS IS NOT A FOLLOW-ALONG VIDEO like the majority of my other recordings. Instead, this is a written routine that includes detailed how-to videos for each drill, as well as educational content to help you maximize your progress in your hip flexibility training journey.
This PDF includes:
Flexibility training best practices
Anatomical considerations for training the hip rotation required for sitting cross-legged (or in lotus pose)
How to modify the drills to make them easier or harder as your flexibility progresses
How to test to adjust the drills (if needed) to keep knees happy and pain-free!
Suggestions for training frequency
A program of drills with how-to videos explaining proper form, what sensations to look for, what muscles to engage (if needed), and how to modify to adjust the difficulty/intensity for each drill. The “default” routine is meant to fit a 20-minute training session
Additional recommended drills (along with how-to videos) for another 10 minutes of training for students who want to extend their practice to a 30-minute session
A printable all-on-one-page list of drills for quick reference
Heads up: Because each of the how-to videos is filmed as an educational video with comments on form, technique, and modifications - and not as a “follow along with me” style video, the videos will likely take longer to watch than to actually execute the exercise. So plan on your first run-through of this routine to take longer than 20 minutes because you’ll likely be watching the videos in their entirety which will take a bit longer (and then just skimming through them for reminders in the future).
Recommended props:
Yoga mat (knee padding is your friend!)
2 yoga blocks
A chair or bench
Some kind of (light resistance) stretchy band that can be made into a small loop (ex. a mini band, or a Theraband you can knot into a smaller band. Long stretchy bands with handles not recommended)