
Lift That Leg! 7 Stretches for a Higher Y Scale Leg Hold
Lift That Leg! 7 Stretches for a Higher Y Scale Leg Hold
A “Y Scale” or a side leg hold is one of my favorite standing contortion shapes because it’s one of the first ones I ever learned to do. Most students tend to enjoy this shape because it looks cool (obviously!) and is typically easier to train than a “traditional” standing split or the even-more-complex needle scale.
Earlier this week I posted a quick how-to showing the basic mechanics of how to do a Y scale. Today we’ll be looking at how to make it look bendier (working on our flexibility to lift the leg higher, make it look split-ier, etc).
Anatomy Overview: Side Leg Hold
Let’s take a super quick look at the basic anatomy of a y scale leg hold.
Here I am with Pelvis Presley, showing what happens to our adductors (red stretchy band) and our hamstrings (blue stretchy band) when we lift our leg out to the side for our leg hold (note: this is a simplified model, there are several muscles that make up the adductor muscle group and the hamstring muscle group, here we’re visualizing them as just one band each):

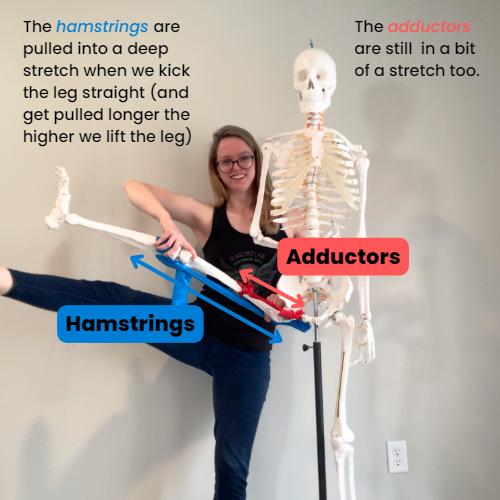
You can see that when we open the knee out to the side, this starts to pull our adductors (inner thigh muscles) into a stretch (very similar to a frogger stretch!). The more you pull the knee out to the side, the more stretch you put on those muscles - so if you have a hard time opening the leg out to the side, that likely means your inner thigh muscles are a bit tight and could use some extra focus.
When we start to flex the knee, kicking the lifted leg straight, this is what pulls our hamstrings on the underside of our thigh into a stretch. The higher we lift the leg, the more these muscles are stretched. So when it comes to height of the lifted leg, that’s all hamstrings baby!
This also helps explain why we also like to tilt our hips in this position: when we tilt our hips to the side (not shown, unfortunately Pelvis is a awkwardly eavy and I can’t hold him in a hip tilt and lift his leg…), we can keep all the muscles in the lifted leg in the same position, they’re not getting any more of a stretch, but we can lift the leg even higher because we’re lifting the side of the hips that it’s attached to. Eventually you can tilt so much that this starts to become an inner thigh stretch for the base leg as well - but that’s more of a Leg Tilt (a slightly different shape), which is another topic for another blog post…
So to summarize what we care about from an anatomy perspective: this skill requires a lot of hamstring flexibility to be able to lift the leg high, as well as some inner thigh flexibility to keep the leg out to the side. So we’ll focus on a couple of stretches/drills that work on these two areas, both strengthening the hamstrings while they’re in a similarly stretched position, as well as strengthening the hip flexors (the “helper” muscles on the front of your hip that can help pull the leg higher).
Recommended Stretches
Side-Lying Active Knee Straightens

Start lying on your left side on the floor. Your bottom leg can be straight, or you can bend the knee for balance (but if you bend your knee keep your thigh in line with your torso, don’t bring your knee forwards). Bend the right knee and lift your right leg towards your side - kicking it in as much as you can. Place your hand or forearm against the thigh for resistance
Keep pressing the thigh into your arm, and your arm into your thigh, as you bend and straighten the right leg 8-12 times
Side-Lying Hamstring Contract-Relax
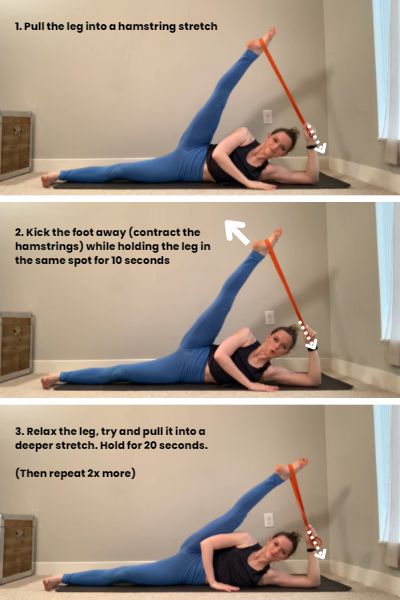
Start lying on your side with your hips stacked on top of each other (hip bones pointing forwards). With your hand or with a strap, pull the top leg into a hamstring stretch, pulling it towards your side body
Keep holding the leg in the same spot (using your arms / the strap) and kick the leg away, causing the hamstrings to contract. Keep this constant kicking pressure for 10 seconds
Then relax the leg, and see if you can pull it into a slightly deeper stretch. Hold this passive stretch for 20 seconds
Repeat for 2 more rounds of contract-then-relax (all while staying in the stretch)
Elevated Side Leg Lifts + Forward Fold

Start standing, with your leg kicked out to the side on an elevated surface, like a chair or a table, both legs straight, and hips level (don’t let the hips tilt!). Pick a surface that’s tall enough to feel challenging, but not so tall that you need to tilt your hips to lift your leg (even just starting on 2 yoga blocks stacked on each other is a great start!)
Lift the leg off of your support surface, keeping both legs straight, and hips level and pointing forwards (don’t let the hips tilt, or twist to face the lifting leg). Lift and lower the leg 10 times
After 10 reps of leg lifts, add a forward fold. Keeping your back flat, hinge at the hips to lean forwards as far as you need to to feel a stretch in the lifted leg (think of this as a variation of a straddle pancake stretch). Keep the lifted leg’s thigh rotated towards the ceiling, don’t let it rotate forwards as you forward fold. You should be feeling a hamstring and/or inner thigh stretch in the lifted leg. You can bend your bottom leg if that makes this more comfortable to forward fold, or keep it straight if you’d also like to try to stretch the bottom leg. Hold this stretch for 20 seconds
Half Moon Dippy Birds

Start standing (standing near something you can rest your hand on for balance helps!). Keeping both legs straight, lift your right leg as high as you can with control (engaging your hip flexors)
Then slowly start to drop the right leg towards the floor. Flex your foot so it doesn’t touch the floor, and once your foot is in line with your torso, start kicking that foot up behind you as you lean forwards - trying to keep a straight line all the way from your heel, to your hip, to your shoulder (imagine your torso and your leg are connected)
As you’re folding forwards, rotate the right thigh to the outside, lifting the right hip, and even twisting your chest open to the right side. Keep leaning placing your left hand on a chair, a block, or the floor (if you can reach) for balance. Hold for a moment, you should be feeling a stretch in the left leg (bottom leg) hamstrings, and a squeeze in the right leg outer hip trying to lift the leg.
Then slowly float back up to standing (dropping the back leg, lifting your torso to stand)
Repeat for 5-12 reps.
Half Split Forward Fold (Passive)

Start kneeling, with both hips “square” (pointing forwards)
Keeping your back flat (avoid letting it round), tilt the top of your hips forwards and down to forward fold (I like to think about lifting my “sits bones” or trying to reach my butt cheeks towards the ceiling). Hands can rest on your front thigh, yoga blocks, or the floor for support. You should be feeling a stretch in your hamstrings (the underside of the front thigh)
Hold this passive stretch for 20-30 seconds
Twisted Half Split Forward Fold (Passive)

Start in your half split forward fold (see above)
Twist your chest towards the inside, reaching your outside hand to the inside of the front leg (the hand can be on a block or the floor - resting it on something will make this easier to balance). If this feels super challenging to twist - lift your chest a bit first to decrease the intensity of the half spilt forward fold stretch, and try your twist there
To go deeper, keep leaning the outside of your ribs towards the front thigh / the floor, closing the gap between your torso and your thigh
Hold for 20-30 seconds
Note: it is totally OK for your hips to “unsquare” (open to the side) when you add the twist to this stretch. If you’d like more of a challenge, you can try to pull the front hip back to square the hips for a deeper stretch.
Wall-Assisted Y-Scale Lean (Passive)
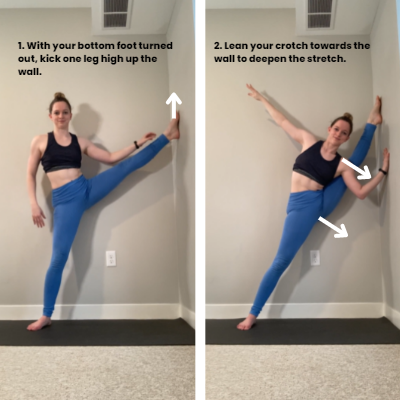
Start standing near a wall (it may take a bit of trial and error to figure out how far away from the wall feels good for this stretch - that will depend largely on your flexibility, so try a couple of different distances). Turn out your bottom (farther-from-the-wall) foot, and kick your other foot up the wall, with your toes pointing towards the ceiling. You can use your hands to try to hoist the foot up as high as you can
Lean your crotch towards the wall to deepen the stretch. If that’s feeling comfortable, you can lean with your torso as well, trying to close the gap between your ribs/torso, and the lifted thigh. Depending on your flexibility, this may feel like a stretch on the inner thigh of the bottom leg (adductors), the inner thigh of the top leg (adductors), the hamstring of the top leg (hamstrings), or even your side body if you’re leaning towards the lifted leg.
Hold for 20-30 seconds
Hopefully you find all those stretches and drills helpful! If you liked those and are looking for even more inspiration, check out the recorded Y Scales (Leg Hold) Workshop which includes a full 60+ min follow-along stretching routine to help you strengthen your hip flexibility for a split-ier Y scale (the base routine is 60 minutes, but I also offer some additional “optional” challenge drills at the end for students who are looking for a longer practice).
Related Content
Recommended Workshop Recording

Who this workshop recording is for:
Students looking to increase their flexibility for a higher standing side leg hold (aka “Y Scale”).
Suggested Prerequisites:
This workshop is geared towards “begintermediate” students with some existing hamstring flexibility. At a minimum, students are expected to be able to sit on the floor with legs straight, and a flat back (90* hip flexion with straight legs). More hamstring flexibility certainly helps, students who can already do deeper forward folds or are closer to flat splits will be able to work on flexier versions of this pose.
If you have super tight hamstrings and can’t yet sit flat on the floor with a flat back, I’d suggest you start with the 45-minute Starting Front Splits workshop instead.
This 75-minute* workshop covers:
An hour long follow-along contortion style conditioning class, including
A full body warm up with extra emphasis on hip mobility
Active flexibility drills to strengthen and stretch our hips to support a deeper open split position: that’s a heavy hamstring flexibility emphasis, but we’ll also work on adductors and external hip rotation (turn out) as well!
“Choose your own adventure” style skillwork practice: 15 minutes of how-to tutorials focused on leg hold shape variations, and optional deeper stretches you can add in for more challenging conditioning.
* This workshop was filmed with the intention of fitting a 75-minute practice, but students may choose to trim it down to 60 min, or continue practicing for even longer.
Recommended props:
2 yoga blocks
Chair, low table, or bench
Strap (can be stretchy or stiff)
Uncluttered wall space you can lean against
Upon checkout, you will receive a PDF with a link to the workshop recording (Squarespace limits file upload sizes so I can’t actually upload the whole recording here). The recording is for your personal use only, not to be shared with others - thank you!