
Is It OK To Lift the Heels in a Bridge (Full Wheel)?
Is It OK To Lift the Heels in a Bridge (Full Wheel)?
This is a question I sometimes get from students (and even other flexibility instructors) - should we try to keep feet flat on the floor in a bridge, or is lifting the heels OK?
The answer - like with so many flexibility questions - is it depends.
Factors that can influence whether or not you may want to lift the heels include your current flexibility, personal comfort, and flexibility goals with the pose. Let’s take a look at how those are impacted by the different feet positions.
Lifting the Heels = Elevating the Feet (and Knees)
First off, it’s important to recognize the lifting the heels essentially just elevates the knees (similar to doing your bridge with feet on yoga blocks):

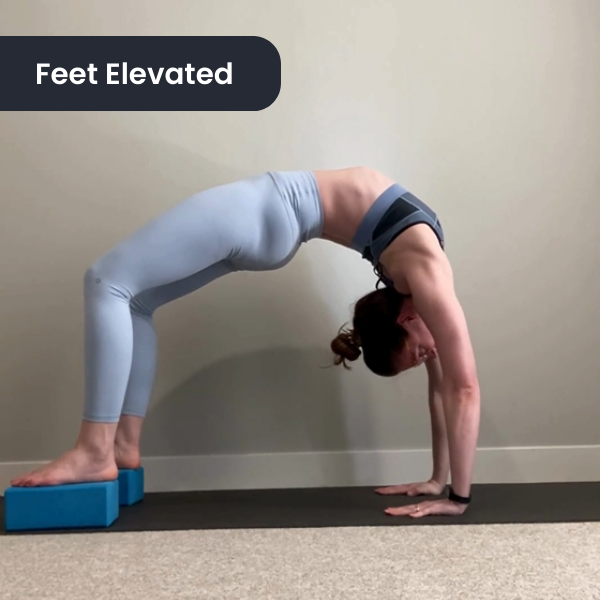
Now let’s see how this changes our form and the stretch(es) compared to keeping the feet flat on the ground:
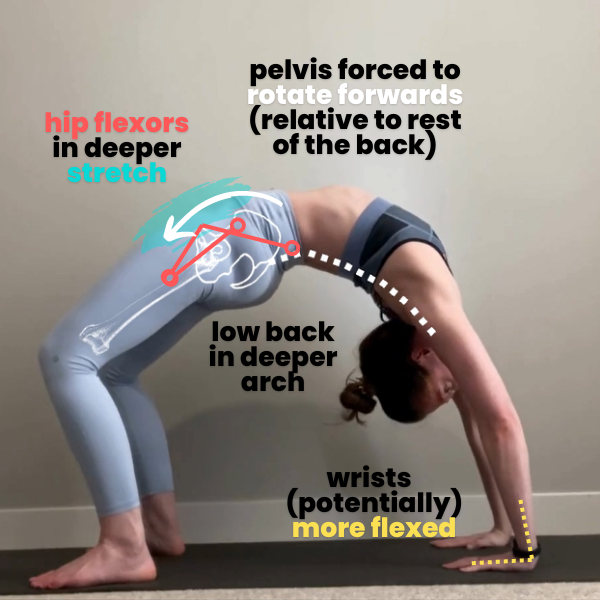
When heels are flat on the floor:
Knees are lower, extending the femur (thigh bone) farther backwards (relative to the hips), causing a deeper hip flexor stretch
The pelvis is pulled to rotate forwards
More of an arch gets pushed into the lower back (especially between the lumbar and sacrum)
Wrists may be forced to flex an uncomfortable amount
The heels-on-the-floor bridge can be a good choice for students who:
have more shoulder and back flexibility (in general)
want to focus on increasing their lower back flexibility
want to challenge their hip flexors

When the heels (and therefor knees) are elevated:
The pelvis can more easily tilt backwards
The hip flexor stretch can (potentially) lessen
The backbend can be more evenly spread to the upper back and shoulders
Shoulders can more easily stack on top of wrists (more comfortable for wrists!)
The heels-elevated bridge is a good choice for students who:
have tighter shoulders & back flexibility in general
want to work more on accessing their upper back
experience wrist pain in a bridge
experience low back pain or “crunchiness” in a bridge
are working towards kickovers and walkover transitions
At the end of the day, both versions are A-OK so long as they don’t hurt! You can pick the one that feels better in your body, and best aligns with your flexibility goals.
Related Content
Recommended On-Demand Workshop

Who this class recording is for:
This recorded workshop is intended for “beginner” students who want to build their back, shoulder, and hip flexibility (and strength!) to push up into a bridge (aka Full Wheel). You’ll learn how to strengthen and stretch your whole backbending chain - with an extra emphasis on the shoulders.
What this class includes:
A quick full-body warm-up to get you ready to stretch
A full 45-minute follow-along stretching routine you can follow 1-3 days per week to work on your backbending flexibility
An additional 5-20 minutes of bridge-specific skillwork you can add on to that routine to specifically work on your bridge press (so you can tailor your training to fit your own schedule)
Recommended props:
Yoga mat
2 yoga blocks
A strap (which can be stretchy or stiff - a towel or sweatshirt would work as well)
Note: Because of Squarespace’s file size limitations (which is what I use for this wonderful website!), upon purchase you will receive a PDF with a link to the recording. You can then stream the recording online from the private link.